

 It seems that I have been writing about a few Ruger 10/22 projects of late. This article addresses yet another 10/22 build; a conversion from the standard 10/22 carbine configuration to an “International” configuration.
The Ruger 10/22 International was introduced, discontinued, resurrected, and finally discontinued by Ruger; however, “International” versions are still available through vendors such as TALO, Lipsey’s, and other on-line retailers and distributors. While some may have scoffed at the “International” version of the 10/22, because of its European influence with a full-length stock, I have always taken a liking to the stock design. I certainly did not need another Ruger 10/22 firearm in the stable, but I convinced myself that I could sacrifice one of my 10/22 rifles to build a simple, but nice example of the “International” version. In other words, take an existing “Plain Jane” 10/22 carbine with a black synthetic stock and turn it into a project.
I have a friend who just happened to have an “International” model with the black laminate stock and I did my best in talking him out of it. A price for the stock was agreed upon, I went to pick up the stock, and also decided to throw in the black synthetic stock that I had as an extra. However, the first challenge of the new build was about to occur.
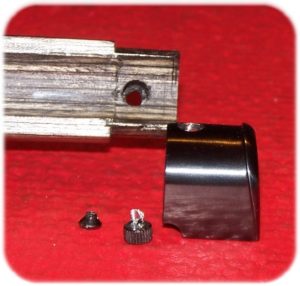
Broken Parts; Muzzle Cap Escutcheon and Screw
Through no fault of my friend, the small screw, the Muzzle Cap Screw (Part D13200) decided to snap in two while being removed. The Muzzle Cap, although held into place by a friction fit, also has a Muzzle Cap Escutcheon (Part D13300) that is press-fit into the front of the stock on the inside and into which the Muzzle Cap Screw is inserted to prevent the Muzzle Cap from moving forward under recoil (yes, even .22 caliber rifles have recoil).
It was decided to drill out the damaged screw. In hindsight, this was a mistake on both of our parts. Since the Muzzle Cap Escutcheon is a press-fit into the stock, this also meant that it should also be able to move out of the stock, perhaps with a small punch and a few taps with a hammer. Granted, the Muzzle Cap Escutcheon would have still had the damaged screw tightly held into place, but the channel into which the Muzzle Cap Escutcheon was pressed would have not been damaged – maybe. By turning the Muzzle Cap Escutcheon and Muzzle Cap Screw, any indentions in the laminate stock made by the press fit would now be rounded off. This meant that even if the Muzzle Cap Escutcheon was replaced, it may not fit as desired – tightly. At this point I had several alternatives to consider. Regardless, the stock was bought and paid for and it was now my responsibility to make things right.
A phone call and e-mail to Ruger was soon answered by an e-mail and phone call from Ruger. I had done some research previously and had the part numbers for what I needed. A very nice lady in Customer Service took the information and informed me that she would get the parts right out to me. I had to consider, at this point, what to do if the Muzzle Cap Escutcheon was replaced and the fit was not going to be tight enough to work. I had several alternatives:
- Press the new Muzzle Cap Escutcheon in place and hope for the best.
- Epoxy the Muzzle Cap Escutcheon in place.
- Use a screw of sufficient length and thread to fasten the Muzzle Cap directly to the laminated wood stock.
- Fill the Muzzle Cap Escutcheon hole with JB Weld or something similar. Drill a pilot hole, and then use a self-tapping stainless-steel screw to hold the Muzzle Cap in place.
- Enlarge the hole in the bottom of the Muzzle Cap to allow a cap screw head to pass through as it is being tightened to the laminate wood of the stock. The cap screw could be tightened against the stock and just the head of the screw would be sufficient to hold the Muzzle Cap in place. However, removing material was not something that I wanted to do.
It should be noted that the Muzzle Cap Screw is countersunk to fit flush with the bottom of the Muzzle Cap. I really was not too concerned, as this is an aesthetic issue. Not a lot of tension is needed to hold the Muzzle Cap in place. The Muzzle Cap is a friction fit with the stock and the band of the front sight. All that is needed is to prevent the Muzzle Cap from moving forward and off of the barrel (and stock) under the massive amount of .22 long rifle recoil. A bit of Anti-Seize compound would work on the Muzzle Cap screw to help prevent future issues.
I’ll discuss what decision was made a little later in the article. Although Ruger won’t admit it, I have a strong suspicion that 10/22 “International” model shooters have faced the dilemma of dealing with a broken Muzzle Cap Screw; I really can’t believe that I am the only one affected by this.
So, while I waited on parts, and deciding on what alternative fix (if any) was going to be necessary, the build moved forward to one of the sub-projects; The magnified optic.
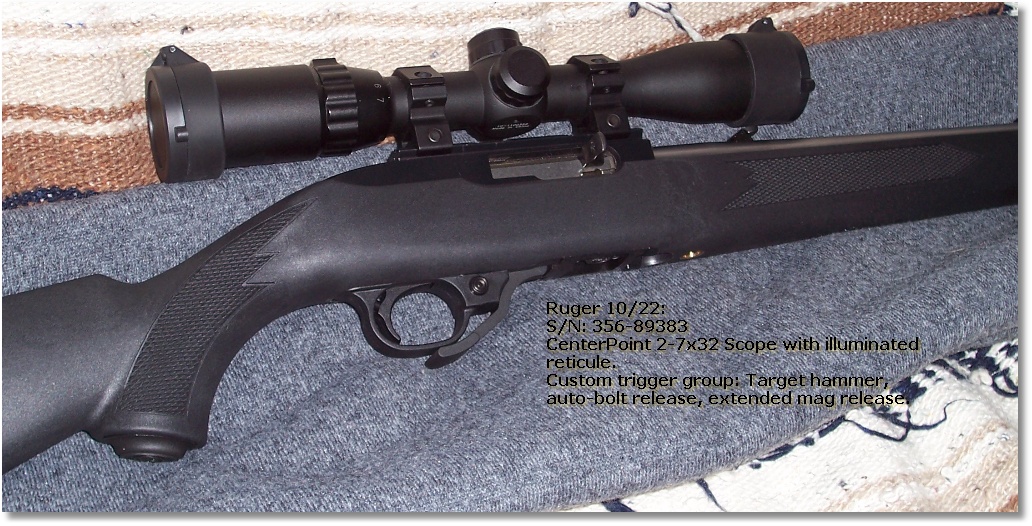
I had mounted a (no longer available) Center-Point 2-7×32 power scope (with illuminated reticle) on the donor carbine at an earlier time. Unfortunately, that was before I had the proper leveling tools to mount the scope and the scope was slightly canted. The scope was remounted properly and life was good again – for a short while. Although I wanted to exchange the scope rings for something better, the existing rings worked very well and I decided to leave things be – for a short while. As a side note, many advocate replacing the sight rail that was provided by Ruger with something better; however, I have never had an issue with the Ruger rail and left it alone.
As much as I wanted to upgrade to a better scope, finances dictated otherwise – for a short while. With that said, and after the range session with the rifle, I decided that I really needed a better scope and mounting system; the Center-Point 2-7×32 power scope left a lot to be desired in the clarity department. An order was placed for a Nikon Prostaff Rimfire II 3-9×40 scope through Academy Sports after much mind-boggling conversations with my inner voices. Medium Leopold Rifleman rings were ordered through a different vendor. I had used the Nikon Prostaff Rimfire 3-9×40 power scope and medium Leopold Rifleman scope rings on the 1262 build (see, The Ruger 10/22 Target Project: https://guntoters.com/blog/2017/01/01/the-ruger-1022-target-project/) and was very satisfied with the result, and I felt that using the Nikon Prostaff Rimfire II 3-9×40 scope would be just as satisfying.
Author’s Note: Academy Sports was the only source for the Rimfire II scope that I could find, and believe me – I looked. The Prostaff Rimfire 3-9×40 scope has been discontinued by Nikon, but could still be found if I really searched for one, but why buy old when you can buy new – for a few dollars more, of course.
At first, I was hesitant to use a larger magnified scope because of the tapered barrel on this firearm and the physical size of the optic. A large diameter scope just would look out of place on the rifle. However, the full stock adds some depth to the front end of the firearm that would not be there with the short carbine-length black synthetic stock. The Nikon Prostaff Rimfire II 3-9×40 scope clarity is far above the Center-Point 2-7×32 scope, and this fact was brought to my attention at the range. With that said; however, changes were in the mill.
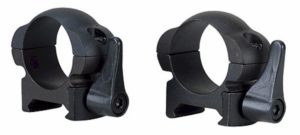
Weaver Grand Slam Lever Lok 1” Medium Scope Rings
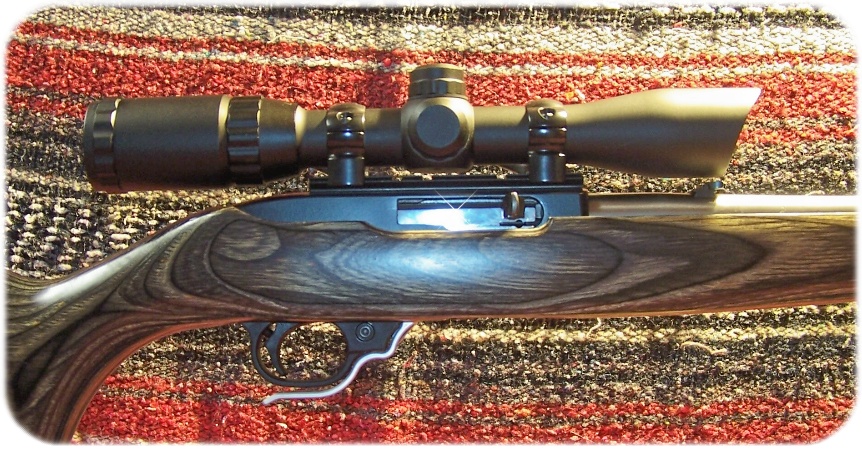
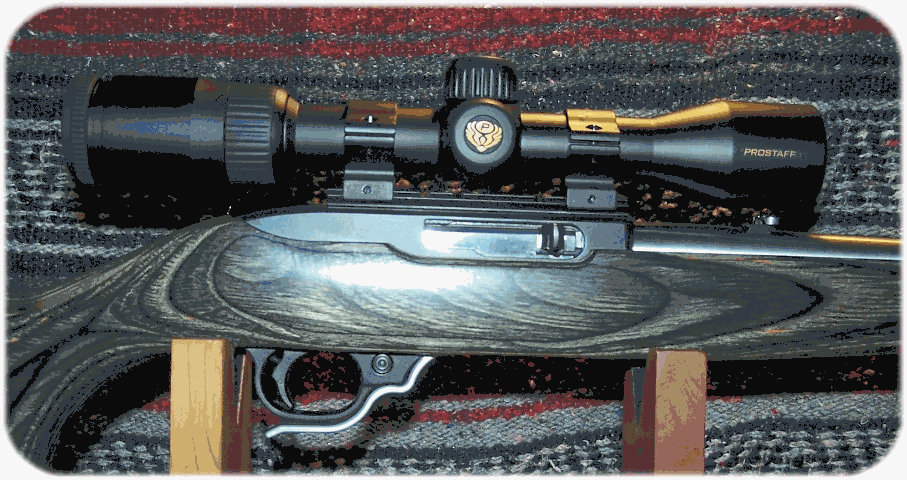
When you decide to build anything, there are a lot factors that, well, have to be factored in. In the case of the scope choice, there was a conflict in configuring the scope to the rifle. The smooth flow of the “International” stock dictated a scope that would not over-power the rifle. I decided that the Nikon Prostaff Rimfire II 3-9×40 scope was over-powering. I decided to return to the Center-Point 2-7×32 power scope (with illuminated reticle), but being dissatisfied with the scope rings that came with the scope, I opted for a set of Weaver Grand Slam Lever Lok 1” medium scope rings, which lock securely to the Ruger-provided sight rail. I decided on this type of scope ring, because it allows me to remove the scope for serious cleaning of the rifle (especially in the receiver) without possibly harming the scope, and the rings are also a tad lower. The scope sits as low as possible without having to remove the rear sight. The combination of the 2-7×32 scope and rings add to the “sleekness” of the rifle, in my opinion; a more streamlined look to it if you will. The illuminated MIL-Dot reticle is also a plus when sighting in on a dark target. And, since this rifle is intended to be not a “target-grade” rifle, the magnification is suitable to my intent for the rifle. I am satisfied with my decision for the magnified optic sub-project.
Another sub-project was prepping the trigger to my satisfaction. A Ruger BX-Trigger, like the scope, had been previously installed and I decided that after graduating from DIY Ruger 10/22 trigger academy that I could come up with a better trigger. I did not want to modify the Ruger BX-Trigger and it so happened that I still had the original trigger that came with the donor.
Trigger Shim Kit
Aside from the usual Volquartsen Match Hammer and Sear, I added a shim kit to the trigger group. You can read about the trigger build @ 10/22 Trigger Shimming… … with Michigan Center Outdoors and TriggerShims.Com: https://guntoters.com/blog/2017/01/11/1022-trigger-shimming/ for detail.
About 25-rounds into the range session with the rifle; however, the trigger was not resetting properly. With the trigger held fully rearward after a shot, there was just not enough trigger return spring pressure to force the trigger past the reset point. I had installed the Volquartsen trigger return spring in this unit and reset problems had been reported by other users, but I was hoping that this would not be the case – but it was.
Even with the unit out of the rifle and on the workbench, the reset problem was still present. The trigger unit was disassembled. Since I had plenty of 10/22 trigger parts, I compared the standard Ruger trigger reset spring with the Volquartsen unit. The Ruger trigger reset spring is not only of a heavier spring rate, it is also slightly longer than the Volquartsen unit. The diagnosis was that the Volquartsen trigger return spring was simply running out of oomph (that is a technical term, by the way) at the end of its travel and could not push the trigger past the reset point, which is at the extreme end of the forward trigger travel. The standard Ruger trigger return spring was installed and the trigger reset properly every time. But, trigger pull weight did suffer a bit. Trigger pull weight went from 2.2 pounds to 2.5 pounds. With that said, I would rather have a dependable trigger, albeit a heavier trigger pull weight, than an undependable but light trigger. With the Ruger 10/22, a trigger pull weight of 2.5 pounds is still a blessing compared to the standard Ruger 10/22 trigger.
Author’s Note: In all honesty, keeping the Ruger BX-Trigger installed would have been the more expedient and inexpensive of trigger choices.
During the range session, the 10/22 had two failures two failures to extract expended casings. At first, I attribute this problem to one of the new 10-round rotary magazines that I was using; however, that was not the case.
Upon inspecting the extractor while cleaning the bolt assembly, I noticed that burned powder had compacted under the extractor and this was causing the sometimes failure to extract. Apparently, I had missed this in a previous cleaning – and it came back to bite me. The 10/22 rifle runs dirty – even with good ammunition. A thorough cleaning solved the issue, as was noted in the next range session. Regardless, a spare 10/22 extractor and extractor spring is a good thing to have in stock.
The trigger unit also received the Volquartsen Automatic Bolt release (in silver), and a Power Custom Competition Extended Magazine Release (also in silver) to add some additional contrast to the stock and barrel combination.
While I had the trigger assembly removed, a new Tuffer Buffer was installed in the receiver. I have also discovered that there was some sizing issues with earlier Tuffer Buffers than with later products. While the earlier product had to be forced into place, the newer product simply pushed on through to the other side of the receiver with little effort. My 10/22 and Ruger Charger firearms don’t leave home without a bolt buffer.
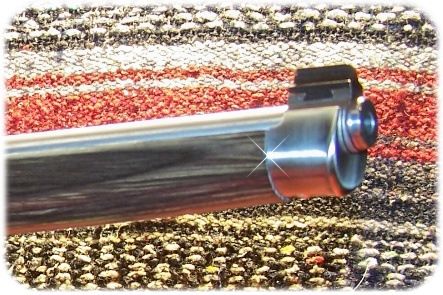
The “International” black laminate stock was in excellent condition exterior wise and a little touch up to the inside with some #600 Emory Cloth took care of finishing the inside a little better than what Ruger provided. The stock has a very nice texture to it and compliments the lock and barrel very nicely. With this particular donor, the receiver is matte black while the barrel is stainless-steel. The pattern of the laminated stock really looks nice against the barrel/’receiver combination. Again, I was not looking for anything special with this build – just a nice looking package that would be fun to shoot. The Muzzle Cap is also black and looks great against the silver-colored band of the front sight (more on that later).
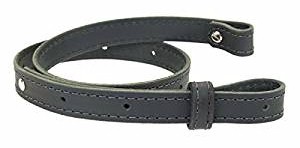 The stock comes equipped with front and rear, semi-permanent (anything can be removed) 1” sling loops and I decided to order a second sling like that used on the Ruger Target 1121 build; the Buffalo Hide Leather Rifle Gun Sling, Black/black Stitch Amish Handmade 1″ Wide. This sling, as with the 1121, would compliment the completed piece – in my opinion.
Full-length stocks are nothing new with long guns. European in origin, Mannlicher gun stocks could be found on many European long guns, including the German Mauser rifles. The Springfield 1903, the British Enfield both sported full-length stocks, which protected the barrel during the harsh realities of war. Full-length gun stocks are still used today, although some question the accuracy of a rifle that uses full-length gun stocks. I imagine that there is some validity to these claims, but I really was not concerned with their claims on a Ruger 10/22 firearm or, in fact, any .22 caliber firearm. And, I am sure that any Russian during WWII that handled the Mosin-Nagant rifle with its full-length stock, and especially a sniper-equipped rifle, would have a lot to say about how a full-length gun stock affected the accuracy of his rifle, although I am sure a lot of German soldiers had wished that they would not have been in the cross-hairs of such a rifle or the Lee-Enfield that was equipped with a No. 32 3.5× telescopic sight. I am also sure that the Russians felt the same way about the German counterpart to the Mosin at the time. And, I am sure that American troops had a lot of respect for the Type 97 Arisaka sniper rifle with its full-length stock. But, I digress too much!
With the trigger and accessories taken care of, it was time to move back to the issue with the damaged Muzzle Cap Screw and Muzzle Cap Escutcheon.
The new Muzzle Cap Screw and Muzzle Cap Escutcheon finally arrived. A quick check to ensure proper Muzzle Cap Screw and Muzzle Cap Escutcheon thread fit, and the Muzzle Cap Escutcheon was put into place in the stock. It seemed that I lucked out, as the Muzzle Cap Escutcheon pressed into place firmly and would hold up to the minor tightening of the Muzzle Cap Screw without further work.
I assembled the rifle, but I still was dissatisfied with the end result. A quick online order from Brownells was made, and in a week a stainless steel Muzzle Cap and Muzzle Cap Screw was in the house.
Once the rifle was assembled for the final time, a dab of Anti-Seize compound was applied to the threads of the Muzzle Cap Screw and the screw lightly tightened. Not only would the Anti-Seize compound prevent galling, but it would also help to keep the Muzzle Cap Screw from backing out under recoil. Time and use will tell.
The “International” build was finally completed.
Before the Build
After the Build
What Gives the “International” its Looks – the Full Stock and Muzzle Cap
POST-BUILD RANGE DAY:
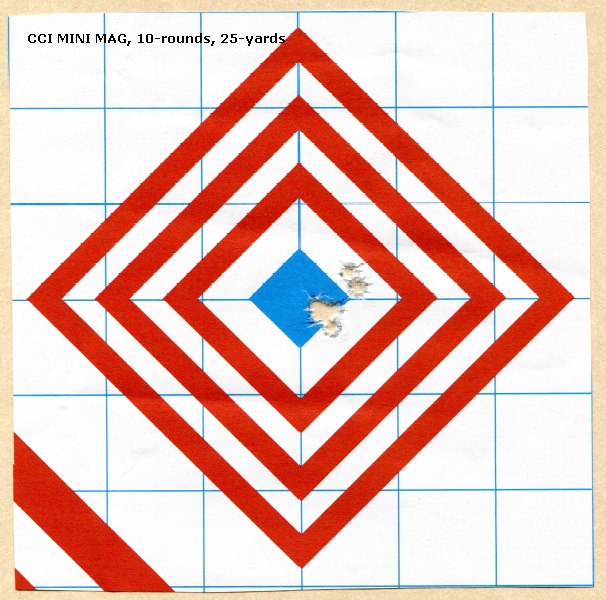
I can’t say that I was initially happy with the start of the post-build range day. I started out with Federal Target Grade Performance ammunition (1200fps) and obtained dismal results through the “International.” This ammunition had performed most exceptionally through the 1121 and 1262 target rifles, but failed to even come close to performing through the 10/22 “International.” I could not even determine a group; it was more of a large expansion of holes. I needed to zero the scope, but it was not going to be done using this ammunition.
I switched out to CCI MINI-MAG CPHP (36-grain @ 1260fps) and the sky parted, angels sang, and all was right in my world. A quick adjustment for near zero and the following 10-shot group at 25-yards appeared. I also tried 10-rounds of CCI Blazer (40-grain LRN @ 1235fps) and the resultant group was almost identical. It was obvious that the 10/22 “International” like warm fodder. At least I felt that my efforts in this build had paid off.
IN THE END:
The one thing about the Ruger 10/22 platform is that you can spend as much or as little on them as you wish. Unlike most .22 caliber platforms, the 10/22 is easy to shoot and easy to modify to your liking.
This particular build, like my other simple 10/22 builds, has been fun, entertaining, frustrating, and educational. Although simple on the surface, it was in fact full of challenges and opportunities. Most of all, the build has been satisfying in a sense that I was able to do it myself. The firearm itself is nothing special; it’s what you put into it that makes it special.
Since 1964, the 10/22 has put smiles on a lot of faces – young and old. It is widely stated that the Ruger 10/22 is the most customized firearm on the planet, but the MSR seems to be putting that statement to the test. Regardless, the Ruger 10/22 is just one of those firearms that can be tailored to your taste, wants, and needs for a reliable .22 caliber firearm.
I have one more Ruger 10/22 in the safe. When it and I am ready, we’ll see what we can do for each other.
UPDATE 03/18/2017:
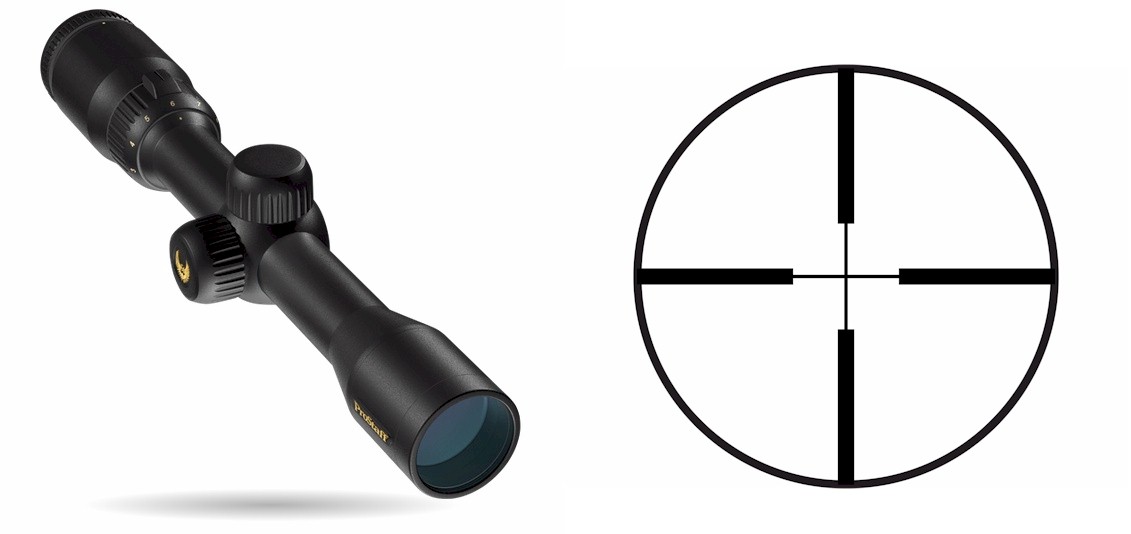
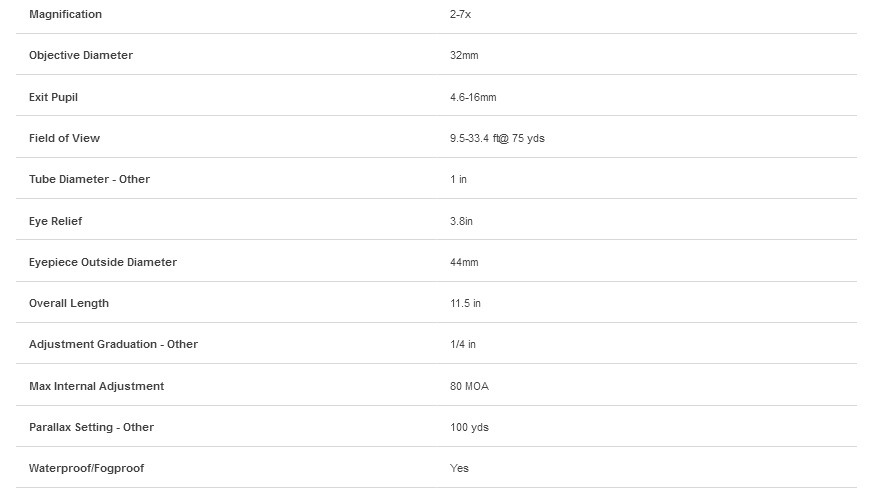
While I did like the Center Point 3-9x32mm scope that was on the “International” it did not particularly suit the firearm. I also did not want QD rings because if a scope was to be mounted on the “International” it should be permanently mounted, given the character of the “International.”
A suitable replacement was found for the Center Point 3-9x32mm scope, which has since found its way onto the Henry AR-7. The Nikon Prostaff 2-7x32mm scope with Nikoplex (Duplex) reticle.The scope rings were replaced by a set of Leupold 1″ Medium rings in matte black.
This scope and ring exchange also allowed me to mount the rear sight adjustment blade back onto the rear sight due to an increase in clearance with the new setup.
RESOURCES:
- Author’s Note: The price of this product has increased by $20 since I ordered it. It is also available through other resources – shop around for the best value. Rug 10/22 22Lr Match Hammer And Sear: https://www.amazon.com/Rug-22Lr-Match-Hammer-Sear/dp/B0029M14R0/ref=sr_1_3?ie=UTF8&qid=1484515165&sr=8-3&keywords=10+22+volquartsen
- Volquartsen Automatic Bolt Release Ruger 10/22: http://www.midwayusa.com/product/688102/volquartsen-automatic-bolt-release-ruger-10-22?cm_mmc=se_service-_-shippingconf-_-shippingconf-_-ProductShippedTodayLink
- Power Custom Competition Extended Magazine Release Ruger 10/22 Aluminum: https://www.midwayusa.com/product/160459/power-custom-competition-extended-magazine-release-ruger-10-22-aluminum
- Michigan Center Outdoors and TriggerShims.Com: http://triggershims.com/shim_kit.html
- Ruger 10/22 Trigger Shim Kit Installation Instructions: https://www.youtube.com/watch?v=ttbRemJvcMk
- Ruger 10/22 Volquartsen Target Hammer and Shim Kit Installation: https://www.youtube.com/watch?v=OLrqrQ1-ta0
- Tuffer Buffer (bolt stop buffer pin): http://www.tufferbuffer.com/
- Buffalo Hide Leather Rifle Gun Sling, Black/black Stitch Amish Handmade 1″ Wide: https://www.amazon.com/gp/product/B018CUA77U
- PROSTAFF 2-7×32 Matte Nikoplex (Product 6719): http://www.nikonsportoptics.com/en/nikon-products/riflescopes/prostaff-2-7×32-matte-nikoplex.html#tab-ProductDetail-ProductTabs-TechSpecs
- Rifleman Detachable Medium Rings: https://www.leupold.com/hunting-shooting/mounting-systems/rifleman-mounting-systems/rifleman-detachable-medium-rings/
![]()