

 I am going to start out by saying that if you own a Ruger 10/22, and like to do your own work on the trigger group, the Gunsmither™ 10-22 Safety Takedown Tool should be in your gunsmithing tool box – period!
Prior to purchasing this tool, I had watched several DIY videos on removing and installing the safety in the 10/22 trigger housing. Using a small dowel with a hole drilled into it and a small punch, I was able to safely and successfully remove and install the safety assembly (safety button, safety plunger spring, and safety plunger). I can’t say that it is a pleasant task, but it is sometimes necessary to “clean up” a rough and gritty safety that is inherent in Ruger 10/22 actions. The DIY tool; however, is good for only one thing – removing and installing the safety. Why not have a tool that can be used for completely stripping and assembling the entire 10/22 trigger group?
I had previously purchased the Gunsmither 10/22 Bolt Bar and Extractor Tool (Gunsmither 10/22 Bolt Bar and Extractor Tool – Product Review: https://guntoters.com/blog/2017/01/04/gunsmither-1022-bolt-bar-and-extractor-tool-product-review/) and was impressed by the simplicity of its operation when installing the bolt assembly. When I discovered the Gunsmither™ 10-22 Safety Takedown Tool, and watched the instruction video, I immediately purchased one.
 Before I go into this review, there is one caution that must be mentioned. You are working with something that is under spring tension; the safety plunger. The very small safety plunger, if not controlled properly, can fly enormous distances – trust me on that one. Always wear eye protection devices when working with items under spring tension! Always release items that are under spring tension slowly! With that said, I can continue with a clear conscience.
The parts that I am referencing in this review are shown circled in red, as shown below.
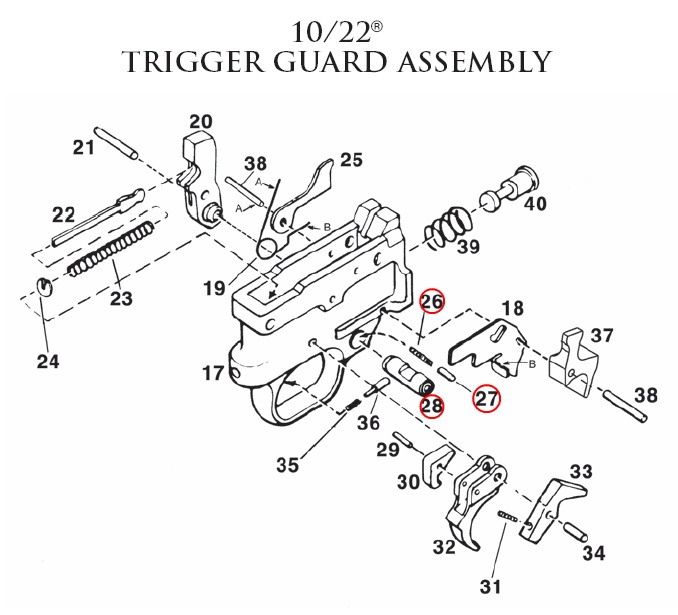
The parts circled in red are identified as such:
- 26 Safety Detent Plunger Spring
- 27 Safety Detent Plunger
- 28 Safety*
* Requires factory installation
SAFETY OPERATION:
 Before you start tearing things apart, it is important to understand how the Ruger 10/22 safety works.
The safety button is oriented to accommodate right-hand shooters. The position of the safety allows or prevents the sear from releasing the hammer of the firearm. In the “safe” position, the sear hits the top of the safety button and prevents the sear from releasing the hammer. In the “fire” position, the sear drops into a channel that is cut in the safety button as the trigger is pulled rearward and this allows the sear to release the hammer.
The safety button cannot be pushed in the “safe” position if the firearm has not been cocked by pulling the bolt handle to the rear.
The safety is held in its “on” or “off” position by a plunger that is under spring tension. When the safety is moved to either the “on” or “off” position, a distinct “click” should be heard as the Safety Detent Plunger is forced to ride over the tip of the M-cutout on the bottom of the safety button. The Safety Detent Plunger is under spring tension by the Safety Detent Plunger Spring, which forces the tip of the Safety Detent Plunger to engage with the M-cutout. This transition can be rough and heavy of feel. The common fix for rough and heavy safety operation is to disassemble the safety and polish the M-cutout of the Safety Button and the tip of the Safety Detent Plunger. Some have also removed a coil of the Safety Detent Plunger Spring to lessen the tension on the Safety Button, but this is not something that I recommend.
Removing the safety mechanism from the 10/22 is actually a simple task, as is polishing the contact surfaces of the Safety Button and Safety Detent Plunger. However, the risk of loosing the Safety Detent Plunger and Safety Detent Plunger spring is quite high if proper precautions are not taken. Installing the safety mechanism; however, may lead to high blood pressure, nausea, possible convulsions, and a desire to hug a Koala Bear as you lay in a fetal position in some dark and remote space of your workshop.
What is needed is a good safety disassembly and assembly tool.
THE CLAIM:
Before getting into the heart of the review, let’s take a read of the claims by the manufacturer:
This great tool makes disassembly and reassembly of the 10/22® safety and trigger housing much easier and quicker.
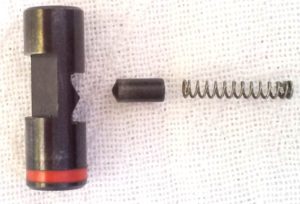
The Gunsmither™ 10/22® Safety Takedown Tool captures the safety plunger and spring, allowing easy, worry free removal, and re-installation of that very small safety plunger and spring. Designed and manufactured by a Professional Gunsmith using modern CNC equipment.
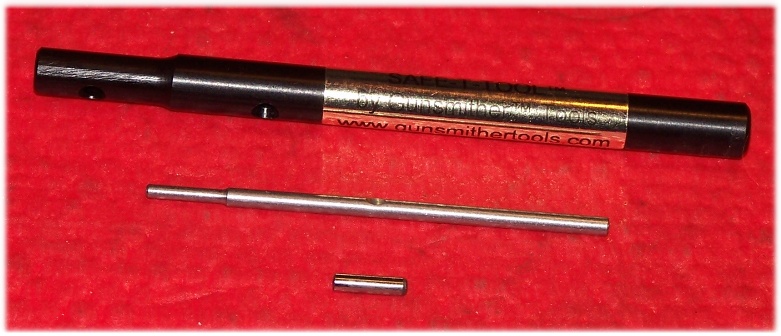
You’ll enjoy cleaning your 10/22® more often when you use this great tool! It features a built in punch for pushing out the trigger housing pins, and comes with a Trigger Slave Pin for the trigger/sear pin, to allow easy trigger installation. Slave Pin stores in main body of tool until needed. One end of tool acts as a pin pusher, the other end is the safety pusher. Pin pusher end is removable, and serves to capture safety plunger in conjunction with safety pusher end. Pin pusher end also helps align parts when reassembling.
Main tool body of the Gunsmither™ 10/22® Safety Tool is CNC machined from non-marring Delrin. Pin pusher, and slave pin are made of steel. Entire tool is about 7″ long, and will fit in your shooting box, or at your work table.
I will comment, at this point, that the 10/22 safety assembly can be removed without the Gunsmither™ 10-22 Safety Takedown Tool. The Gunsmither™ 10-22 Safety Takedown Tool; however, makes the removal a more controlled process, which makes for a safer and less stressful experience. My most common method of removing the safety button was placing the trigger assembly (stripped to the safety button level) in a large food storage bag, and then pulling the safety button out while pressing my trigger finger lightly on the safety button to stop the safety detent plunger and spring as they were forced upward when the safety button cleared them. I had tried this method without using the food storage bag – I found the safety detent plunger about five feet away from where I had removed the safety button – after twenty-minutes of looking while trying to figure out the direction of its flight path. My shop floor is painted with paint that has various colors of flecks in it. The safety detent plunger is about the same size as the flecks in the pain, which did not make my search any easier.
To put things into perspective, the hollow Safety Detent Plunger measure approximately 0.123-inches in diameter (less than 1/8”) with a total length of about 0.269 inches. The Safety Detent Plunger is made of a metal that is magnetic (that can be useful, as you will read later).
While you can watch the instructional video on this product (see, RESOURCES for a link to the video), but I am going to take you through a step-by-step instructions for those who like step-by-step instructions.
SAFETY BUTTON ASSEMBLY REMOVAL:
- Prepare the Gunsmither™ 10-22 Safety Takedown Tool by removing the trigger disassembly/assembly pin, and the pin pusher, from the tool.
- At this point, there are two ways to properly position the Safety Button for removal:
- Position the safety button so that the center of the safety button is approximately half-way inside the trigger housing (About the same position as is needed to remove and install the action to the stock). Then, squeeze the safety button between the thumb and finger of the left hand and slowly rotate the safety button counter-clockwise until the sear slot (the long slot) on the safety button is at about a 45-degree angle. Note: The long slot of the Safety Button can also face to the rear of the Trigger Housing. The main point here is to have the Safety Detent Plunger riding on the barrel of the Safety Button and not riding in the M-groove.
- Using the butt of the Gunsmither™ 10-22 Safety Takedown Tool, push against the forward edge of the large slot in the Safety Button. The Safety Button will rotate just far enough counter-clockwise to free the Safety Detent Plunger from the M-notch, which fully compresses the Safety Detent Plunger Spring.
- Secure the 10/22 trigger housing. (I use a small, portable, vacuum-mount vice that enables me to position the Trigger Housing however I need to work on it.) Note: While the safety assembly removal can be performed while holding the trigger group in the hand, securing the trigger housing provides a more stable platform.
- Using the Gunsmither™ 10-22 Safety Takedown Tool, push the safety button out to the left, while ensuring that no gap exists between the Safety Button and the tool, and clear of the trigger housing. The tool will stop on the left edge of the Trigger Housing, at this point. Note: There is a hole in shaft of the Gunsmither™ 10-22 Safety Takedown Tool. This hole should be facing the rear of the trigger housing at an angle (to prevent the Safety Detent Plunger and Safety Detent Plunger Spring from accidentally escaping the tool) that will allow you to insert the pin pusher section of the tool into the Safety Detent Plunger hole in the shaft.
- Partially insert the pin pusher rod into the hole in the shaft of the tool.
- Carefully align the Safety Detent Plunger hole of the shaft, with the pin pusher rod in place, over the Safety Detent Plunger. You will hear an audible click when the Safety Detent Plunger engages the Safety Detent Plunger hole of the shaft and hits the pin pusher.
- Slowly withdraw the pin pusher from the Safety Detent Plunger hole to relieve pressure on the Safety Detent Plunger Spring.
- Once the tension is released completely from the Safety Detent Plunger Spring, the entire Safety Detent Plunger and Safety Detent Plunger Spring can be removed as a unit (the spring fits inside the detent tightly, but this may not be true in all cases). You can use a small screwdriver with a magnetized end, a small magnet, or simply turn the trigger housing unit over in your hand and allow the Safety Detent Plunger and Safety Detent Plunger Spring to fall out into your hand. Personally, I like using a magnetic, which allows me to use better control over loose parts.
- With the Safety Detent Plunger and Safety Detent Plunger Spring removed, remove the Gunsmither™ 10-22 Safety Takedown Tool from the trigger housing.
That is it for safety assembly removal. At this point, I will polish the Safety Button where it engages the Safety Detent Plunger (the M-notch) and the tip of the Safety Detent Plunger. I will also lightly lubricate the inside of the Safety Detent Plunger. In addition, I will lightly lubricate the M-notch points on the safety Button that engage the Safety Detent Plunger. Also, I will lightly lubricate the Safety Detent Plunger hole in the Trigger Housing. Lubricating the holes in which the Safety Button slides back and forth in the housing should not be necessary, as there is plenty of clearance. Once satisfied, it’s time to put the Safety Assembly back into the Trigger Housing.
SAFETY BUTTON ASSEMBLY INSTALLATION:
- Push the Gunsmither™ 10-22 Safety Takedown Tool into the Trigger Housing until the Safety Detent Plunger Access Hole in the tool is approximately aligned with the Safety Detent Plunger hole in the Trigger Housing. Hint: Use the small pin pusher end of the tool to locate the Safety Detent Plunger hole.
- Using small needle nose pliers, tweezers, or small magnetized screwdriver, place the Safety Detent Plunger and Safety Detent Plunger Spring into the Safety Detent Plunger Access Hole in the tool.
- Using your fingers, rotate the Gunsmither™ 10-22 Safety Takedown Tool within the Trigger Housing until the Safety Detent Plunger and Safety Detent Plunger Spring drops into place in the Trigger Housing.
- Using the thicker part of the pin pusher part of the tool, press down on the Safety Detent Plunger until it clears the Gunsmither™ 10-22 Safety Takedown Tool.
- Using the pin pusher, rotate the Gunsmither™ 10-22 Safety Takedown Tool approximately 45-degrees to the rear of the Trigger Housing, or just enough so that the pin pusher can be removed from the tool. The Safety Dent Plunger and Safety Detent Plunger Spring is now locked into place.
- Orient the Safety Button so that when it pushes the Gunsmither™ 10-22 Safety Takedown Tool out of the Trigger Housing the safety engagement point will engage the Safety Detent Plunger. Also, ensure that the red band on the Safety Button is to the left of the trigger housing. (Note that there are ambidextrous and left-hand safety buttons available. Ensure that the Safety button is oriented properly before attempting installation.)
- Slowly push the safety button against the Gunsmither™ 10-22 Safety Takedown Tool to force the Gunsmither™ 10-22 Safety Takedown Tool out of the Trigger Housing. Important: As with Safety Button removal, do not allow any gap to exist between the Safety Button and the Gunsmither™ 10-22 Safety Takedown Tool. (I simply hold the tool with some pressure as the Safety Button is pushed through the housing. The Safety Button is fully installed when the Safety Button engagement point captures the Safety Detent Plunger. At this point, the Gunsmither™ 10-22 Safety Takedown Tool should be clear of the Trigger Housing.
- Test the Safety button for proper functioning:
- The Safety button should transition from “safe” to “fire” position cleanly, with mild tension, and an audible click should be heard as the Safety Button is locked into place by the Safety Detent Plunger and Safety Detent Plunger Spring.
- The Safety Button should not be able to move from the “safe” to the “fire” position if the firearm is not cocked.
- Cock the firearm, move the Safety Button to the “safe: position, and pull the trigger. The Safety Button should prevent the trigger from moving rearward enough to release the hammer.
- Push the Safety Button to the “fire” position”. The trigger should move cleanly to the rear and the hammer should be released and strike the hammer.
SUMMARY:
The Gunsmither™ 10-22 Safety Takedown Tool lives up to the claims about it. My Glock Tool was once the main tool to use when pushing pins on the Ruger 10/22 Trigger Housing; however the Gunsmither™ 10-22 Safety Takedown Tool is now the tool of choice for all Trigger Housing work. The trigger sear “Pilot” pin allows me to confidently remove and replace the trigger/sear/disconnector assembly.
The only improvement that I would like to see is that the “pin pusher” part of the tool be magnetized, which would help removing and installing the Safety Detent Plunger and Safety Detent Plunger Spring from the 10/22’s Trigger Housing; being magnetized would not interfere with the installation. With that said, the pin pusher can be temporarily magnetized by rubbing a large magnet along its surface.
Is the tool worth the money? Yes it is. It is especially worth the money when using it will prevent the “Flying Detent” circus from performing.
If you have a Ruger 10/22 (or Ruger Charger) and decide to do some work on your trigger unit, you definitely need the Gunsmither™ 10-22 Safety Takedown Tool.
Using the Gunsmither™ 10-22 Safety Takedown Tool has not reduced my desire to hug a Koala Bear, however.
PICTORIAL REFERENCE LIBRARY:
Just in case that you needed some visual guidance, I have included some images that I took during disassembly and assembly of the Safety Button and related components.
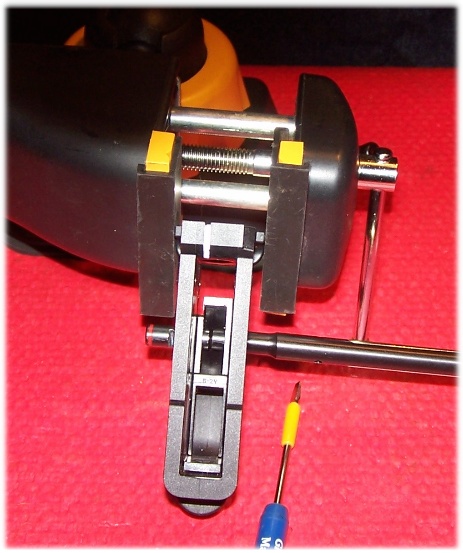
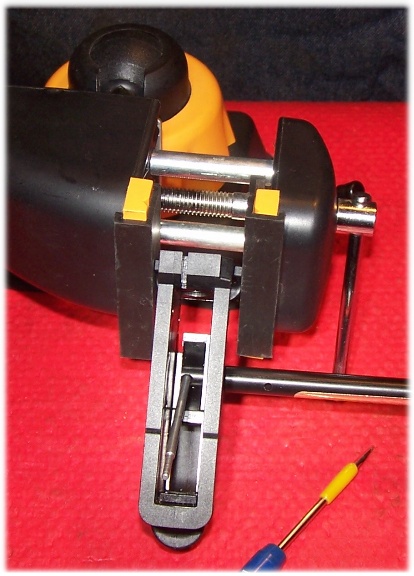
The Safety Button – Partially Removed or Inserted, depending on which way you look at it. Note that there is no gap between the tool and the button.
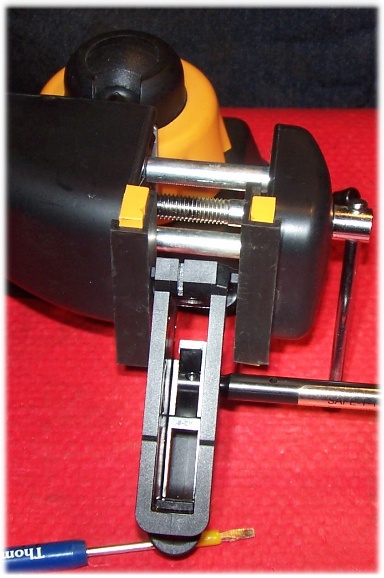
Position of Tool Handle for Safety Detent Plunger and Safety Detent Plunger Spring Prior to Removal and Installation
Safety Detent Plunger and Spring in Captured and Installation Position
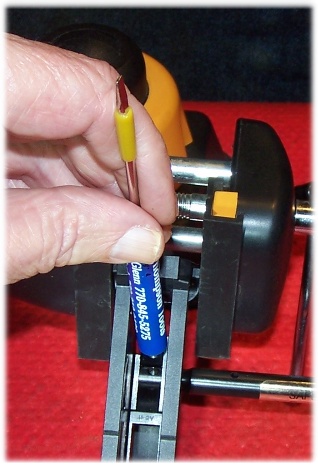
Removing and Installing Safety Detent Plunger and Safety Detent Plunger Spring with Magnetized Screwdriver
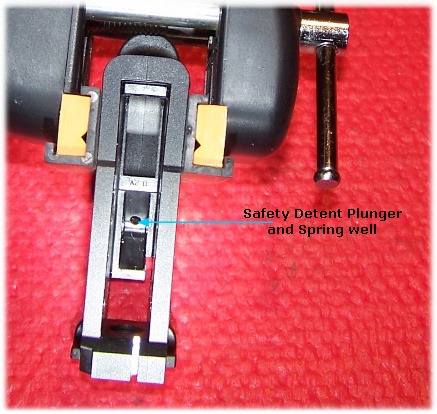
Well for the Safety Detent Plunger and Safety Detent Plunger Spring
RESOURCES:
The Gunsmither Safety Takedown Tool Ruger 10/22, 10/22 Magnum is available through the following vendors:
- http://www.midwayusa.com/product/414743/gunsmither-safety-takedown-tool-ruger-10-22-10-22-magnum
- http://www.gunsmithertools.com/gunsmither-1022-safety-tool/index.html
- http://www.shootersdiscount.com/cart/accessories/gunsmither-tools/gunsmither-safety-trigger-guard-takedown-tool.html
- http://www.cheapgunparts.com/store.php/armedamerica@comcast.net/pd2208270/gunsmither_safety__trigger_housing_tool
- https://www.tandemkross.com/Gunsmither-Ruger-1022-Safety-Tool_p_141.html
Gunsmither™ 10-22 Safety Takedown Tool (Instructional Video): https://www.youtube.com/watch?v=mQZn8BgEm4g
![]()