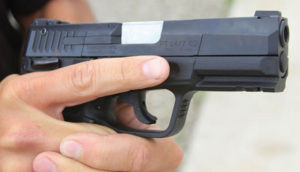
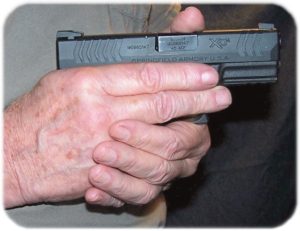
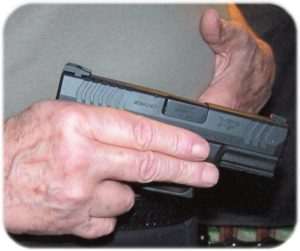
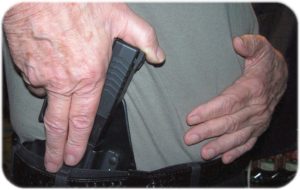
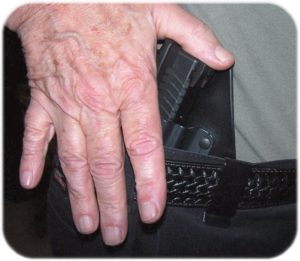
I have been playing with a new technique of holstering my firearm lately. For lack of better words to describe it, I call it my “Two Finger” holstering technique. Essentially, the “Two Finger” holster technique provides full coverage of the trigger guard while holster holstering your EDC.
When we draw our EDC from the holster, our natural inclination is to lay the trigger finger outside of the holster while attempting to get as full a grip on the firearm as possible. As the firearm is withdrawn from the holster, our trigger finger rests against the side of the frame or alongside the trigger housing. The trigger finger usually stays in this attitude until we thrust the pistol forward from a high-ready position toward the target, are ready to fire, and the trigger fingers slips inside the trigger guard. When we have completed firing, the trigger finger slips out from the trigger guard and the pistol is either moved back into a high-ready position or positioned to replace a spent or partially-spent magazine (as with a combat reload).When we return the pistol to the holster, the trigger finger is once again resting alongside the frame to prevent an inadvertent insertion into the trigger guard. If we are wearing an outer garment, that outer garment has to be cleared prior to inserting the pistol into the holster. In some cases, as with open carry (law-enforcement or otherwise), there may be a thumb break strap that has to be cleared prior to holstering the firearm. There is the distinct possibility that outer clothing, or possibly the thumb break strap, could find its way into the trigger guard. With “Safe Action” pistols, there is a possibility of clothing or thumb break strap hitting against the trigger in a fashion that could cause an Unintentional Discharge (UD) of the pistol. The possibility even exists in pistols that incorporate an active thumb safety and or passive grip safety if these safeties have not been set to their “safe” positions.
I have been experimenting with the “Two Finger” holstering technique with three different firearms; a Glock G19 that has no external safety aside from the trigger safety, a Springfield XD that has a trigger safety and a “passive” grip safety, and a 1911-based pistol that has no trigger safety but does have an external “active” safety (thumb safety) and an external “passive” safety (grip safety).
The “Two Finger” holstering method begins from the “high-ready” position and the pistol is ready to be holstered; for example, you have just run a “double-tap” drill from the holster and will be holstering the pistol to re-run the drill. Both hands are still on the firearm and the trigger finger is positioned alongside the frame just above the trigger guard. As the support hand is relaxed, the middle finger of the shooting hand comes up and lies alongside the trigger finger. The middle finger is longer than the trigger finger and will rest outside and alongside the trigger guard. In this position, the middle finger protects the trigger while the remaining two fingers and thumb grip the firearm. Let’s stop here for just a bit.When the military began teaching soldiers how to shoot the 1911 pistol, shooting was done with the middle finger; the trigger finger was positioned alongside of the frame. Shooting with the middle finger was soon abandoned by the military when it was found that the soldiers were pressing the trigger finger against the disassembly pin, which would move it, subsequently moving the entire disassembly assembly outward from the frame during firing. If the disassembly pin was pushed far enough during the pistol’s cycling, the pistol could jam. (I have had this happen on a 1911-based pistol with a disassembly pin that would walk out of the frame without my assistance while the pistol was being fired. I guarantee that the pistol will eventually jam.)
Picking up where I finished digressing, and with the trigger and middle finger now alongside the pistol, the holstering process begins. If the pistol has an external thumb safety, the safety has been placed in the “safe” position prior to moving the pistol downward for holstering. If the pistol has a passive grip safety, the hand is relaxed slightly to release the pressure on the grip safety. As the pistol is inserted into the holster, both fingers feel the lip of the holster and flair slightly outward. This action assists in removing any clothing away from the trigger guard. As the trigger guard clears the lip of the holster, the thumb is used to simply guide the pistol the rest of the way into the holster by simply pushing against the rear of the slide (in the case of the 1911, the thumb can simply push against the top of the grip safety and the rear sight).While drawing the pistol from the holster is best done fast, smooth, and deliberate, holstering the pistol is best done slow, smooth, and deliberate.
Let it be noted that the pistol can be fired from the high-ready position if need be – one handed or two handed – with the trigger finger or the middle finger. The pistol can also be drawn from the holster using the “Two Finger” method with practice.
With the “Two Finger” holstering method, it is still important to use the whole hand clear the pathway to the holster by removing an obstruction to the holster as it is to use the whole hand to remove any obstruction while drawing the pistol from the holster.
As with any technique that is new to you, practice the technique with an unloaded and safe firearm until it becomes natural to you. I have found that when using the “Two Finger” holstering technique I feel a little safer when holstering a pistol, regardless of the number of safeties included in its design.
![]()


