

The Ruger 10/22 rifle is, no doubt, one of the most highly popular rim fire rifles of today’s time. Folk’s who own these rifles (or the 10/22 based “Charger” pistol), for the most part, have never been satisfied with the base rifle and use it to serve as ‘donors’ for modifications that customize the rifle to their liking.
Updating an Already Updated Magazine Release
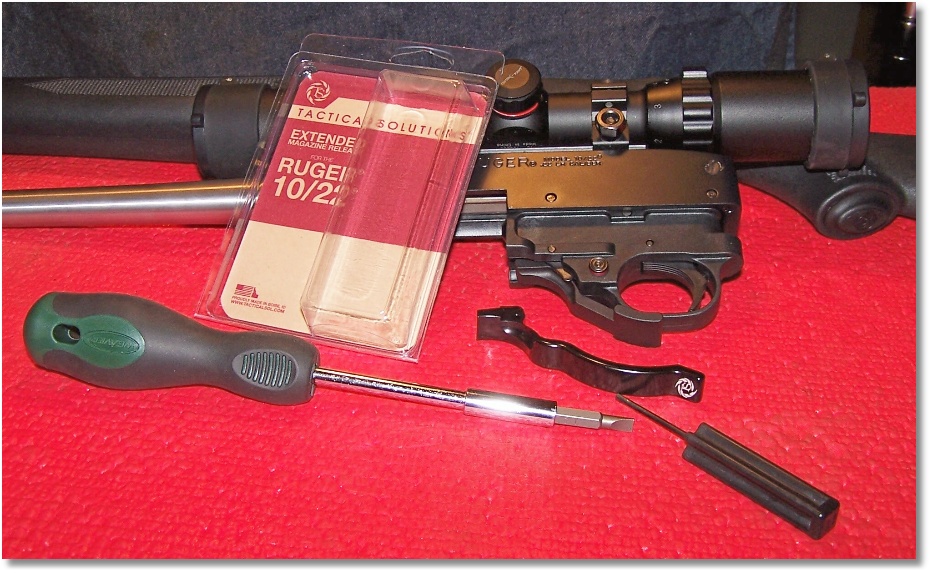
I Replaced An Already Modified BX-Trigger’s Magazine Latch (below the Trigger Guard Assembly) With the Extended Magazine Release by Tactical Solutions
THE PRODUCT:
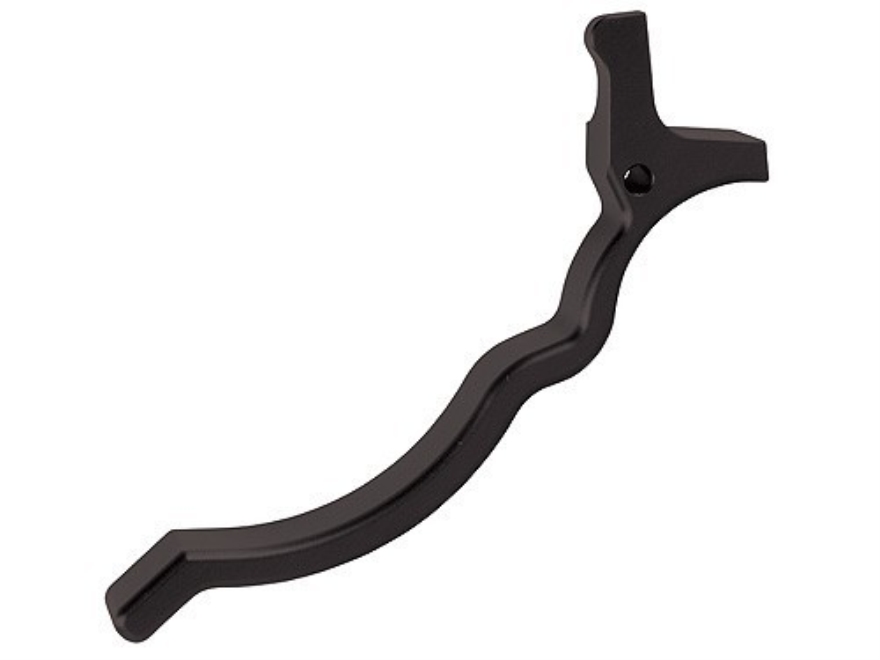
Tactical Solutions Performance Extended Magazine Release Ruger 10/22 Aluminum
The Tactical Solutions Performance Extended Magazine Release wraps totally around the trigger guard to provide an extension at the rear of the trigger guard, which is pushed down and away from the trigger guard with the middle finger, thus releasing the magazine with less effort that is humanly possible with the stock Ruger magazine release.
INSTALLATION:
Installing the Tactical Solutions Performance Extended Magazine Release is simple. If you can break-down your Ruger 10/22 or Ruger Charger for cleaning, you can remove the stock magazine release and install this product yourself in a matter of minutes using simple tools.
For reference purposes, I have included an Illustrated Parts Breakdown of the Ruger 10/22 and Charger Trigger Guard Assembly at the end of this article. This will help you locate the parts referenced in the instructions.
Tools:
You will only need two tools to accomplish the magazine release lever swap; a tool to remove the stock from the action, and a pin-pushing tool. (Note: I use the Glock Disassembly Tool, but any pin punch that will fit the Magazine Latch Pivot and Ejector Pin (B35) will do).
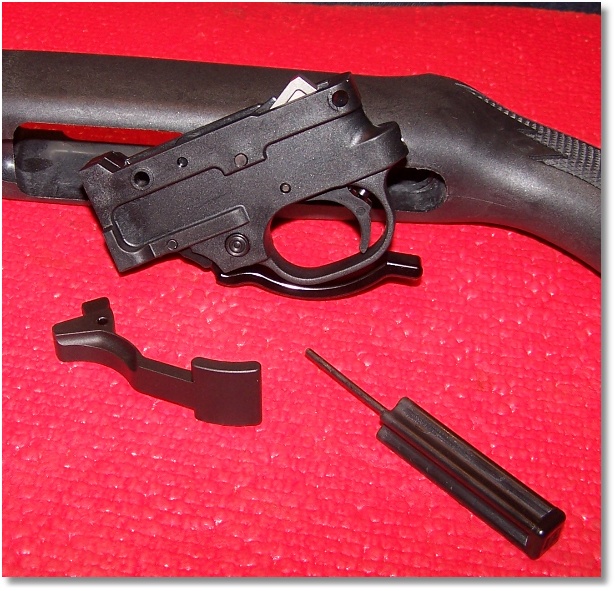
Stock Magazine Latch (B00034) Removal:
Remove the Receiver Cross Pins (B5) To Remove the Trigger Guard Assembly (B2C)
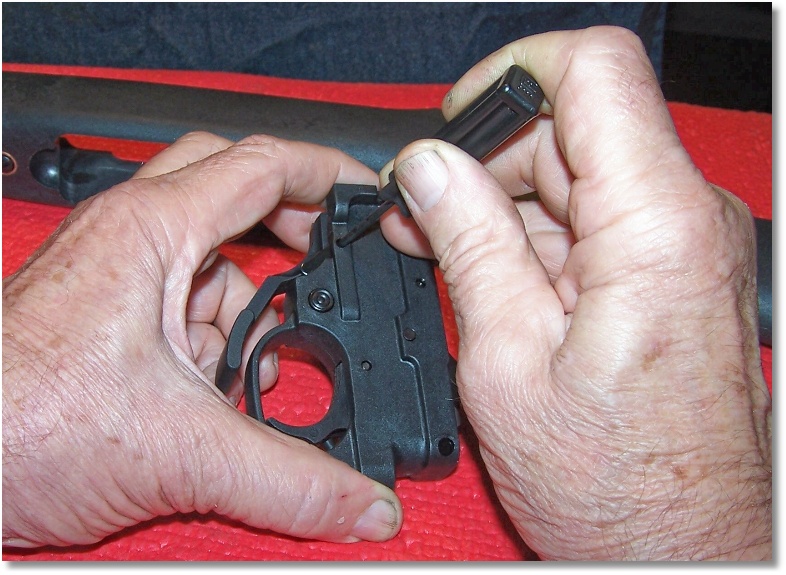
Remove the Magazine Latch Pivot and Ejector Pin to Remove the Magazine Latch. Push the Magazine Latch Plunger (B36) In To Relieve Spring Pressure.
- ENSURE that the firearm is unloaded and safe.
- Remove any magazine from the firearm.
- Pull the bolt to the rear to cock the hammer.
- Release the bolt in the forward (in battery) position.
- Use the stock removal tool to remove the stock from the firearm. Note that the safety must be centered to remove the stock from the action.
- Use the pin removal tool to push the Receiver Cross Pins (B5) out of the firearm. Note that on some firearms, the pins may be tight, which means some pressure must be used. On some firearms, the pins will almost fall out of the firearm.
- Set the Receiver Cross Pins (B5) aside for safekeeping.
- Remove the Trigger Guard Assembly (B2C).
- Press the Magazine Latch Plunger (B36) to the rear of the Trigger Guard Assembly (B2C). This releases tension on the magazine release lever.
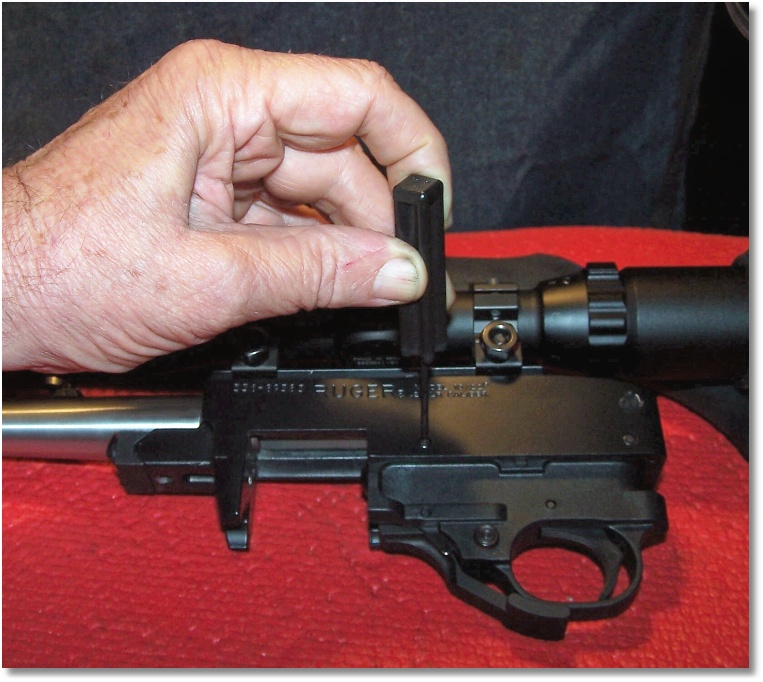
- Use the pin punch (or Glock Tool) to push the Magazine Latch Pivot and Ejector Pin (B35) from the Trigger Guard Assembly (B2C). (Note: In some cases, the Magazine Latch Pivot and Ejector Pin (B35) will simply fall free from the Trigger Guard Assembly (B2C). DO NOT LOSE THE Magazine Latch Pivot and Ejector Pin (B35).)
- Put the Magazine Latch Pivot and Ejector Pin (B35) aside for safekeeping.
- Pull the Magazine Latch (B00034) downward and away from the Trigger Guard Assembly (B2C). In most cases, the Magazine Latch (B00034)will simply fall free from the Trigger Guard Assembly (B2C).
- Slowly release the pressure on the Magazine Latch Plunger (B36). The Magazine Latch Plunger (B36) is under spring pressure from the Magazine Latch Plunger Spring (B37) but is not enough to send the spring and plunger flying to parts unknown; however, do not misplace these parts.
Now, you are ready to install the Tactical Solutions Performance Extended Magazine Release.
Tactical Solutions Performance Extended Magazine Release Installation:
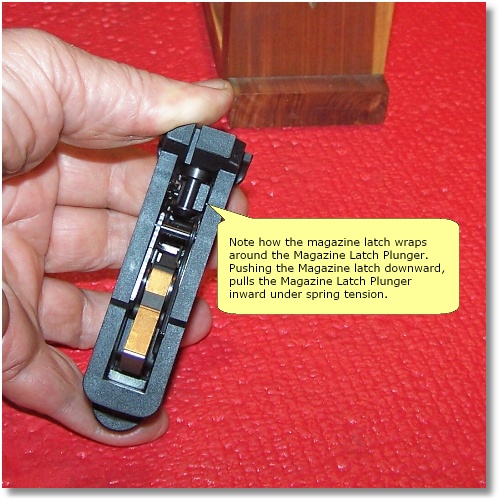
Magazine Latch Alignment with Magazine Latch Plunger
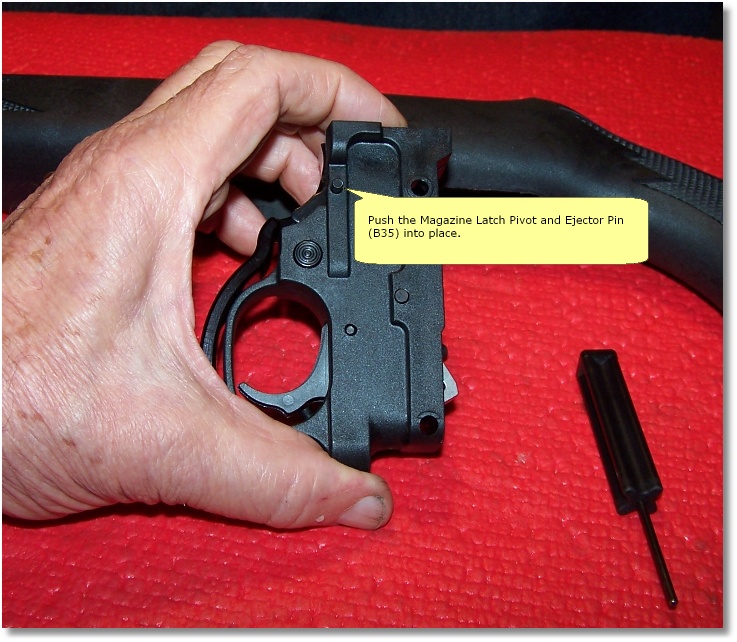
Press Magazine Latch Plunger slightly inward to Install the Magazine Latch Pivot and Ejector Pin. Ensure to Capture the Ejector During Assembly.
- Press the Magazine Latch Plunger (B36) inward.
- Place the Tactical Solutions Performance Extended Magazine Release into the Trigger Guard Assembly (B2C).
- Ensure that the hole for the Magazine Latch Pivot and Ejector Pin (B35) is aligned with that in the Bolt Lock (B41).
- Insert the Magazine Latch Pivot and Ejector Pin (B35) (Note: The Magazine Latch Pivot and Ejector Pin (B35) may fall out from the other side when everything is in alignment. I normally place my third finger over the pin hole on the opposite side to prevent the pin from falling out.)
- Once the Magazine Latch Pivot and Ejector Pin (B35) is in place, release the Magazine Latch Plunger (B36).
- Ensure that the pin is centered in the Trigger Guard Assembly (B2C) housing.
- Push downward on the Tactical Solutions Performance Extended Magazine Release, the Magazine Latch Plunger (B36) will move to the rear under spring pressure.
- If the hammer is forward at this time, push the hammer to the rear to cock it.
- Ensure that the Ejector (B8) is in its proper position in the slot at the left-hand side of the Trigger Guard Assembly. (Note: The rifle can be assembled with the Ejector (B8) out of its slot; however, the bolt cannot be retracted to the rear.)
- Install the Trigger Guard Assembly (B2C) into the action.
- Push the two Receiver Cross Pins (B5) pins into place.
- Install the action into the stock. (Note: Ensure that the safety is centered to prevent possible damage to the stock.)
Function Check:
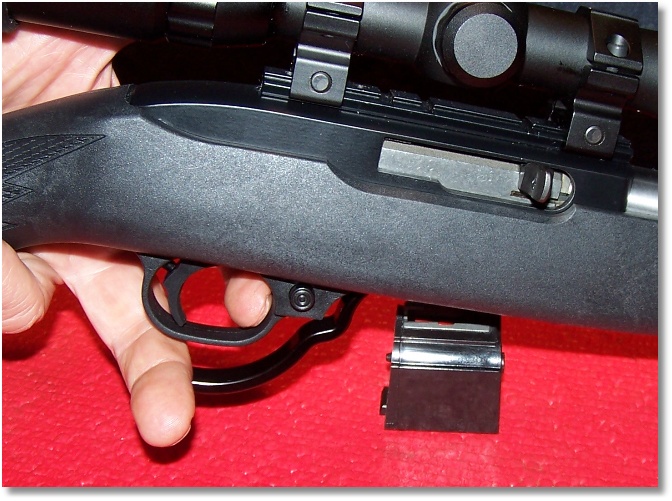
A Simple Press Down-to-Release Action Drops the Magazine.
- Pull the bolt to the rear.
- Use the bolt lock to lock the bolt into place.
- Insert an empty magazine into the magwell.
- Push down on the Tactical Solutions Performance Extended Magazine Release lever. The magazine should fall free from the firearm.
- Optional Step: Insert a snap-cap into the magazine. Insert the magazine into the firearm.
- Using the bolt lock, unlock the bolt and allow it to go into battery.
- Push the safety to the “Fire” position.
- Pull the trigger to dry-fire the firearm.
SUMMARY:
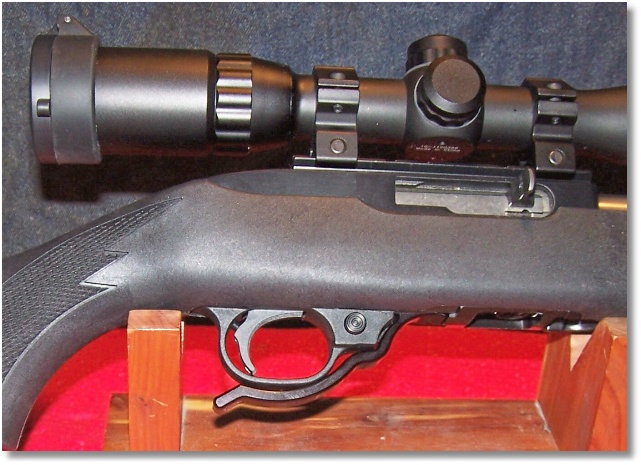
The Installed Extended Magazine Release by Tactical Solutions
When not in use, the Extended Magazine Release by Tactical Solutions rests lightly against the forward slope of the Trigger Guard Assembly ready to be operated by the trigger finger or the middle finger (the middle finger works best for me).
The Extended Magazine Release by Tactical Solutions works with any 10/22 magazine from BX1 through BX whatever. Fast magazine changes are now just a press away. The Extended Magazine Release by Tactical Solutions is just one of many after-market products that make the Ruger 10/22 or Ruger Charger a more pleasurable shooting experience.
RESOURCES:
Tactical Solutions Performance Extended Magazine Release Ruger 10/22 Aluminum: http://www.midwayusa.com/product/596824/tactical-solutions-performance-extended-magazine-release-ruger-10-22-aluminum
Glock Disassembly Tool: http://www.midwayusa.com/product/181144/glock-disassembly-tool?cm_vc=ProductFinding or http://www.amazon.com/Glock-GLOCK-DISASSEMBLY-TOOL/dp/B0014VX2M2/ref=sr_1_1?ie=UTF8&qid=1434823397&sr=8-1&keywords=Glock+Disassembly+Tool
Ruger 10/22 and Charger Trigger Guard Assembly IPB (as found in the owner’s manual):
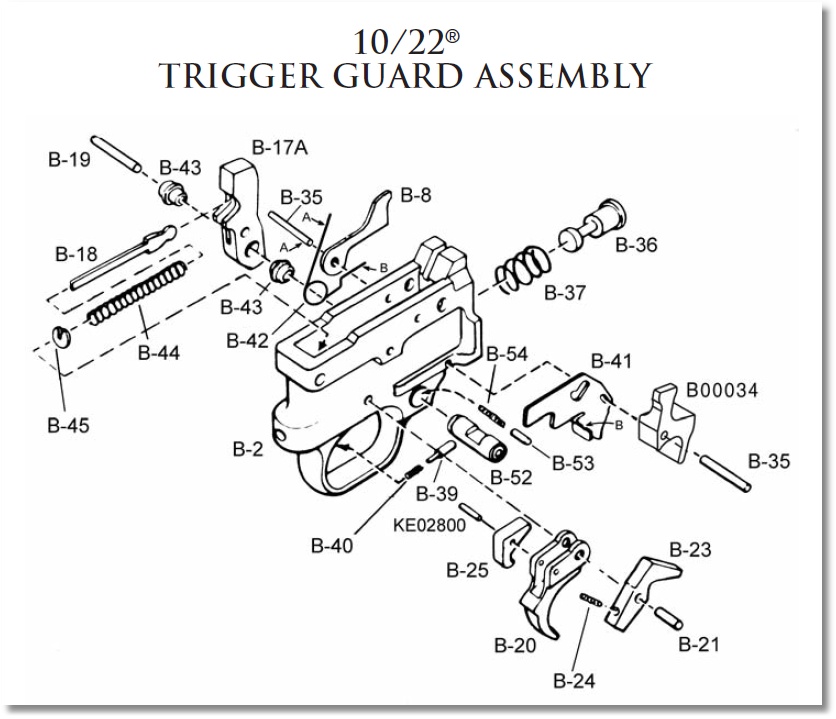
Ruger 10/22 and Charger Trigger Guard IPB
![]()