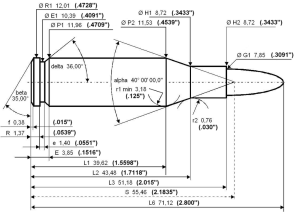
Take a proven cartridge, for example the .308 Winchester (or 7.62×51 NATO) and then stick that cartridge into the chamber of a rifle weighing about 7-pounds dry with a 18” barrel and you have most of the equation for Jeff Cooper’s definition of a “Scout Rifle.” Now, adding that the rifle is to be a bolt-action with a boxed magazine, the definition takes on more character. Lastly, add a forward-mounted optic and the equation is near completion.
When I first started this review, it was hard to come up with things about the Ruger Gunsite Scout (herein referred to as the RGS) rifle that hasn’t been written about, videoed or otherwise discussed in various forums and articles. To tell you the truth, it is still hard to come with something new even with trying to compare the RGS against its competition; and there are many to include factory built and home-built versions. Simply put, I can’t provide a comparison with other “Scout rifles” since I don’t have access to those “other” rifles. What I can do is tell you my honest opinion of the RGS in my usual non-succinct manner.
If you wish to do some reading about those “other” Scout rifles, here is a great link: http://en.wikipedia.org/wiki/Scout_rifle. Feel free to read about them and come back to read what I have to say.
I happened across the opportunity to purchase the Ruger Model 6822 RGS through a trade-in at a local gun shop. I had always been interested in one since they came out in 2011 but, at that time, only a blued; 16” version was all to be had. I liked the “Scout” rifle concept and even built a pseudo scout rifle out of one of my Mosin 91/30 rifles. The overall length of the Mosin “Scout”; however, exceeds the Jeff Cooper limit of 36” because I decided not to shorten the barrel; a decision that I do not regret. When the stainless 18” version of the RGS came out, my interest was again peaked but not enough for me to run right out and get one. Instead, I purchased a Savage 11/111 Trophy Hunter XP hunting package in .308 simply because I did not own a bolt-action rifle and I thought .308 Winchester cartridges was a good place to start. My do-it-all rifle before the Savage was an early (pre-cross bolt safety) Marlin 336 chambered in .30-30. But, let me get back to the here and now.
When you look at the RGS and compare it with other Ruger BA rifles, the RGS just seems like a tactically-modified M77 Hawkeye. You observation would be pretty close because the RGS was based on the Ruger M77 “Hawkeye” platform that features a “Mauser-like” action and is fed from a boxed magazine of 4-rounds; a rifle meant for hunting, obviously. Simply put, the M77 platform was transitioned and re-featured into the RGS with some guidance of the Gunsite Ranch people. Sturm, Ruger and company have always been innovative in their own way and continue to put their twist on things firearm in nature – even if they don’t always agree with the purists of intentions. In the case of the RGS, I am glad that they did stray a bit because I now have their latest rendition of the RGS in .308.
The first thing that I noticed about the RGS was that it is built heavier than what it looks. In the usual Ruger fashion, the RGS is robust in appearance and over-built by the nature of Ruger. Although the rifle only weighs in at 7.10 pounds dry, you would swear that it is heavier. Overall, the RGS is nicely balanced neither feeling barrel nor butt-heavy. By comparison, the SKS weighs 3.85 kg (8 lb 8 oz) dry. With a full compliment of 10-rounds, the RGS still comes up the lighter of the two. As another comparison, the SKS is 40 inches in length; whereas the RGS is 39.50″ – 41.00″ in length depending on what spacers (if any) are used to adjust length-of-pull. Additionally, the SKS is chambered in 7.62×39, which is similar in performance with the .30-30 cartridge. The RGS, on the other hand sends a far more superior round downrange at greater velocities, a much flatter trajectory, and a much greater distance with more energy than the .30-30 or 7.62×39.
Getting past the weight, I am going to move to the muzzle end and work back to the butt of the RGS.
Flash Suppressor:
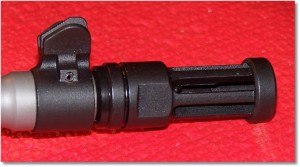
One of the most noticeable things on the RGS is the flash suppressor. Flash suppressors are designed to reduce the muzzle flash from the weapon to preserve the shooter’s night vision, usually by diverting the incandescent gases to the sides, away from the line of sight of the shooter, and to secondarily reduce the flash visible to the enemy. If the operator of the RGS does not want the flash suppressor, it can be removed and replaced with a threaded muzzle protector that is provided with the RGS (stainless steel model only) or, if the operator has the proper authorization, a silencer could be added. For me, the flash suppressor is just fine.
Sights:
Moving rearward slightly, a non-glare and ramped front sight is protected by two “wings”. The ramped front sight is serrated to prevent glare and is black. I may paint the front site my usual “day-glo” orange at a later time, but I have no problems with it as it is (so far).
Riding the Rail:
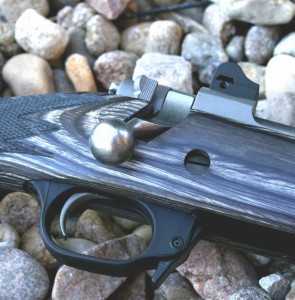
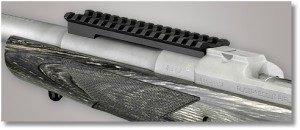
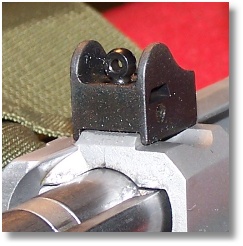
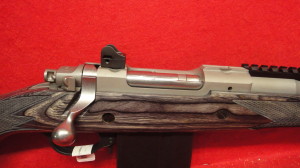
Moving rearward, a Picatinny rail perches atop the graduated 1:10” right-hand twist 18” barrel and provides a mount for a Long Eye Relief optic that Jeff Cooper included in his “Scout Rifle” definition. Ruger went a step further; however, and provides Ruger-patented scope mounts that serves as a resting place for a receiver-mounted scope; a feature, to me at least, takes away from the concept of a “scout” rifle but does allow the operator a choice of scope mountings. Additionally, the rear scope mount allows the use of the provided ghost ring adjustable rear aperture sight. My old eyes welcome this type of sighting system and I’m sure that some young-eyed operators would welcome them as well. The means to allow three types of sighting systems is a big plus to me. I’ll discuss my sighting options later.
The rear ghost-ring site provides immediate target acquisition in a clearly defined field. The rear sight; however, cannot be easily adjusted in the field without the provided 5/64” hex wrench.
For windage adjustments, here is the procedure:
- Loosen the Combination Windage Adjustment and Locking Set Screw (turn it counter-clockwise using a 5/64 hex wrench) on the side that matches the direction of intended aperture travel (right side first to move aperture right, left side first to move aperture left). Full turns are not required and any portion of a turn is acceptable. One complete rotation of the hex screw will move the point of impact approximately 5 inches at 100 yards.
- Tighten the opposite Windage Adjustment and Locking Set Screw. The aperture will be pushed and locked up against the screw that was adjusted in Step
Adjusting for elevation is even more fun:
- Loosen one of the Combination Windage Adjustment and Locking Screws one full turn (either one is fine; however, loosen only one so that the original windage adjustment is maintained).
- Adjust the aperture by rotating it in half turn increments. Rotating the aperture clockwise will move the aperture down (and therefore the point of impact down as well). Rotating the aperture counter-clockwise will move the aperture up (and therefore the point of impact up). Rotating the aperture a single half turn (180 degrees) will move the point of impact approximately 1.25 inches at 100 yards.
- Tighten the Combination Windage Adjustment and Locking Screw that was loosened in Step One. The Aperture will move against the other screw and will be aligned to the half turn position.
If you desire to remove the rear sight (for example, mounting a receiver-mounted scope), the rear sight can be quickly removed through the use of the hex wrench.
Bolt:
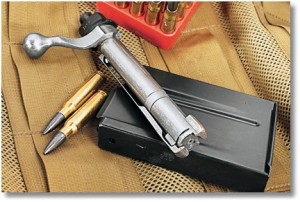
Moving downward we find the excellent bolt-action operating system. With a Mauser-type claw extraction system, the bolt grabs the expended case like your life depends on it – and it may. A fixed ejector helps getting the expended case out of the way – and a fine job it does.
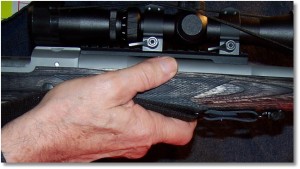
The bolt is robustly built and the operating handle is angled nicely. Although I am a right dominant left-handed long-gun handler, I have no problem working the bolt with my open-hand technique – even with gloves. Here is the way I work. My trigger finger comes off the trigger. My support hand moves from the forearm and the bolt is placed in the web of my thumb and shooting finger with the whole hand moving the bolt upward. All fingers of the bolt hand are pointing upward. Using the web of my bolt hand, the bolt is pushed to the rear until the expended round ejects. The bolt hand changes direction and my thumb pushed the bolt forward chambering the next round. When the round is chambered, the bolt hand rotates forward and the thumb, still in an extended position, pushes the bolt down until it locks into place. The entire hand then slides from the bolt handle and takes up its support position on the forearm. The trigger finger has never moved out of its position alongside the trigger. A simple insertion of the trigger finger of the shooting hand and I’m ready to fire the next chambered round.
To remove the bolt, make the firearm safe (remove magazine and any round that might be in the chamber), push the safety lever to the middle position, slightly lift the bolt release lever that is located on the left side of the receiver, and remove the bolt from the firearm. To install the bolt, lift the bolt lock lever and simply push the bolt into the receiver with the safety lever in the center (middle) position.
Stocking Up:
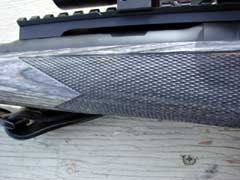
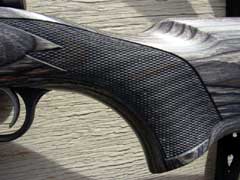
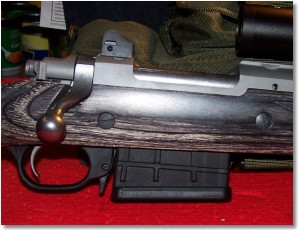
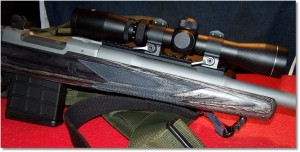
The upper assembly is firmly mounted to an excellent black laminated stock that features some serious checkering in the gripping areas. I have read that checkering is 28:1 but I’ll take that as fact as I am not going to sit down and measure the checkering for want of nothing else to do. The barrel, by the way, is free-floating. The entire upper is very nicely matched to the stock. Although Ruger claims the laminated stock to be black, it seems grayer to my eyes. Hence, the RGS is now named “Gray Boy.”
Safety:
The three-position safety, although positioned on the right side of the bolt, presents no problem to this left-handed shooter. The thumb of the shooting hand can easily run the safety through all three positions without the hand being removed from the stock. I like that feature.
The Belly of the Beast:
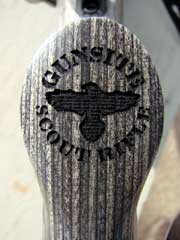
Flipping “Gray Boy” on his back, my eyes immediately notice the Gunsite Scout Rifle and Gunsite logo engraved on the grip cap (and name roll marked on the receiver). Additionally, studs for mounting sling swivels; a glass reinforced nylon trigger guard, and magazine well is part of the undercarriage.
Reading a Magazine:
Just forward of the trigger guard is the magazine release and is very similar in operation to that found on the Ruger 10/22 and other box magazine rifles. Simply push the magazine release forward to release the magazine.
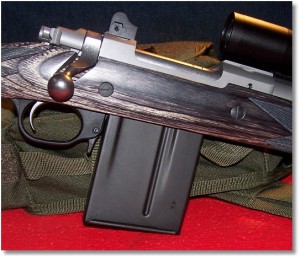
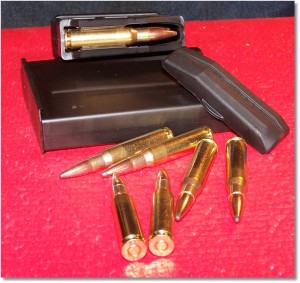
The role of a magazine is simple; make a cartridge readily available to the operator for insertion into the chamber of the firearm. The magazine the ships with the rifle has been the subject of much criticism from gun writers and users alike. The RGS ships with one 10-round, single-stack parkerized steel magazine with the rifle. The magazine would look right at home in a M14 or M1A1 rifle. In the RGS; however, not so much. Utility role aside, the magazine is just plain ugly when mounted in the rifle. It does; however, serve its intended purpose, and reliably so. The provided 10-round parkerized steel magazine, locks up tight, works well, and fits loose in the magazine well, which leads to a lot of rattling. The magazine uses, what looks like, a plastic magazine follower. I will have to say that it is a well-made magazine
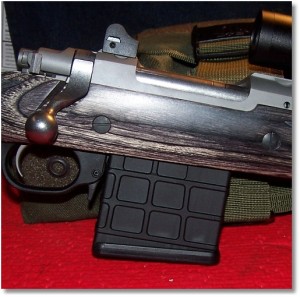
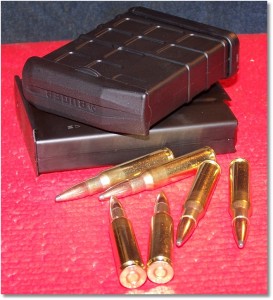
Ruger; however, has made available 3-round, 5-round, and 10-round glass-reinforced nylon polymer magazines that are available through Ruger or other outlets. I highly recommend the polymer magazines for several reasons; cost first and foremost (the 10-round parkerized steel magazine is nearly $80 through the Ruger website, but can be found for less elsewhere), a muffled rattle if any, they work, they are aesthetically pleasing, and they are resistant to the elements, corrosion and most solvents.
The 10-round parkerized steel magazine is 4.880” at its highest point; whereas, the polymer magazine is 4.045 at its highest point. That’s a reduction of 0.835” – greater than three-quarters of an inch in height!
The 10-round polymer magazine fits nicely in the magazine well and locks up without question. They are somewhat loose but they do not rattle like the steel magazine. The steel and polymer magazines have a removable floor plate for cleaning the innards. In the polymer magazines, a polymer magazine follower insure proper alignment of the rounds and a magazine spring provides enough tension to hold the round against the feed lips of the magazine. The feed lips are not reinforced; however, which perhaps removes the possibility of keeping full magazines if the feed lips are prone to deforming. Steel-reinforced feed lips would be desirable. However, of the eight 10-round and two 5-round magazines that I have, none have exhibited failures of any kind. How well the polymer magazines will hold up over time and use? Well, only time and use will tell.
Additionally, the polymer magazine comes with a top cover that helps to keep dirt and debris out of the magazine – whether the magazine is filled to capacity or not. Even with a fully-loaded magazine, the top covers are easily installed and removed.
Personally, I like the 5-round magazines for range use. Besides, it is a psychological thing; I feel better knowing that I have loaded four 5-round magazines with a single box of (20) rounds rather than just two magazines from the same box of 20.
The magazines are easily loaded from the front once you figure out the correct method. To load the magazine, align each cartridge with the bullet forward, press the magazine follower, or the last cartridge loaded, as you insert a cartridge from the front and slide it back to the rear of the magazine. No special loading tools are required.
To install the magazine into the rifle:
- Hold the magazine at an angle and insert all the way up into the magazine well.
- Pull the bottom of the magazine toward the trigger guard until the magazine latch at the rear of the magazine well engages. Check to be sure that the magazine is securely latched into place by pulling down on the magazine.
To remove the magazine, push and hold the magazine latch forward as you pull the magazine out of the magazine well. To minimize the possibility of damage and malfunctions, do not let the magazine drop to the ground.
Supposedly, you can load the polymer magazines from the top. I tried and was unsuccessful simply because I did not want to put strain on the feed lips. I suppose that it could be done with some force, but I choose not to and prefer to load the magazine from the front, as intended by the magazine’s design. Loading from the top could possibly damage the feed lips since they are not steel reinforced.
External ribbing reinforces the polymer magazines and provide a better purchase on the magazine for removal from the magazine well. They also look more pleasing than the provided 10-round parkerized steel magazine; the magazines look like they are part of the rifle and blend in well with the rifle’s lines.
To me, the magazine is a weak link in the rifle – any rifle that uses one. Whether it is a tube magazine, box magazine, fixed magazine, or fixed magazine with droppable floor plate, the magazine must always function flawlessly. Ruger has provided a reliable magazine for the RGS in keeping with Jeff Cooper’s vision of the scout rifle and Cooper never stated that the magazine should look pretty.
Trigger:
The trigger itself, well, standard factory trigger/sear engagement is about .035-.045. The RGS incorporates the LC6 trigger mechanism. Ruger states the trigger pull at about 5 pounds. The trigger pull on this RGS is about 3.5 pounds according to my Lyman trigger-pull gage. The trigger pull is smooth and exhibits a crisp let-off with a mild after-travel. All in all, I am satisfied with it. The trigger will, no doubt, smooth out after it is worked for a while. The RGS is, after all, not a target rifle but it is better than any of my Glock triggers and any found in my Springfield pistols. I can live with that. There are; however, plenty of kits, springs, and replacement triggers if one feels to need to modify an already acceptable trigger.
Getting Spacey:
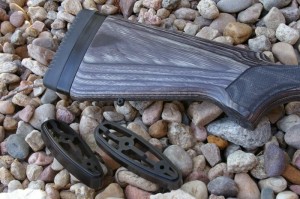
Butt wait! Ruger has seemed fit to accommodate shooters of various arm lengths. Included with the rifle are three 1/2 – inch spacers that can be used to adjust the length of pull from 12.75″ – 14.25″ by simply removing two Allen-head screws with the provided Allen wrench, removing or adding spacers until the desired LOP is attained, and then re-installing the screws. The butt pad itself is soft and does well handling the recoil of the .308 Winchester. I will add here that although I could have installed all of the spacers to fit my desired 14.25” LOP, I opted not to. See, My Add-ons.
My add-ons:
Optics:
Although I wanted to run right out and shoot the RGS, I fought the urge and decided to start equipping the RGS the way that I wanted at least for evaluation purposes.
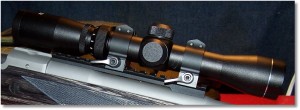
First thing was optics. I ordered a Nikon Force XR 2.5-8×28 EER Matte with BDC, but decided to try a less inexpensive AIM Sports 2-7×32 Dual-Illuminated Pistol/Scout Scope first. I have this scope on a Mosin Nagant that is set up with a forward-mounted configuration. It has held up to about 200 rounds of 7.62x54R so I ordered a second one for the RGS. I like the scout scope configuration simply because I don’t like a scope close to my face as with rear-mounted scopes. Eye relief with the AIM Sports 2-7×32 Dual-Illuminated Pistol/Scout Scope is 8” to 10”. Only time and use will tell.
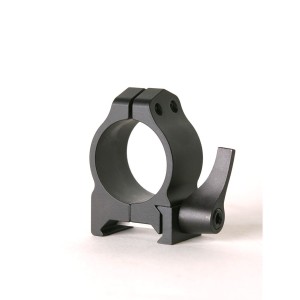
I wanted to be able to quickly detach the scope from the Picatinny rail and a set of Warne Maxima Series Steel Rings (URL) was quickly set up. I wanted to keep the scope as low to the bore axis as possible yet still be able to keep the rear sight. The low height of the Warne rings is perfect. A couple of turns of the tightening levers, the scope is in my hands, and the fixed sights are always ready. The scope adds 13.6 ounces to the weight of the gun
I’m also experimenting with the UTG DS3068 6.4-Inch ITA Red/Green Dot Sight with Integral QD Mount and Flip-open Lens Caps. I have this unit on the Windham Weaponry SRC and it has worked well. I would like to be able to use a unit like this for up to 100-yards and closer and switch to a more powerful scope (like the Nikon) to reach out further. It is all an experiment.
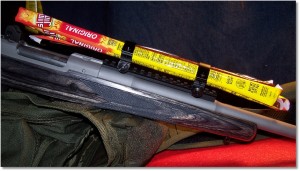
Slim Jims with Minute Of Mouth Accuracy! 1″ Scope Rings Holds 4 Slim Jims in a Convenient Off-Scouting Snack Arrangement
As a note, if you have a spare set of quick-detachable 1″ scope rings lying around, why not put them to use? During those “Off-Scouting” moments, use a spare set of rings to hold 4 of your favorite Slim Jim Snacks in an easy-reached arrangement. Accuracy is Minute-Of-Mouth. If you have to use those pesky fixed sights, or need to quickly mount an EER scope, simply detach the Slim Jim mounts and you are on your way! Patent is not pending nor considered.
Adjusting for LOP:
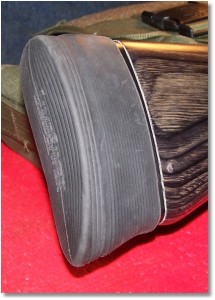
Limbsaver Slip-on Recoil Pad. Quick Adjustment for LOP According to Clothing + Additional recoil Management
Rather than use the Ruger provided spacers for LOP, I used the Limbsaver large slip-on recoil pad to slide over the existing butt pad and spacer. The Limbsaver provides an extra layer of recoil cushioning and, if I am wearing heavy clothing like a thick outdoor coat and inner vest, I can slip the Limbsaver off quickly without having to dissemble the butt of the firearm and the extra bulk of the coat and vest provides enough LOP. If I remove the heavy winter coat, I can simply slide the Limbsaver back on the rifle. With the Limbsaver installed, the LOP is at a perfect 14.25” for me. I won’t complain about the additional recoil protection.
Sling:
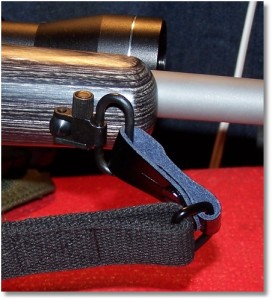
Jeff Cooper’s vision of the Scout Rifle was one that was carried in the “Port-Arms” position. Cooper advocated the use of a sling as a shooting aid and preferred the “Ching Sling” or “CW” sling. I opted for a simple two-point sling that I have on several shotguns and it works perfect for the RGS – a sling intended for the SKS.
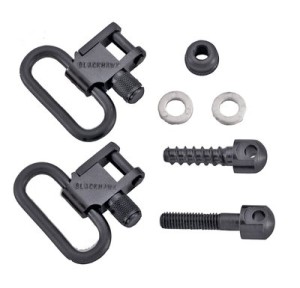
NcStar makes a nice unit in black with black leather “leaders” that strap to quick-detach swivels from Blackhawk Tactical. It not only fits the RGS nicely and accents the RGS’s lines, but it is very functional for my needs.
I would like to stray from the review for just a moment.
Of the different types of slings, the simple two-point, single-strap sling with quick-attachment fittings does the trick in most cases. For me, the adjustment buckle is positioned to the butt of the firearm, which leaves an unobstructed sling surface for what work is needed at the forearm area – providing a stable shooting platform.
If I am simply shooting offhand, and don’t feel that I need the sing for extra stabilization, I simply let the sling hang.
Again, I am a right-dominant left-handed long-gun operator but the technique that I use when using a two-point, single-strap sling is applicable to right-handed long gun operators; the support arm is mirrored.
Note: If you have a sling that has a pad for carrying, the technique will still work. If I have a sling with a moveable carrying pad, I like to move the pad to the rear by the buckle where it is mostly out of the way while using the sling for support.
Rather than just allow the sling to rest on the outside of my hand, I use the sling to regulate the amount of tension that I desire.
With the rifle shouldered and with the sling initially adjusted, I insert the right arm inside the sling until the sling rest against the upper arm. The right arm then is moved outward in a slight swooping action. Coming inward from the outside of the sling, the sling is placed in the palm of the support hand. The support hand then moves to the forearm with the sling placed in the palm of the hand. I judge the tension on the sling and re-adjust the sling length until I feel that the tension is as close as I want it. If I need more tension on the sling, I move my hand rearward and my elbow outward while allowing the sling to slide in the palm of my hand. To release some tension, I simply move my hand forward on the forearm of the stock. As I shift my support hand position, the elbow of the support arm moves in and out accordingly.
I have tried the technique using a quick-adjust two-point sling and found that I was either allowing too much slack or not enough slack when I was moving into the firing position to make the sling work as I wanted it; thus the reason for a simple two-point sling. I set it and forget it.
To work the bolt, I release the support hand from the rifle’s forearm and release the sling from the palm of my hand. The sling remains across my forearm and upper arm. I can then operate the bolt using my open-handed technique. After the bolt locks into place, the support hand goes forward just in front of the rifle’s forearm. I once again place the sling in the palm of my hand and move the hand rearward until the proper tension is felt.
Now, back to the regularly scheduled program.
Storage, Transport, and Support:
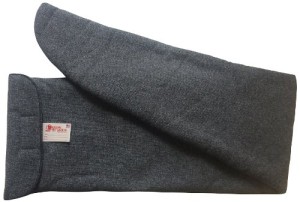
The Bore Stores SRC-1 Silicone Treated Gun Storage Case is Perfect for Protecting the Rifle During Storage
A Bore Stores SRC-1 Silicone Treated Gun Storage Case protects the rifle when in the safe. I used to use silicone treated gun sock, but they have been cut up and are now used as silicon-treated wipes. The Bore Store provides padding and protection of valuable firearms – and some not so valuable.
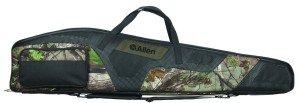
The Allen Company Badlands Hybrid Case for Scoped Guns Oversized Fits Rifles with Bi-Pods is used to transport the rifle to and from – wherever.
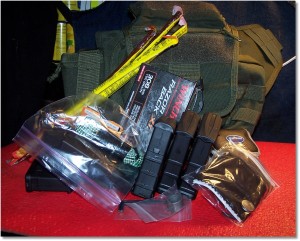
The .308 Support Operators Bag provides all the items necessary to support the RGS. “A roomy main drawstring-closed compartment provides generous and secure storage space for your gear in this multi-functional Tactical Messenger. With a front pocket for quick access, an interior pocket for convenient, separated storage, and a concealed back pocket with zipper closure to protect your most essential small firearms or accessories, this is the only bag you need. It also has a fully adjustable, padded and ergonomic shoulder strap for comfortable carrying.” There is room for a fully functional Ruger SR1911 w/spare magazines and canned sardines. I wanted to add a Velcro patch to the outside flap, but it would have added to much weight :>).
Some items, like selected spare parts are not shown (ordered but have not arrived).
Part I Wrap Up:
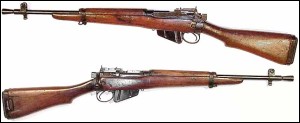
The RGS Looks Similar to the Lee- Enfield MK 5 “Jungle Carbine – Note Front Sight and Flash Suppressor
Well, there you have the basics. I think that Sturm, Ruger & Co. did a good job in keeping with Jeff Cooper’s vision of a “Scout Rifle” while keeping the cost affordable to most folks like myself. It won’t wear an old man like me down while handling the darn thing and unlike some of those “delicate” hunting rifles in like caliber, the RGS screams “utility” like a MAC truck.
When I first saw the RGS I, like some others, thought that it slightly resembled the old Lee-Enfield No. 5 Mk 1 “Jungle Carbine” albeit a more modern version and slightly heavier (unloaded , the Lee-Enfield No. 5 Mk 1 “Jungle Carbine” was about 6.8 pounds vs. 7.10 pounds for the RGS).
However, the RGS fires the .308/7.62x51mm NATO cartridge; a more powerful round that the .303 British, or 7.7×56mmR
.308 @175 gr (11 g) BTHP, 2,645 ft/s (806 m/s), 2,720 ft•lbf (3,690 J)
vs.
.303 British @ 174 gr (11 g) HPBT, 761 m/s (2,500 ft/s), 3,265 J (2,408 ft•lbf)
In Part II, I will be taking it to a new indoor range where I can see what “Gray Boy” is going to do at 100 yards.
Go to Scouting Around – Part II (Ruger Gunsite Scout Continued – Finally!): https://guntoters.com/blog/2016/08/15/scouting-around-part-ii/
Some Resources:
- Allen Company Badlands Hybrid Case for Scoped Guns Oversized Fits Rifles with Bi-Pods – http://www.amazon.com/Allen-Company-Badlands-Oversized-Bi-Pods/dp/B004NFRMXG/ref=pd_sim_sg_1?ie=UTF8&refRID=0H8Q8B3DJFFJGWK1PTF6
- UTG Multi-functional Tactical Messenger Bag – http://www.amazon.com/dp/B002BJBIT0/ref=twister_B002TUSSY4?_encoding=UTF8&psc=1
- Aim Sports 2-7X32 Dual III. Long Eye Relief Scope with Rings – http://www.amazon.com/gp/product/B003BRB1PM/ref=oh_aui_detailpage_o01_s00?ie=UTF8&psc=1
- Warne Scope Mounts Low Matte Quick Detach Rings (1-Inch) – http://www.amazon.com/gp/product/B0002MJZ2A/ref=oh_aui_detailpage_o01_s00?ie=UTF8&psc=1
- Blackhawk 1″ Swivel Hardware (for use with Bolt-Action Rifles)- Wal-Mart
- NcStar AAKSB Ak/sks Sling – Black (NcStar AAKSB) – http://www.amazon.com/gp/product/B00MASAYZ6/ref=oh_aui_detailpage_o02_s00?ie=UTF8&psc=1
- Ruger Magazine Ruger Gunsite Scout 308 Winchester Polymer Black – http://www.midwayusa.com/product/1366829505/ruger-magazine-ruger-gunsite-scout-308-winchester-polymer-black
- UTG DS3068 6.4-Inch ITA Red/Green Dot Sight with Integral QD Mount and Flip-open Lens Caps (not shown) – http://www.amazon.com/gp/product/B004HIFS8A/ref=oh_aui_detailpage_o00_s00?ie=UTF8&psc=1
![]()





2 Responses to Scouting Around – Part I (Ruger Gunsite Scout Model 6822)