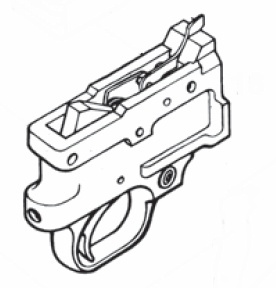
 Having performed several standard 10/22 trigger conversions to Volquartsen Match Hammer and Sear units, I was still not satisfied with the results. Granted that the trigger pull weight was tremendously reduced by using the Volquartsen Match Hammer and Sear units, there was still an issue of “side play” within the hammer, trigger, and trigger/sear assembly within the trigger housing.
I am not a gunsmith nor have a played one at any time, but excessive play in a trigger assembly is not a good thing. You want all of the parts to engage and disengage smoothly, cleanly, and evenly. The standard 10/22 trigger lacks in all respects, but all can be fixed. All of the 10/22 trigger units that I have upgraded, thus far, with Volquartsen components are good triggers in my book. But, I wanted a trigger that was just more than just a “good” trigger; I wanted one that was “exceptionally good!” I needed to learn a little more about triggers in general and the 10/22 trigger in particular.
When you pull any trigger to the rear, the trigger should pull to the rear evenly and should have very little side-to-side free play or other “angular” play. The trigger finger does not always engage the face of the trigger evenly. The result is that the trigger may deviate from a “straight-back” motion. This deviation from center can cause uneven wear on things like the hammer engagement with the sear and disconnect engagement with the trigger. Too much free play could also cause drag in the trigger – something of which that the standard 10/22 trigger has plenty. One obvious solution is to prevent the side-to-side play of the trigger and hammer components with shims.
THE PRODUCT:
 A search on the internet led me to a source of shims for the 10/22 trigger, Michigan Center Outdoors and TriggerShims.Com, whose owner suffered from the 10/22 trigger like many of us. In his case; however, he was able to do something about it and offers his solution to all Ruger 10/22 owners in the form of shim packs and pins.
Our 10/22 Gun Shims and 10/22 TriggerShims Brand Kits are Custom Made here in Michigan Center, Michigan out of Alloy 302 Stainless Steel manufactured in the U.S.A.
Our Ruger 10/22 Trigger Shim Kits will remove side play found in stock and custom trigger assemblies, will stop the trigger from rubbing the trigger housing and smooth the trigger pull, correctly centering the Hammer, Disconnector, Sear and Trigger, possibly improving accuracy.
All of our Stainless Shim Kits can be ordered for both the Original 10 22 Metal Trigger Housing and the New 10 22 Plastic Trigger Housing Assembly with one piece Hammer/Bushing set.
Your Satisfaction is Guaranteed 100%
Source: Michigan Center Outdoors and TriggerShims.Com
I had recently ordered a Volquartsen Match Hammer and Sear for a 10/22 trigger build that I was planning and decided to take a chance on the 8 PIECE STAINLESS STEEL STANDARD SHIM KIT that was on sale for $12.00 and free shipping.
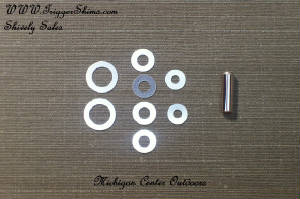
The Stainless Steel Ruger 10/22 Trigger Shim Kit includes 8 Stainless Shims and consists of the following:
- Shim #1 are 10/22 Hammer Bushing Shims, 2 each in .005″ thickness.
- Shim #2 are 10/22 Trigger and Sear Shims, 4 each in .005″ thickness.
- Shim #3 are 10/22 Disconnector Shims, 2 each in .005″ thickness.
- “Cheater Pin” included to aid installation.
The “Cheater Pin” is used to hold the trigger, sear, and disconnector in place during installation into the trigger guard.
THE BUILD:

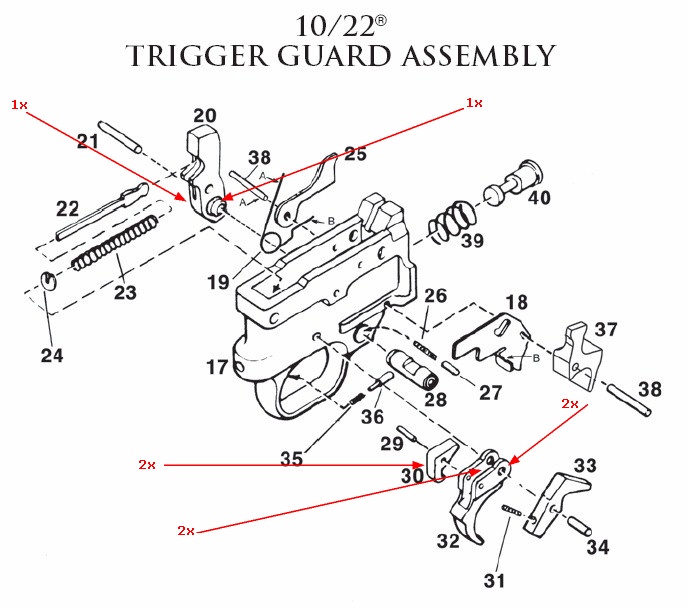
Shim Points (Red) for the Ruger 10/22 Trigger
Although I knew how to install the Volquartsen Match Hammer and Sear, installing the shims correctly was another matter. Michigan Center Outdoors and TriggerShims.Com provides a great assembly video and with one viewing I knew how to proceed. But first, I had one problem to overcome.
The standard Ruger Hammer Pin was too large for the bushings that came with the Volquartsen target Hammer, but would push easily through the Trigger Guard. The Hammer Pin should simply push through the bushings easily; the hammer and Hammer Bushings should rotate on the Hammer Pin freely. Luckily, I had several standard 10/22 trigger units as spares. I found a hammer pin that would allow the Hammer to properly pivot on the Hammer Pin and also rotate properly within the hammer bushings. Now, there might have not been an issue with a tight bushing-to-pin fit, as it is the hammer that rotates around the hammer pin, but I wanted to make sure that no issues were present. Also, when you install the shims, a pin that can freely move without the help of a pin punch makes assembly so much easier. I was good to go, at this point.
First up was installing the sear to the disconnector in the trigger. With the aid of the “Cheater Pin” assembly is quite quick. The proper shims were mated to their applicable assembles, and if there was any lateral free play, it was not detectable. The trigger was then installed into the trigger housing, the trigger pin pushed the “Cheater Pin” out like it was supposed to, and then the appropriate shims installed. The result was a trigger assembly with no detectable side-to-side free play. I liked things very well at that point. On to the Hammer!
Using the bushings and shims provided by Volquartsen, the Hammer was soon in place. Backing out the Hammer pin just a tad on each side allowed the installation of the two, 0.005: thickness Hammer Bushing Shims. The result was a very smooth hammer rotation with absolutely no detectable side-to side play. The hammer would release from the sear evenly and also strike the firing pin evenly. It does not get any better than that. The Hammer Spring and Hammer Strut was installed and I liked what I felt when releasing the trigger with the hammer in the cocked position, but the final tally would not be taken until the entire trigger unit was assembled.
Note; however, that standard Ruger springs were used. The Standard Ruger springs, hammer and trigger reset, have proven to be reliable and I felt no reason to change that.
Finishing up the build was the installation of the Volquartsen Automatic Bolt Release and a Tactical Solutions Extended Magazine Release; both are prime upgrades to the 10/22 trigger in my opinion.
When I started this build, the standard 10/22 trigger pull was over six pounds and heading toward seven pounds. The resultant trigger pull weight after the build was 2.24 pounds average with the unit out of the rifle. In the rifle, the trigger pull weight will actually feel lighter simply due to better leverage against the trigger.
Through the use of shims, I have been able to remove as much “play” in the trigger as I possibly could; thereby, enhance reliability. There should be no friction by the hammer or trigger components against the trigger housing, but on that same token the trigger does need some degree of looseness.
SUMMARY:
Without the 8 PIECE STAINLESS STEEL STANDARD SHIM KIT, I would have had a nice trigger for a Ruger 10/22 or Ruger Charger. With the 8 PIECE STAINLESS STEEL STANDARD SHIM KIT; however, the resultant trigger is much smoother and seems to be more precise in its operation.
Once again, it comes down to cost vs. benefit. It also comes down to how well you like a good trigger.
The following is a breakdown of cost for this build:
- Trigger Guard Assembly: No cost, as this was part of an existing rifle
- Volquartsen Match Hammer and Sear: $70
- 8 PIECE STAINLESS STEEL STANDARD SHIM KIT: $12
The basic build cost roughly $82 and free labor (mine).
The cost is a little higher than what it cost for the Ruger BX-Trigger (depending on where you buy one), and much less than Volquartsen, Timney, or Kidd triggers (See my article: The Ruger 10/22 Trigger: To Replace, Modify, or No to Both?: https://guntoters.com/blog/2017/01/05/the-ruger-1022-trigger-to-replace-modify-or-not-to-both/)
My additional, optional upgrades:
- Extended magazine Release: $28
- Volquartsen Automatic Bolt release; $11.50
Total cost was $128.50. The cost of being able to do it myself and come up with a 2.24 pound trigger – priceless.
RESOURCES:
- Michigan Center Outdoors and TriggerShims.Com: http://triggershims.com/shim_kit.html
- Ruger 10/22 Trigger Shim Kit Installation Instructions: https://www.youtube.com/watch?v=ttbRemJvcMk
- Ruger 10/22 Volquartsen Target Hammer and Shim Kit Installation: https://www.youtube.com/watch?v=OLrqrQ1-ta0
![]()

