—by M1911A1—
Pistol shooting isn’t easy to learn, and it’s hard to do. If you just “have at it,” and go it alone, you will most likely end up frustrating yourself and learning nothing useful. In order to be successful, you need to make a plan, and then you need to follow it. So here is a plan that will do the job, and some information about what you need to learn while following it.
The very first principle that you need to understand is that trying to be a “fast gun” right from the beginning just doesn’t work. When you try to shoot quickly, which will always be more quickly than your skill level will permit, you will miss with most of your shots. You will also be teaching yourself bad habits which will only keep your string of misses going strong. If you want to be successful at self-defense shooting, you will have to learn to be accurate, not fast. A slow hit beats a fast miss, every time. And only good, solid hits stop fights.
Learning to shoot a pistol accurately and well, which is the path toward quick, life-saving self-defense, requires commitment on your part. The first commitment you have to make, in your learning plan, is that you will practice to build, and then to maintain, your pistol-shooting skill. The time involved isn’t much, but it absolutely has to be done each and every day. I suggest that you set aside 10 minutes a day for pistol practice, and that this 10 minutes of practice takes place at about the same time each day. If it is already fitted into your daily schedule, it’s more likely that you’ll do it.
This daily pistol practice won’t be inconvenient, because it will be done with an empty, unloaded gun, right in the privacy of your own home. And it really takes only about 10 minutes. In fact, if you practice much longer than that, maybe 15 minutes or so, you will get tired, and your tiredness will promote sloppiness and make you develop bad shooting habits. (It is possible, of course, to do more than one 10-minute practice session in one day. Just space ‘em a couple of hours apart, and don’t tire yourself.)
Now that you’re committed to a practice regimen, I suggest that the next step in your plan should be to choose a shooting style. It really doesn’t matter which style you choose, but only that you stick to it until you’re good at it. Once you’ve become a good shot, you can experiment with other styles, and you might even want to change yours. But until that time, I suggest that you decide to use one of the two shooting styles that I believe are the easiest to learn. They are called “isosceles” and “modified Weaver.”
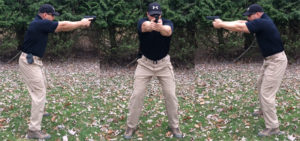
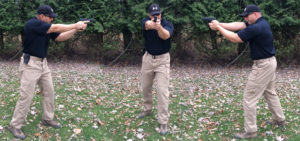
Here are some pictures, so you can see what these two styles look like. When you choose the one that you’re going to practice, try to copy the exact position that’s shown here. Don’t make changes now; instead, wait until later, when you’ve gained some experience.

The Isosceles Stance

Here you can see why it’s called the “isosceles stance.” The shooter’s arms form an isosceles triangle.
Generally speaking, the “isosceles” position is the easier one to learn and to get into, and is, perhaps, the quicker one in actual defensive use. However, it doesn’t promote accurate shooting as well as does the “modified Weaver” position, which, if you practice it as much as you should, is quite fast enough.
In the “isosceles,” both of your elbows are straight and both of your knees are bent, but neither arms nor legs are slack or relaxed. Maybe think of all of those joints as flexible, but very firm. Your flexed arms and legs absorb recoil, and their springy firmness brings your pistol back into shooting position very quickly.

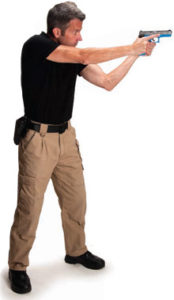
The “Modified Weaver” Stance

Note that in this example, the shooter’s legs are straighter, and his weaker-side elbow is more sharply bent downward.
In the “Weaver,” assuming that you’re right-handed, your right arm is locked and stiff, and is pushing your pistol away from you. Your left arm is bent, with its elbow pointing straight down (rather than out to the side), and is pulling your pistol strongly toward you. These opposing forces exert strong control over recoil, and they almost turn your upper body into a sort of “mini-rifle,” of which your pistol is merely the barrel.
Choose a position, and practice getting into it. Remember: Don’t try to go fast, but rather try for slow smoothness. Practicing slowly to become smooth is the best way to learn to be quick. A wise man (and really good defensive-pistol shooter) once said: “Smooth is faster than fast.” Speed is accompanied by errors and sloppiness, while smoothness is error-free in a contest in which the first effective hit wins.
Start by making sure that your pistol is completely unloaded, and that there is absolutely no ammunition anywhere in the room with you. Now, face a blank wall.

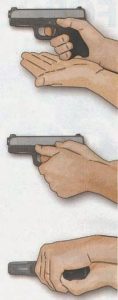
Establishing a Firm, Two-Hand Grip
(note the positions of the thumbs)
Hold your gun in the two-hand grip most appropriate to the foot position you’ve chosen (as shown in the pictures). Your stronger hand should grasp the pistol, while your less-strong hand wraps around your stronger one, and lends support. You should begin the process from a relaxed position, holding your weapon at about waist level, its muzzle pointed about 45° away from your body.
Look directly at any blank place on the wall, and don’t move your eyes. First move your feet into the chosen position, paying close attention to getting it right. Then your hands can bring the pistol up, both hands tightening their grasp until you’re holding the gun as tightly as possible, until the pistol is at eye level and aligned with your stronger eye. The trick is to bring the gun’s sights, already aligned, up to where your eye is looking. It isn’t easy, and it will require lots of failed attempts before you get it right.
When you begin to have success in doing all of these things in sequence (that is, after about a week of practice), begin the attempt to do all of them at the same time. Stare at the wall, and then move your feet and the pistol all at the same time, and end up with everything in the right place, and your pistol’s sights aligned with your eye and where it has been looking all along. On your pistol’s way up, press your gun’s safety lever (if it has one) down to its “off” position, and hold it there. Learning to smoothly do all of that will take at least another week. Maybe more.
Now add-in the trigger press. First find some way of cocking the weapon, even racking its slide if that’s necessary, before you begin to move. Start from your relaxed position. When the gun is aligned with your eye, and its safety is off, smoothly press its trigger, maintaining its sight alignment and its alignment with your eye. When the gun goes “click,” maintain your hold and your position for a couple of seconds. This is called “follow through,” and it’s a necessity if you want to shoot with useful accuracy. All of this preliminary practice should take at least three weeks of 10-minute daily increments. Don’t rush it. Take longer, if you need to. Get it right.
Now you’re ready to actually fire a few real shots. The best place to do this is as far from any shooting range or building as you can get. That’s because no self-respecting shooting range will permit you to do the very-close-range shooting required by the next few steps of your learning process. And you don’t need a holster. Not yet.
Find a place where your bullets will be absorbed by dirt (not rock), place a two-feet-by-three-feet piece of cardboard upright against a dirt bank or hillside, and step back from it. Go back three long strides, which will measure about nine feet. Face the cardboard. Put on eye and ear protection. Now you can load your pistol, rack its slide to chamber a round, and set its safety (if it has one).
Now do your practice exercise, just as if the pistol were empty. After you hear the “BANG!” and after you have maintained your position for your follow-through, look at the piece of cardboard from where you’re standing. Is the hole just about where you were looking? (If it isn’t, you need more trigger-press and follow-through exercise at home.) Now fire another shot, just as if you were practicing, but this time keep your eyes riveted on that first hole that you just made. See if the second hole appears in about the same place.
The point of this exercise is to keep all of your new holes clustered around that very first hole. If they aren’t, experiment with adjusting your technique until they are. Now go home and do more dry-fire practice against that blank wall, incorporating what you learned from your first try at shooting.
In about a week, go back to your shooting place, and try the whole thing again. This time, bring some masking tape, to tape over the holes you’ll be making so you can tell which set of holes is which. By now, your holes should be all clustered pretty closely around your first hole. If that’s true, then tape over all of your holes and move back until you are shooting from five long strides (15 feet) away. Shoot five shots, staring at the first hole you make. Can you still make a small cluster of holes?
Do whatever you need to do, to modify your technique to improve the closeness of the holes to one-another. Dry-fire practice for another week. Then shoot from five strides away and, if you can form a pretty close cluster of holes, move back two more strides (to 21 feet) and try again. Shoot, dry fire for a week, and then shoot some more. At each distance, when you can make a small cluster, move back a couple of paces further and start again. Keep at it.
Now you know what you are doing. You have a plan, and you’re following it. Always practice to be smooth, not fast. If you learn to be smooth and accurate, speed will come to you automatically. Keep practicing. In fact, never stop practicing, ever. Ten minutes a day. Always. That’s what the experts do, and, if you keep at it, you will become an expert too.
![]()


2 Responses to Your First Steps… ...Into Self-Defense Pistol Shooting