Sometimes I take the opportunity to do follow-on articles, and this would be one of them. I ask myself, as anyone would when contemplating a new product; does the product really work? In some cases a product looks pretty but does not work while in others they work but look ugly. I have to say that this product not only looks good, but works as good as it looks.
Let’s get to the article.
So you want to DIY-it and mount a scope on a rifle, shotgun, or even a handgun. The Wheeler Level-Level-Level system just won’t cut it, because you do not have enough space between the desired scope and the scope base to place a level, which occurs a lot with low-mount scope rings and even with some medium-height scope rings. Not to worry if you have the Wheeler Professional Reticle Leveling System.Assuming that you already have a dovetail (Redfield) scope base, a Weaver scope base, or Picatinny rail mounted to your rifle’s receiver, the Wheeler Professional Reticle Leveling System allows you to level the long gun prior to mounting the scope.
Place the bubble level across the scope base and level and lock the firearm in a good rifle rest. The Reference Level has a magnetized base.Once you have achieved level, attach the barrel level to the barrel and adjust the barrel level to the base level; co-witness the levels. Once the barrel level is co-witnessed to the base level, remove the base level and loosely attach the scope rings and scope of your desire. Then, place the base level atop the elevation turret of the scope. (In most cases, the turret cover will be flat. In cases where the turret cover is not flat, remove the cover and place the level atop the turret.)
Level the scope according to the turret level (that is now co-witnessed with the barrel level) and the barrel level. Tighten according to torque specifications and you now should have a scope that is level with the firearm. At this point, you should be ready to bore sight the scope.
At times, I will be using both the Wheeler Level-Level-Level system and the Wheeler Professional Reticle Leveling System to mount a scope.
I had borrowed a friend’s Wheeler Professional Reticle Leveling System to mount a scope on a Ruger M77/357 and the time it saved when mounting the scope made this tool a necessity to have available in the tool box whenever I want to add a scope to a firearm or swap out a scope with another firearm. I ordered a Wheeler Professional Reticle Leveling System for myself, because my friend wants his back and I did not want to give it up before I received mine.
What’s in the Package?
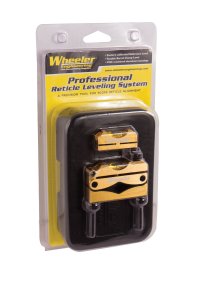
So what do you get for your money? Once you open the plastic you will have a CNC machined leveling system (a Reference Level and the Barrel Clamp Level), a nice storage box for the two components, and a set of directions.
A Word (or more) Before We Begin:
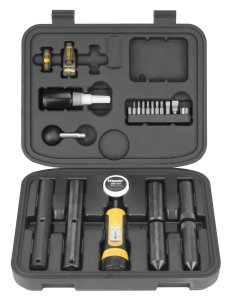
Sometimes things just get skewed up when attempting to mount a scope to a firearm. In some cases the scope rings may need alignment and lapping. To determine if this is the case, you may want to try your hand mounting the scope with the Wheeler 540-127 Scope Mounting Kit with storage case before you get to the leveling part that follows.
With this project, I found that I neither had to align nor lap the Warne rings.
The Test Bed:
I wanted to test the Wheeler Professional Reticle Leveling System on a rifle other than the Ruger M77/357 and decided to remove the scope that I had previously mounted on a Ruger American in .223 caliber while trying to use the Wheeler Level-Level-Level system.
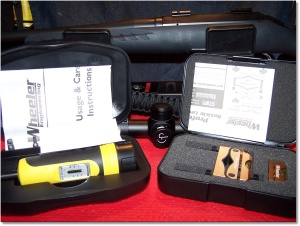
The Kit and Caboodle! Rifle, Scope, Wheeler F.A.T Wrench, and Wheeler Professional Reticle Leveling System
Onto the Leveling!
I removed the scope from the Ruger American while trying to keep my original setting for eye relief. The Warne rings are tightened from the side rather than from the top. Since the Warne scope rings were permanent mount rings, everything had to be loosened to allow the scope to rotate within the rings with slight resistance.
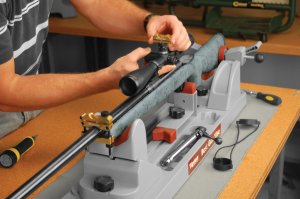
Using my cheap Winchester Sight Vice, I placed the rifle into the slots and the small bubble level (the Reference level) from the Wheeler Professional Reticle Leveling System onto the front scope base. Then, I rotated the rifle within the sight vice until the Reference Level was, well, level. I tightened the site vice while monitoring the Reference level until I was satisfied that the rifle would not rotate.While keeping the reference level where I could watch it, I placed the Barrel Clamp Level around the barrel as close to the stock as I could get it.
Prior to this, there was one adjustment that I had to make (according to the manufacturer) By turning the adjustment knob on the Barrel Clamp Level, I had to set the upper level section so that it was approximately parallel with the lower half of the upper clamp. This ensured me that I would have enough of an adjustment range to work with. (Note that the Barrel Clamp Level is padded to prevent damage to the rife barrel.)
While watching the Reference Level, I lightly tightened the Barrel Clamp Level as close as I could to level. While watching the Reference Level, I adjusted the Barrel Clamp Level adjustment knob until the Reference Level and the Barrel Clamp Level were exactly the same. (Note that you can adjust the clamp to level; the bubble level just gives you a fine adjustment if needed.)
Now, here is where it gets confusing trying to explain what is going on.
Now that the Barrel Clamp Level is equal to the Reference Level, the Barrel Clamp Level becomes the Reference Level. Why? The Reference level, the level on the scope base, is going to be removed from the scope base so that I can mount the scope. The Barrel Clamp Level, now co-witnessed with the Reference Level, becomes the new ‘reference.’
Prior to mounting the Warne scope rings and scope, I lightly lubricate the mount with a thin layer of grease. I learned this little trick from Jeff Quinn at Gunblast.com. Lubricating the scope bases/mounts serves two purposes; (1) it helps to prevent moisture from getting in between the scope rings and the scope ring mounts, and (2) if the scope rings should shift in the bases, it helps to prevent metal-to-metal contact. All that is needed is a very thin layer and I use Lubriplate No. 130-A, but any good grease will work. Wipe off any excess grease.
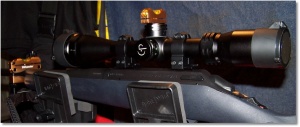
The rings (and Scope) are mounted, and the small bubble level (previously referred to as the ‘Reference Level’) is placed atop the elevation turret.
Level of the rifle, as now indicated by the Barrel Clamp Level (the new Reference Level), is double-checked. The scope is rotated in the rings until the scope level is in perfect alignment (co-witnessed) with the Barrel Clamp Level (even if the rifle shifts slightly off level). The scope rings are then tightened with the Wheeler F.A.T Wrench and appropriate bit, in incremental steps, while monitoring both levels until the desired torque setting is achieved (about 25-inch pounds with the Warne rings). If any shifting of the scope occurs while tightening, screws are loosened slightly to readjust the scope level to the Barrel Clamp Level, as necessary.Once I am assured that both levels read the same, I now have a scope that is level with the rifle. The scope’s Reticle is now as precisely aligned with the rifle to ensure holdover or turret adjustments for bullet drop compensation, for point of impact. If the cross-hairs are canted left or right, both elevation and windage bullet impact error will occur.
A slight loosening of one of the Barrel Clamp Level removes the unit from the rifle. All parts are stored in the convenient case until the next excuse I need to double-check rifles that have scopes mounted on them.
As a final note, the Barrel Clamp Level is universal enough to use on large bore long guns (for example, a 12-gauge shotgun). Turkey and deer hunters would appreciate a means to quickly mount and level a scope.
To Summarize:
The Wheeler Professional Reticle Leveling System can maximize the accuracy potential of any rifle, pistol, or revolver that incorporates a scope. The components are CNC machined; anodized aluminum housings, and all levels are factory calibrated. It is about as close to perfect as it gets.
I was able to install and level the scope in less than 10-minutes with the Wheeler Professional Reticule Leveling System.
The mounting of a scope to your favorite rifle, shotgun, pistol, or revolver can be a daunting task. Through a combination of a good scope, scope rings and bases, and excellent tools will make the task less daunting. Plus, you will get a good feeling about doing it yourself with professional results.
References:
Wheeler 540-127 Scope Mounting Kit with storage case : http://www.amazon.com/dp/B001HY4EI2/ref=wl_it_dp_o_pC_S_ttl?_encoding=UTF8&colid=Q8X6JBTGBISS&coliid=I1ZV1UB9TV1JY1
![]()



3 Responses to Wheeler Professional Reticle Leveling System