

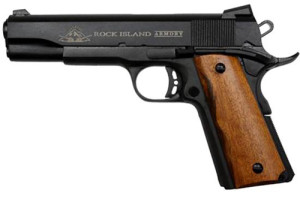
Rock Island Armory FS 1911 Tactical
A while back I had purchased a Rock Island Armory FS 1911 Tactical in .45 ACP. I took it to the range (after cleaning and lubricating it properly) (See, Rock Island Armory (Armscor) 1911 FS Tactical (2nd Generation) – Owner’s Review)
My second goal, after a functioning test, was to see where the rounds were impacting at twenty-five yards, which was the limit of the range, but would also serve as a good distance for checking zero.
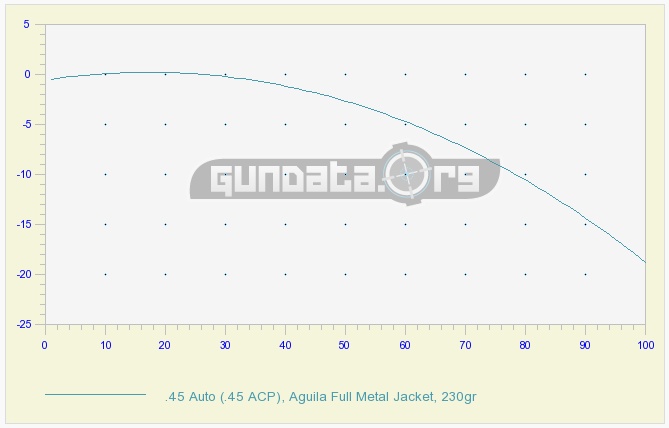
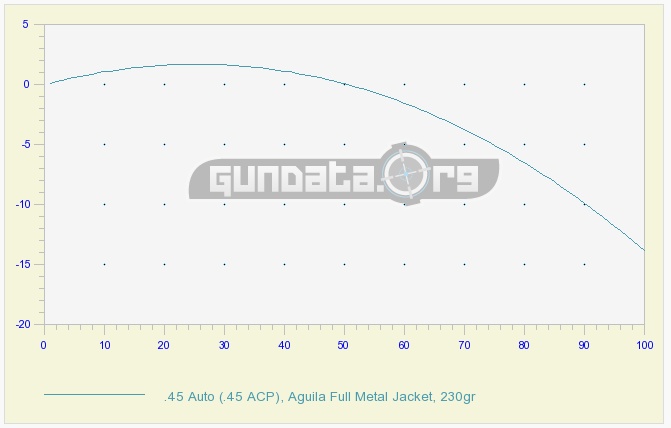
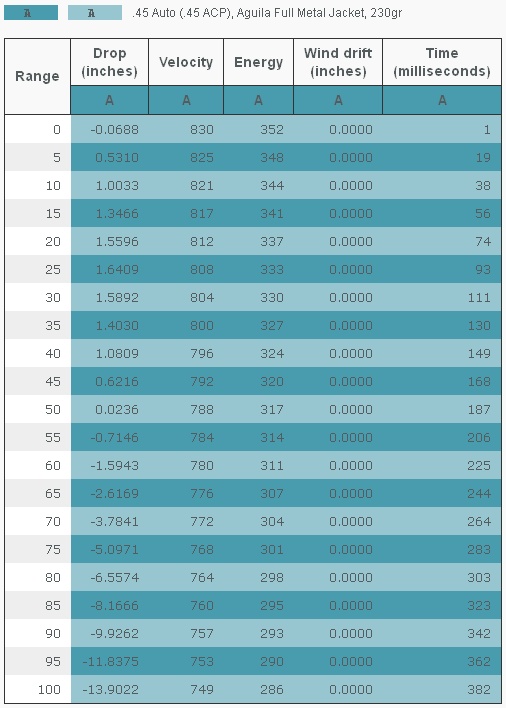
Prior to the range session, I had done some homework regarding the cartridge that I was going to shoot; the Aguilla 230-grain FMJ cartridge, which is rated at 830 fps out of a five-inch barrel, which happened to be the barrel length with this particular pistol.
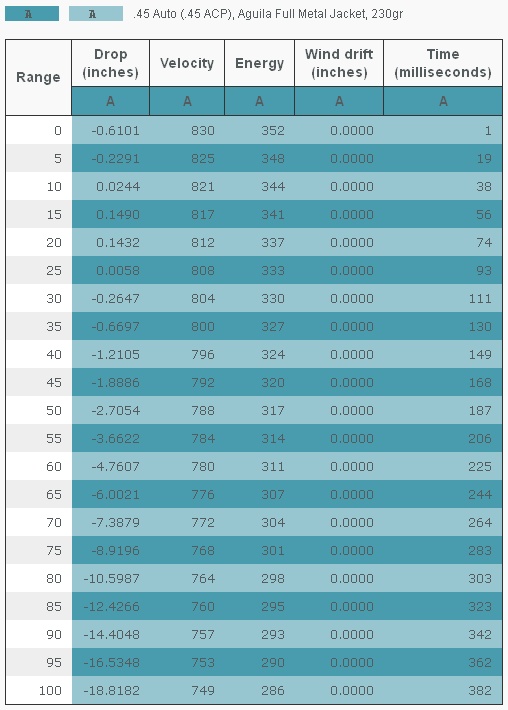
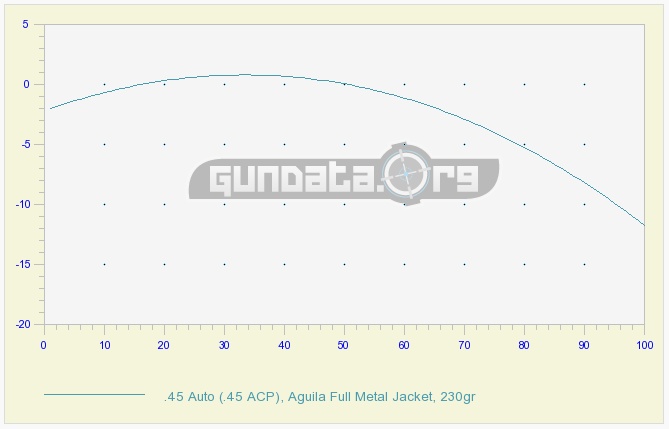
Using the Ballistics Calculator found at GunData.org, I was able to select the cartridge and enter the ballistic data like; zero distance (25-yards), sight height (0.625″), total distance to display (100-yards), and trajectory increments (5-yards). With that data, the program came up with the following ballistic information in graph and tabular form:
AUTHOR NOTE
Although I could have plugged in environmental conditions, I did not feel it necessary. I would be shooting at an indoor range at close distances and environmental factors would have not affected the bullet until well beyond the distance at which I was shooting.
I shot a full magazine (eight rounds) at the target twenty-five yards distant while holding the sights as close to the center of the target’s bulls-eye as I could from a supported position. While my group was not great as I wanted, I could still consider all of the shots as “grouped.” By all indications, the group was low but fairly well-centered on the target. At least, I had trigger control working well for windage.
Referring to the chart that I had brought with me, it seemed that the “Natural” zero for this pistol, with the ammunition that I was using, was not twenty-five yards, but something entirely different (read more about “Natural” zero at NATURAL ZERO in this article.) However, I wanted a zero at twenty-five yards with my favorite sight picture; the aiming point of the front sight on the desired point of impact. To obtain what I desired as zero with my favorite sight position on the target, I knew that I had to make some changes. But, what changes did I need to make; the gun, the ammunition, or me?

Rock Island Armory FS 1911 Tactical Front Sight
The front sight on the Rock Island FS 1911 is the usual blade type that is dovetailed into the slide and blends in well with the pistol while providing a no-snag surface to holsters and clothing. While the front sight contains no dot, it is more than adequate for defensive use and that is what this pistol is intended for.
The front sight is sloped slightly at the front (muzzle end) to reduce the possibility of “snagging” on anything.
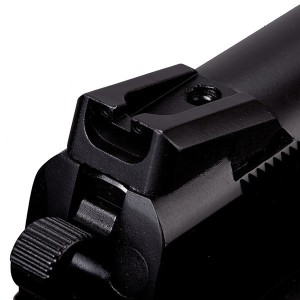
Rock Island Armory FS 1911 Tactical Rear Sight
The rear sight is a “Novak-Style” unit, is dovetailed into the frame, secured by a “hex” head screw (loosen the screw and drift the sight for windage), and is not adorned with two dots or other type of sighting indicator. The width of the notch is enough to provide spacing to adequately view the front sight blade with just a hair of space on each side of the front sight.
Unfortunately, the POI was well lower than my POA with 230-grain FMJ ammunition than I desired. I prefer, at what I consider a “normal” distance for a hand gun that is primarily intended for defensive work, that the sights be on what I want to hit; I am not a fan of the 6 o’clock sight position. I simply want the bullets to strike as close to my aiming point as possible. While there is an advantage of the 6 o’clock hold when shooting graduated-marked targets, when shooting at a living target, which is not graduated-marked, the advantage goes to POA = POI.
Perhaps, the stripes on early prisoner uniforms were “Graduation Marks?” And, I don’t mean for receiving a diploma. But, I digress.
A week passed before I was able to file the front sight down while using the most advanced calculations known to man; I eye-balled it.
Essentially, the front rearward slope of the front sight was removed so that the top of the front sight was parallel with the slide. After that was done, the face of the front sight was painted with a white base-coat and then fluorescent red to make the front side stand out a little better than stock. Additionally, the top of the front sight, which had to be filed down, had to be painted and a coat of flat black took care of that. The next trip to the range told the tale. Aiming just a “shy high” of the bull was resulting in a series of holes appearing within the bulls-eye at seven yards. In other words, cover what you want to hit with the barrel. Upon pulling the trigger; the skies parted, thunder rolled, and .45 caliber holes appeared pretty near where I wanted them to at seven yards. But, where did those 11.46 millimeter holes appear on the target at twenty-five yards? They did not hit where I expected them to hit, and I address that issue in part 2 of this article.
In essence, what I did by filing down the front sight was to raise the muzzle slightly that, in turn, raised the bullet’s point of impact. Had the pistol been outfitted with an adjustable rear sight, I could have simply moved the rear sight up to accomplish the same thing. Unfortunately, with a fixed rear sight, there is no way to raise it.
Returning back to the range with my now “adjusted” front sight, my “groups” were better, but not where I wanted them if I considered the Rock Island Armory FS 1911 fit for “duty” use! There was much more work to be done.
SO WHAT EXACTLY HAPPENED?
In essence, I simply changed the pistol’s “natural” zero with the ammunition that I happened to be using at the time for zeroing purposes. The new “Natural Zero” was still not at my desired zero.
Some may interject at this point that the ammunition that I used to zero the pistol was not going to be the same ammunition as I would carry in the pistol for defensive work. I can’t argue with that statement, because it is true. However, the only significant differences in trajectory takes place further down range and well beyond my desired zero distance of twenty-five yards, as shown in the graph and chart that follows.
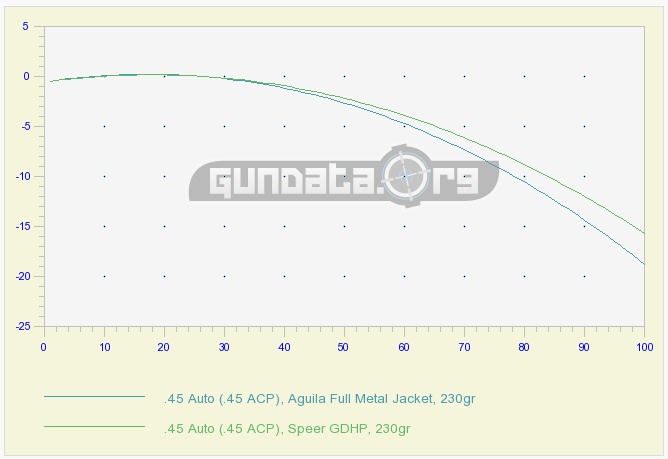
Trajectory Graph Showing Difference Between the Selected Practice Ammunition vs. Actual Carry Ammunition
At a zero distance of twenty-five yards, the only difference; essentially, is the energy of the projectile while in flight and at the target. But, let’s get back to this “natural” zero thingy.
NATURAL ZERO
A trajectory is a description of the flight path of a projectile relative to some known and fixed points
The angle of departure (for small arms generally very small) is formed by the intersection of the line of departure and the base line. The mid-range trajectory is the bullet’s height above the base line halfway between the muzzle and the point of impact
Trajectory Changes With Changes In Zero
Referring to the above illustration, the difference between trajectories results from different angles of departure required to zero the firearm (change its point of impact) at two ranges; 100 yards and 200 yards. Trajectories fall below the base line (line of sight) at zeros of 100 and 200 yards respectively. Bullet trajectories beyond their point of impact are described in terms of inches of drop.
I’ll jump in at this point and state that the “natural” zero of any firearm is the result of the barrel-to-bullet relationship after the bullet is fired. With that said, one must consider at what point distant from the muzzle could be considered a natural zero. The answer is fairly simple. The point at which the bullet impacts a target, using the sights that currently exist on the firearm[1], with the operators desired POA, and with the target at a known distance on the same plane as the firearm. Why is that, you ask? Well, let’s take a look at it!
[1] This is assuming that the firearm has sights installed. If the firearm does not have sights, such as with many hunting rifles, the “Natural” zero would be determined from the center of the bore (the “bore sight”) with the barrel level rather than determined by some point above the bore axis.
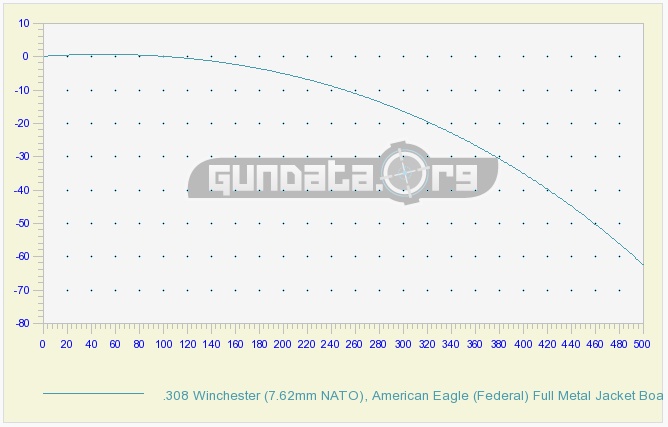
The images that follow illustrate the trajectory of a .308 projectile that is fired from a rifle in which the barrel is bore-sighted with the center of a 100-yard target and a scoped rifle with a sight height of 1.5-inches that is zeroed on the center of a target 100 yards distant.

First, assume that we have a loaded, closed-breech rifled barrel that is locked into a holding apparatus that only allows the barrel to move directly to the rear when a bullet is fired from it; we remove muzzle flip and rotational motion to the recoil.
The bullet, after leaving the barrel under extreme pressure, follows a path where, at some point, it falls to its final resting place. I suppose that I could consider that final resting place a “zero” point, although we know it simply as the “Maximum Range” of the projectile. Consider a rocket or missile housed nuclear bomb; when launched, the missile follows a trajectory path to its destination; whereupon; its final point of travel, if it is to impact earth (or detonate at some point above it), is called “Ground Zero.” With that in mind, one could consider the point at which a primer in a cartridge is struck by a firing pin (or striker) as “Ground Zero.” Or, perhaps, we could consider the point at which the lands and groove capture the bullet after the Leade as “Ground Zero.”
What I am trying to get at is that “Natural Zero” is a relative term and it is relative to what we perceive “zero” to be.
In context, and in the spirit of this article, I consider a “natural zero” to be the point of impact on a target whose distance is determined by my choosing, is influenced by the presence of sights, the effects of recoil in my hands, and how well I can use or control those factors.
’Nuff said about “my” natural zero.
FINDING THE NATURAL POINT OF AIM
We can, of course, produce an adjusted zero in several ways; adjusting sight height for front and/or rear sights, adjust for our desired zero with an optic (magnified or otherwise), or simply physically compensate (raise or lower the point of aim) as desired to achieve the point of impact we desire. The latter would have been the simplest means of adjusting the bullet’s point of impact with the Rock Island Armory FS 1911. However, the latter was not an option because the point of aim was well above the point of impact on the target. The impact was too low for comfort, for me.
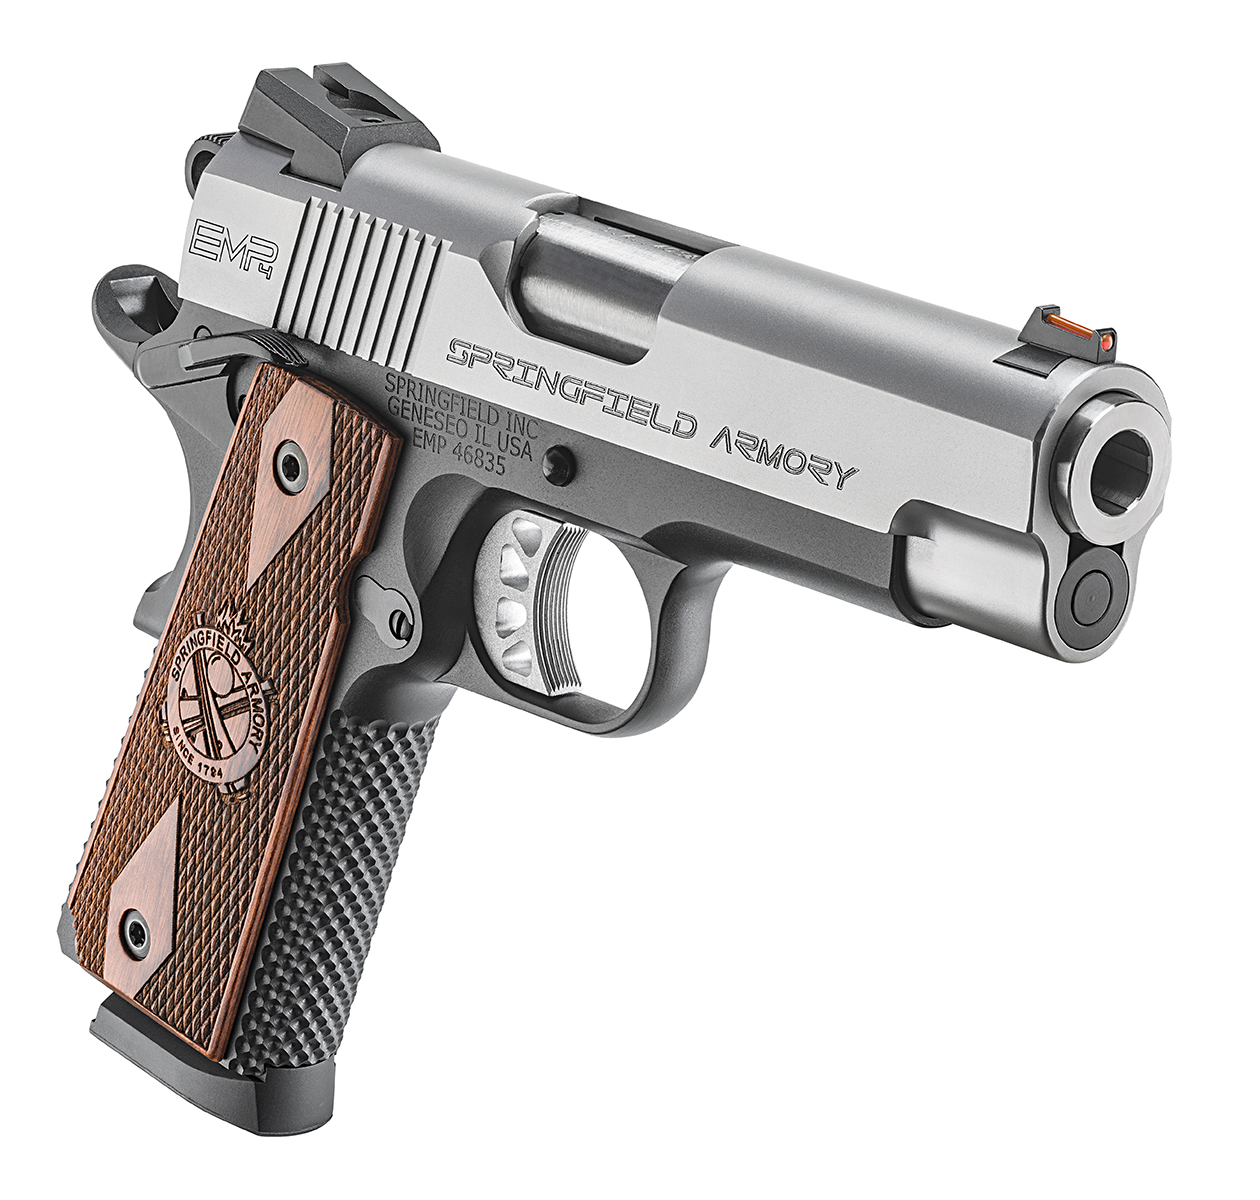
Slide-Mounted Sights on the Springfield EMP Champion
Most pistols have the advantage of having the sights mounted on the slide of the pistol, unlike revolver sights that are usually mounted with the front sight on the barrel and the rear sight on the frame. Some firearm manufacturers offer front sights in different heights and which can be interchanged with little effort (think, Glock Sight Tool and the Ruger front sight button (on selected revolvers)). If desired, adjustable low-profile rear sights are available, for pistols that allows such, through many vendors.
I am not going to mention rifle sights because that is a whole new ball of wax that I don’t need to go into for the purpose of this article.
According to some, including Brownells, the front and rear sight height must be the same height above the center of the barrel. It is not; however, the rule of law. What is important is the rear and front site relationship the impact of the bullet on a target. The statement made by Brownells is in regard to tapered barrels as found in many hunting rifles where you would need a taller front sight than the rear sight due to the contour of the barrels outer surface. That may be fine for hunting rifles, or other rifles with contoured barrels, but we are talking handguns here.
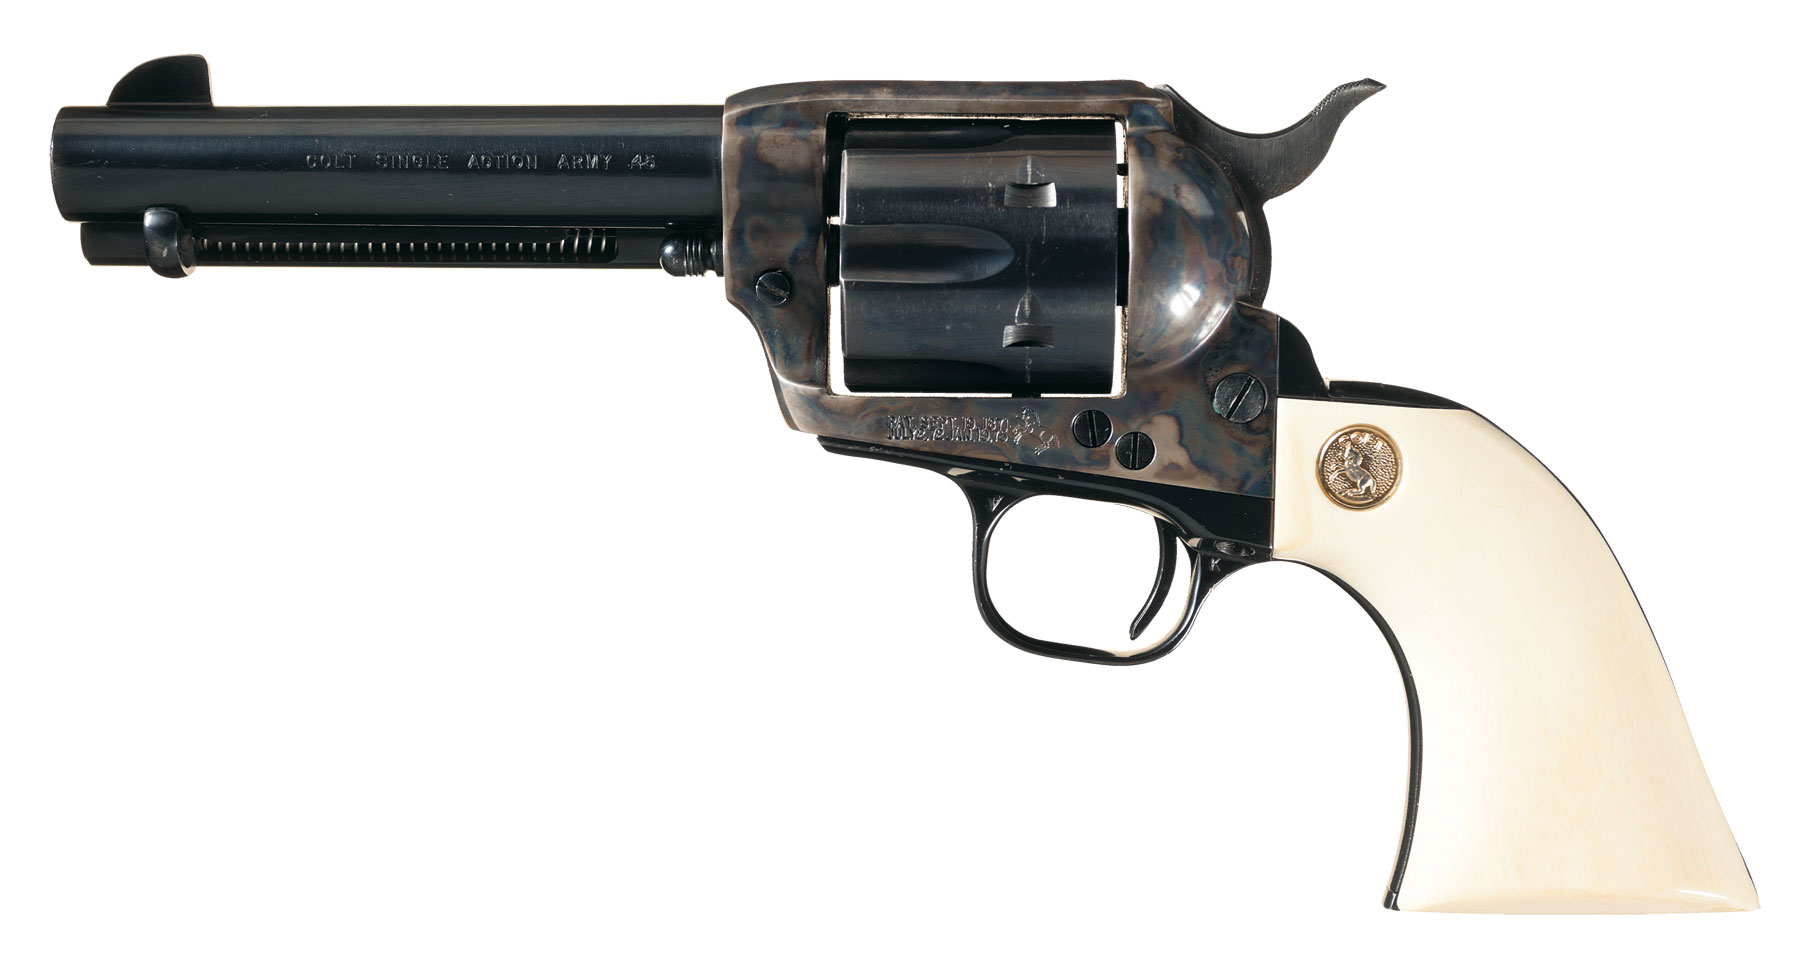
Tall Front Sight Blade on a Colt SAA Revolver
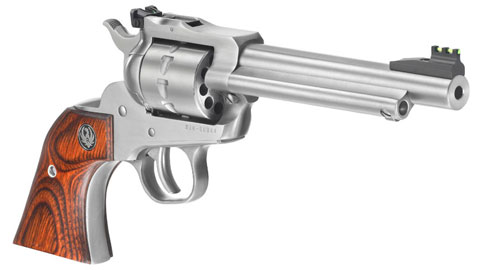
Modern Ruger Single-Action Sights
In early Western revolvers, like the 1873 Colt SAA, one would find a tall front sight blade and a notched rear sight that was part of the frame. By the very nature of these sights, when the revolver was properly gripped, and the sight picture was in perfect alignment, the muzzle of the revolver would be pointed down slightly. This sight arrangement took into consideration the effects of recoil; muzzle rise and the revolvers tendency to rotate in the hand.
The original Colt SAA revolver, according to military requirements, was supposed to provide a seventy-five yard zero. That, my friends, is a “fur piece” for a handgun to be zeroed. Nonetheless, Colt delivered and the rest is history. You have to remember that that 1873 Colt SAA accepted by the U.S. Army also had a 7 ½-barrel, and that is quite a longer barrel length as is found on most, if not all, of today’s handguns intended for concealed carry. It is not unnatural for a Western-based revolver to shoot low at close range and the widely-accepted practice, when shooting these revolvers, is to simply raise the sight picture.
As revolvers became more compact and with shorter barrels that were friendlier to short distance shooting, the front sight height was brought down: sometimes even to a point where the front sight was barely noticeable. The front sight only served as a directional device rather than any aid to accuracy and these revolvers were more intended for point-n-shoot rather than for aimed fire. That has not changed much.
Today, some single-action revolvers made by Ruger incorporate adjustable rear sights, which is something some cowboys of the “Old West” would have appreciated, although the weight of Ruger SARs might note have been appreciated.
GOING BACK IN TIME
Just for giggles, I researched the sight height on the original M1911. I found them to be 0.091 above the bore axis. Again, and for giggles, I attempted to chart the ballistics for the G.I “Ball” ammunition at the time. The original .45 ACP cartridge was rated at 830 fps. Surprisingly, the Aguilla 230-grain FMJ cartridge duplicates the original cartridge used in the M1911. Plugging in the sight height, a 50-yard zero, and bullet selection, here are the results in graph and table form:
M1911 Estimated Ballistics with 230-grain ammunition and a 50-yard Zero
I found the results to be fascinating! Note, that with the low sights of the M1911, the bullet rise was greater than 1.6-inches above the bore-line at 25-yards with a 50-yard zero. No wonder some said that the M1911 does not shoot bullets – it lobs them!
At what point, you might ask, do I need to use the sights at all? My answer is; anytime that you need to place accurate shots.
THE 1994 FAIRCHILD A.F.B STUDY
In my article: Holdover, Hold-under, Hold off, Hold On!!, I mentioned this event:
Consider this incident at Fairchild Air Force Base that occurred in 1994:
A significant event at Fairchild occurred on June 20, 1994 when Dean Mellberg, an ex-Air Force member entered the base hospital and shot and killed five people and wounded many others. Mellberg had been discharged after failing psychological evaluations by base psychologists Maj. Thomas Brigham and Captain Alan London. At the time of the shooting, Fairchild’s hospital was an ungated facility. The gunman, armed with a Chinese-made MAK-90, an AK-47 clone entered the office of Brigham and London and killed both men. Mellberg continued to move through the hospital, injuring and killing several people, including 8-year-old Christin McCarron. The gunman then walked out of the building into the parking lot, where after killing Anita Lindner, was confronted by Security Policeman, Senior Airman Andy Brown. From approximately 70 yards away, Brown ordered Mellberg to drop his weapon. After Mellberg refused, from a kneeling position Brown fired four shots from his 9mm pistol, two rounds hitting the perpetrator in the head and shoulder, killing him. After an investigation it was concluded that Airman Brown was justified in his actionns, saving countless lives, and was awarded the Airman’s Medal by President Clinton.
The shots were taken at 70 yards, from a kneeling position; with a pistol. (I am assuming the Beretta 92F, the M9). Four shots were fired and two hit the mark. Since the rounds were fired from a “Military Service Pistol” the ammunition used was probably 9×19mm Parabellum 124-grain FMJ M882 Ball with a muzzle velocity of 1140 fps. The Maximum range of the M9 is 1800 meters (1968.503 yd) with an effective point of 50 meters (54.6806 yd). Beyond 50 meters, the effectiveness is up to speculation but, in this case, it was effective enough to stop the threat.
Let’s see if I can approximate the trajectory for 50-yard zero for the cartridge using a somewhat standard sight height of .8 inches and then determine what hold-over is needed for an 70-yard zero with the same ammunition. See the results in the image that follows.
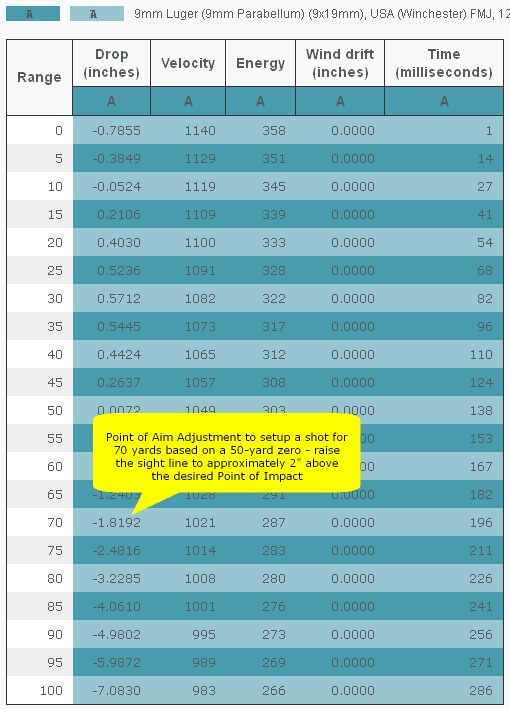
According to the chart, a hold-over of approximately 2″ would have placed her on target at 70-yards, although her pistol was zeroed for an (assumed) 50 yards.
While I rarely do this, I am going to recommend that you read my article, Holdover, Hold-under, Hold off, Hold On!!: and also an article by M1911A!: Minute-Of-Angle and Point-Blank Zero (What the Heck are They?) and then return to this article.
THE NEW “NATURAL” ZERO
In the beginning of this article, I brought out the fact that my practice ammunition closely approximated my carry ammunition – up to a certain distance.
I also mentioned that by adjusting the front sight (removing some material) I could mitigate having to “Hold Over” on the target at my desired “zero” distance. Of course, I could have zeroed the pistol for fifty yards. But the point-of-fact is that there is not enough difference at distances between 7 yards to 25-yards with a fifty-yard zero to warrant doing that, in practical terms of combat accuracy. However, this statement is not entirely true – and I explain why in part 2 of this article.
Now, before you go performing surgery on your existing sights, or deciding to go with a new set of sights, ensure that you are not the problem. I learned this lesson recently with the Springfield XDs 4.0 in 9mm. I had not shot the pistol since reviewing it (Springfield XDs 4.0 9mm Review) and I had to re-acclimate myself to the pistol. The XDs has a two-dot fixed rear sight and a fiber-optic front sight.
My first set of shots was way low from my point of aim. They were so bad (how bad?) that the first magazine full could not even be considered a group – rather a cluster. They were so bad that when whoever came up with the Shooting Correction target could have used me as the subject.
I knew that the pistol was inherently accurate, so I begin analyzing my grip. The XDs is very narrow and so is the grip area. I am used to holding a 1911 that is equipped with a rubber wraparound grip, which adds some girth to the handle of the pistol. After making adjustments to my grip (increasing the tension) and getting as high on the back-strap as I could, the impacts were coming up to my point of aim. After three magazines, I and the pistol were working in somewhat harmony.
My point is that the firearm is a machine and you have to decide who is going to control who.
Now, back to my regularly-scheduled program!
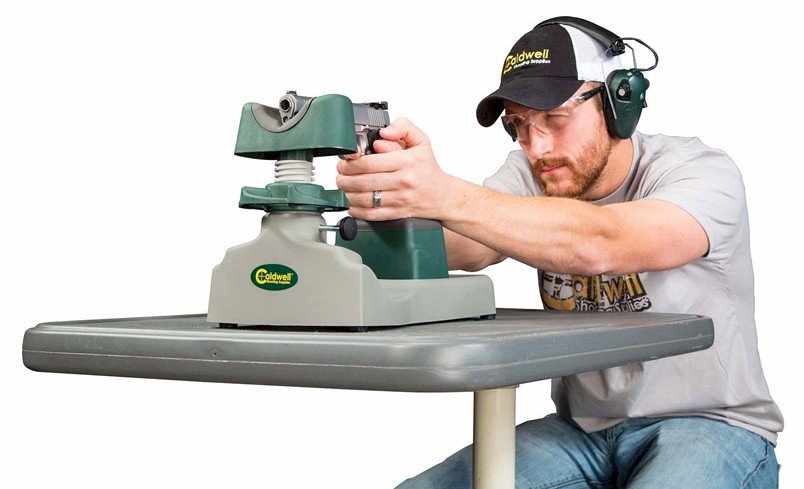
A Shooting Rest Provides a Stable Platform
To sight in any handgun, I highly recommend a bench rest of some sort; something to help stabilize you and the firearm. Then, set your target at a distance at which you can easily see where the bullets impact the target. Depending on your firearm, this could be any distance where you feel comfortable shooting. Personally, I like to start at 10 yards or so, which gives me something between seven yards and twenty-five yards – just to get a feel for what the pistol is doing with the selected ammunition.
Normally, I will put my sights on the “X” of the target, take a look at the first couple of shots, and then begin correcting to find the point-of-aim that lands the bullets in the “X” if need be. If I am satisfied that the POI is as close to my POA, then the real work begins; finding the “natural” zero at my intended zero distance and then decide what needs to be done to force the zero to my liking – if anything.
What has to be considered is that any firearm equipped with sights has two zero points; two points where the projectile crosses the line of sight. However, that is not always the case.
If you look at the graph for the 25-yard zero, you will see that the trajectory never goes above the line of sight during its entire trajectory. Compare that with a 50-yard zero for the same cartridge, you will see that the bullet goes above the line of sight at about fifteen yards and then again at fifty-yards. You; therefore, have two zero points with a longer zero distance. But, also notice that the bullet does not exceed 1” at any time above the line of sight during the trajectory out to the fifty-yard zero point.
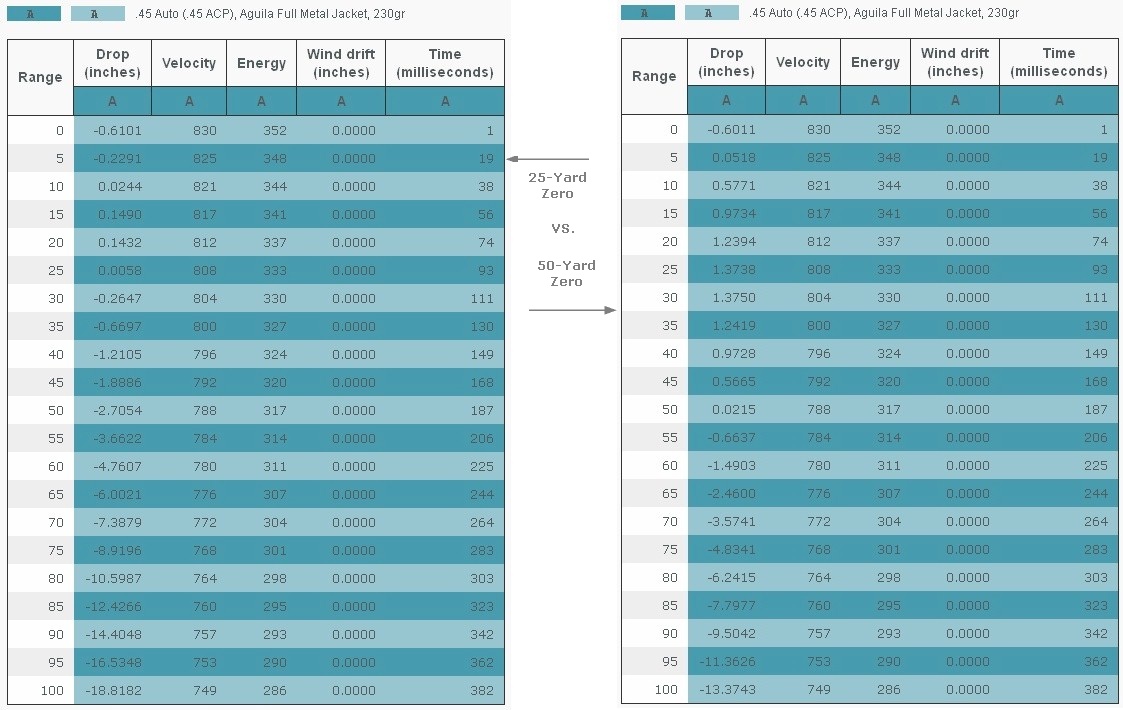
25-Yard vs. 50-Yard Comparison
Even if a scope is mounted on the pistol where the sight height would be, say, 2.25 inches above the bore-line and a fifty yard zero, the bullet will, again, not exceed the line of sight by more than one inch! Pretty amazing stuff, right?

50-Yard Scoped Zero Ballistic Examples
THE MAGIC WINDOW
I consider the “Magic Window” as an impact of the bullet on the target, within a desired area, in relation to the point-of-aim.
To hit a target eighty yards distant when I have my sights set for a fifty-yard zero means that I have to hold my sights over the top of the target by almost six inches above where I want the bullet to impact the target! My sight picture has not changed, but the angle of which I am shooting has. I am simply compensating for a change in “Zero” because that target at eighty-yards is now my new zero and I don’t have enough sight, or sight adjustment, to compensate for it.
If I had a good scope mounted, I could simply dial in some elevation and place the cross-hair on the center of my target (assuming no other factors are affecting the path of the bullet).
THE TUNNEL OF LOVE
If I set my sights directly on the “X” in a target that is at or set within my zero distance, and the bullet impacts within 1” of the “X,” I then consider that the bullet followed my perceived “Tunnel of Love” and landed within my “Magic Window” based on either calculations or an EWAG. But! What about longer distance shots? Shots that are beyond my zero distance! Well, hold on! Or, I should say, Hold-over!
Of course, the “Tunnel of Love” is an expectation on my part; I would like for the bullet to follow a tunnel of 1″ on all sides of the expected flight path of the bullet based on my POA.
There are expectations and then there is reality.
THE REALITY WINDOW
Now, I get to throw in the term “Combat Accuracy.” Combat Accuracy simply means that you can hit a target at combat distances. While it is popular to say that 21-feet (7-yards) is considered “Combat Distance,” I venture to say that combat can exceed that distance.
Let’s venture back to my “Magic Window” for just a bit. If I am assured that my pistol and I can place a round within my 1” “Tunnel of Love,” and I can place that round within my “Magic Window,” some damage to my assailant is going to occur. To what extent of damage, I cannot say. My job is to simply deliver the goods and the rest is up to the bullet and the target (if the target happens to be of four-legged or two-legged persuasion.
My “Magic Window” for a handgun is a two-inch circle at 7 yards, a four inch circle at twenty-five yards, a 6-inch circle at fifty yards, and an eight-inch circle at seventy-five yards while shooting offhand. At least, that is what I shoot for and I am not going to say that I am successful at hitting my “Magic Window” every time; it is simply a goal to achieve. The closer that I can place the impact of the bullet to my POA, the better chance I have of having a bullet impact within my “Magic Window,” if I do my part. Reality; however, can be a cruel teacher. The reality is that I am a human operator of flesh, blood, and bone and although my firearm may be capable of extreme accuracy – I am not. However, If I can keep my shots within a “Combat Accuracy,” or “Magic Window” window in my time of need, I can accept that.
The effective range (maximum effective range) of a weapon is the furthest distance an effective shot can be taken with reasonable certainty that it will hit. It is determined by a number of factors: type of cartridge fired, inherent precision of the weapon, and volume of fire delivered. Maximum Effective Range does not; however, take into account the affect of the impact on the target. I find that, as I get older, my maximum effective range grows shorter without the aid of magnified optics.
Knowing where a bullet will impact, in relation to my sights, is highly important.
This is why I spend time researching the ammunition that I will use and constantly evaluate the results during my range practice.
WINDING IT DOWN
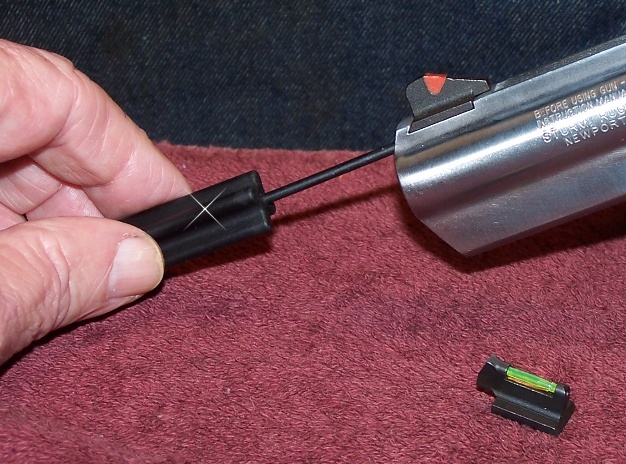
Front Sight Swap on Ruger GP141
When I replaced the blade front sight on my Ruger 4” GP100 with a fiber-optic sight, I was concerned that the revolver’s zero had changed. The fiber-optic sight sat lower than the previous sight and I expected that the GP100 would be shooting high. Shooting high turned out not to be the case. Although the sight was physically lower, the fiber-optic rod was in perfect alignment with the two dots on the revolver’s rear sight. I could easily adjust the rear sight to compensate for any difference in zero, had the sights been off.
When I was preparing this article, I knew that there was no way I could address any aspect of bullet ballistics within a short article with any degree of substantial depth. There is a plethora of information available to us online and within hard-copy material that covers everything from reloading data, manufacturers data, and all the way through to firearm ballistics engineering. However, I will have to say that no other resource will introduce you to highly-technical ballistic terms like “Magic Window” or “Tunnel of Love.”
With any firearm, the “natural” zero needs to be established using your POA favorite sight picture. If the results (point of entry on the target) satisfy you, then you are in great shape. If you are not satisfied with the results, you need to take steps to, well, be satisfied.
Being satisfied may require adjusting or replacing sights, or simply shifting your point of aim. With that said, the closer the impact on the target, in relation to your point of aim, the better you will be able to handle shots at distances beyond your zero point that require “working the trajectory angles.”
I go into more detail about “Natural” zero in a follow-up article, “Working the (Trajectory) Angles – Part 2 (More Projectile Dysfunction)” and also some of the work that I had to do with the front sight of the Rock Island Armory FS 1911 Tactical.
RESOURCES
GunData.org: http://gundata.org/ballistic-calculator/
![]()