


I have several Rock Island Armory (ARMSCOR) 1911 ‘Ultra’ pistols that are manufactured with magwell housing. A Smith and Wesson PERFORMANCE CENTER® SW1911 PRO SERIES® in 9mm, and a Springfield Armory 1911 TRP are also manufactured with magwell housing, but of a different type. I get into types a bit later in this article.
The Rock Island Armory Ultra FS and MS models come provided with an 8-round magazine, which is one more round than some 1911 pistols are shipped with, including my selected pistol for this project. The magwell helps to smooth out the profile of the magazine that extends beyond the butt of the pistol and allows for faster reloading by giving the pistol a bigger opening that is beveled to help me guide the magazine home. The same can be said about the Smith and Wesson PERFORMANCE CENTER® SW1911 PRO SERIES® and the Springfield Armory 1911 TRP.
My magwell housing project (for part 1 of this article) was to replace the standard mainspring housing on one of my carry 1911 pistols with a magwell housing. The question was what 1911 pistol would receive the new extended magazine and what magwell housing would be the chosen one, and there are quite a few to choose from. That selection is coming up.
This project was borne primarily out of curiosity, a yearning to learn something new, and doing something that I have never done before. I am not a gunsmith, but I do like to work on my firearms if I feel capable enough to do so. A plus was that I get to obtain a new tool for the 1911. I ordered a MAINSPRING HOUSING PIN TOOL from Brownells, as this tool is designed for removing the mainspring housing pin. That is not to say that I have not removed a mainspring housing without this tool, because I have. However, I do believe in using the right tool for the job
Since I will be writing the procedure that I used to add the magwell housing, I will also post a complete set of tools and materials required to do so.
Magazine housings comes in two types; two piece and one piece. Two piece magwell housings may or may not allow the removal of the magwell, should the operator decide to run the pistol without the magwell. Single-piece units do not provide the means to remove the base. There are also assorted styles, such as flat mainspring housings, arched mainspring housings, and different texturing and finishes of the backstrap.
Normally, the mainspring housing uses the mainspring housing spring to secure it to the pistol. However, there is one magazine well that does not, the Wilson Combat unit shown below.
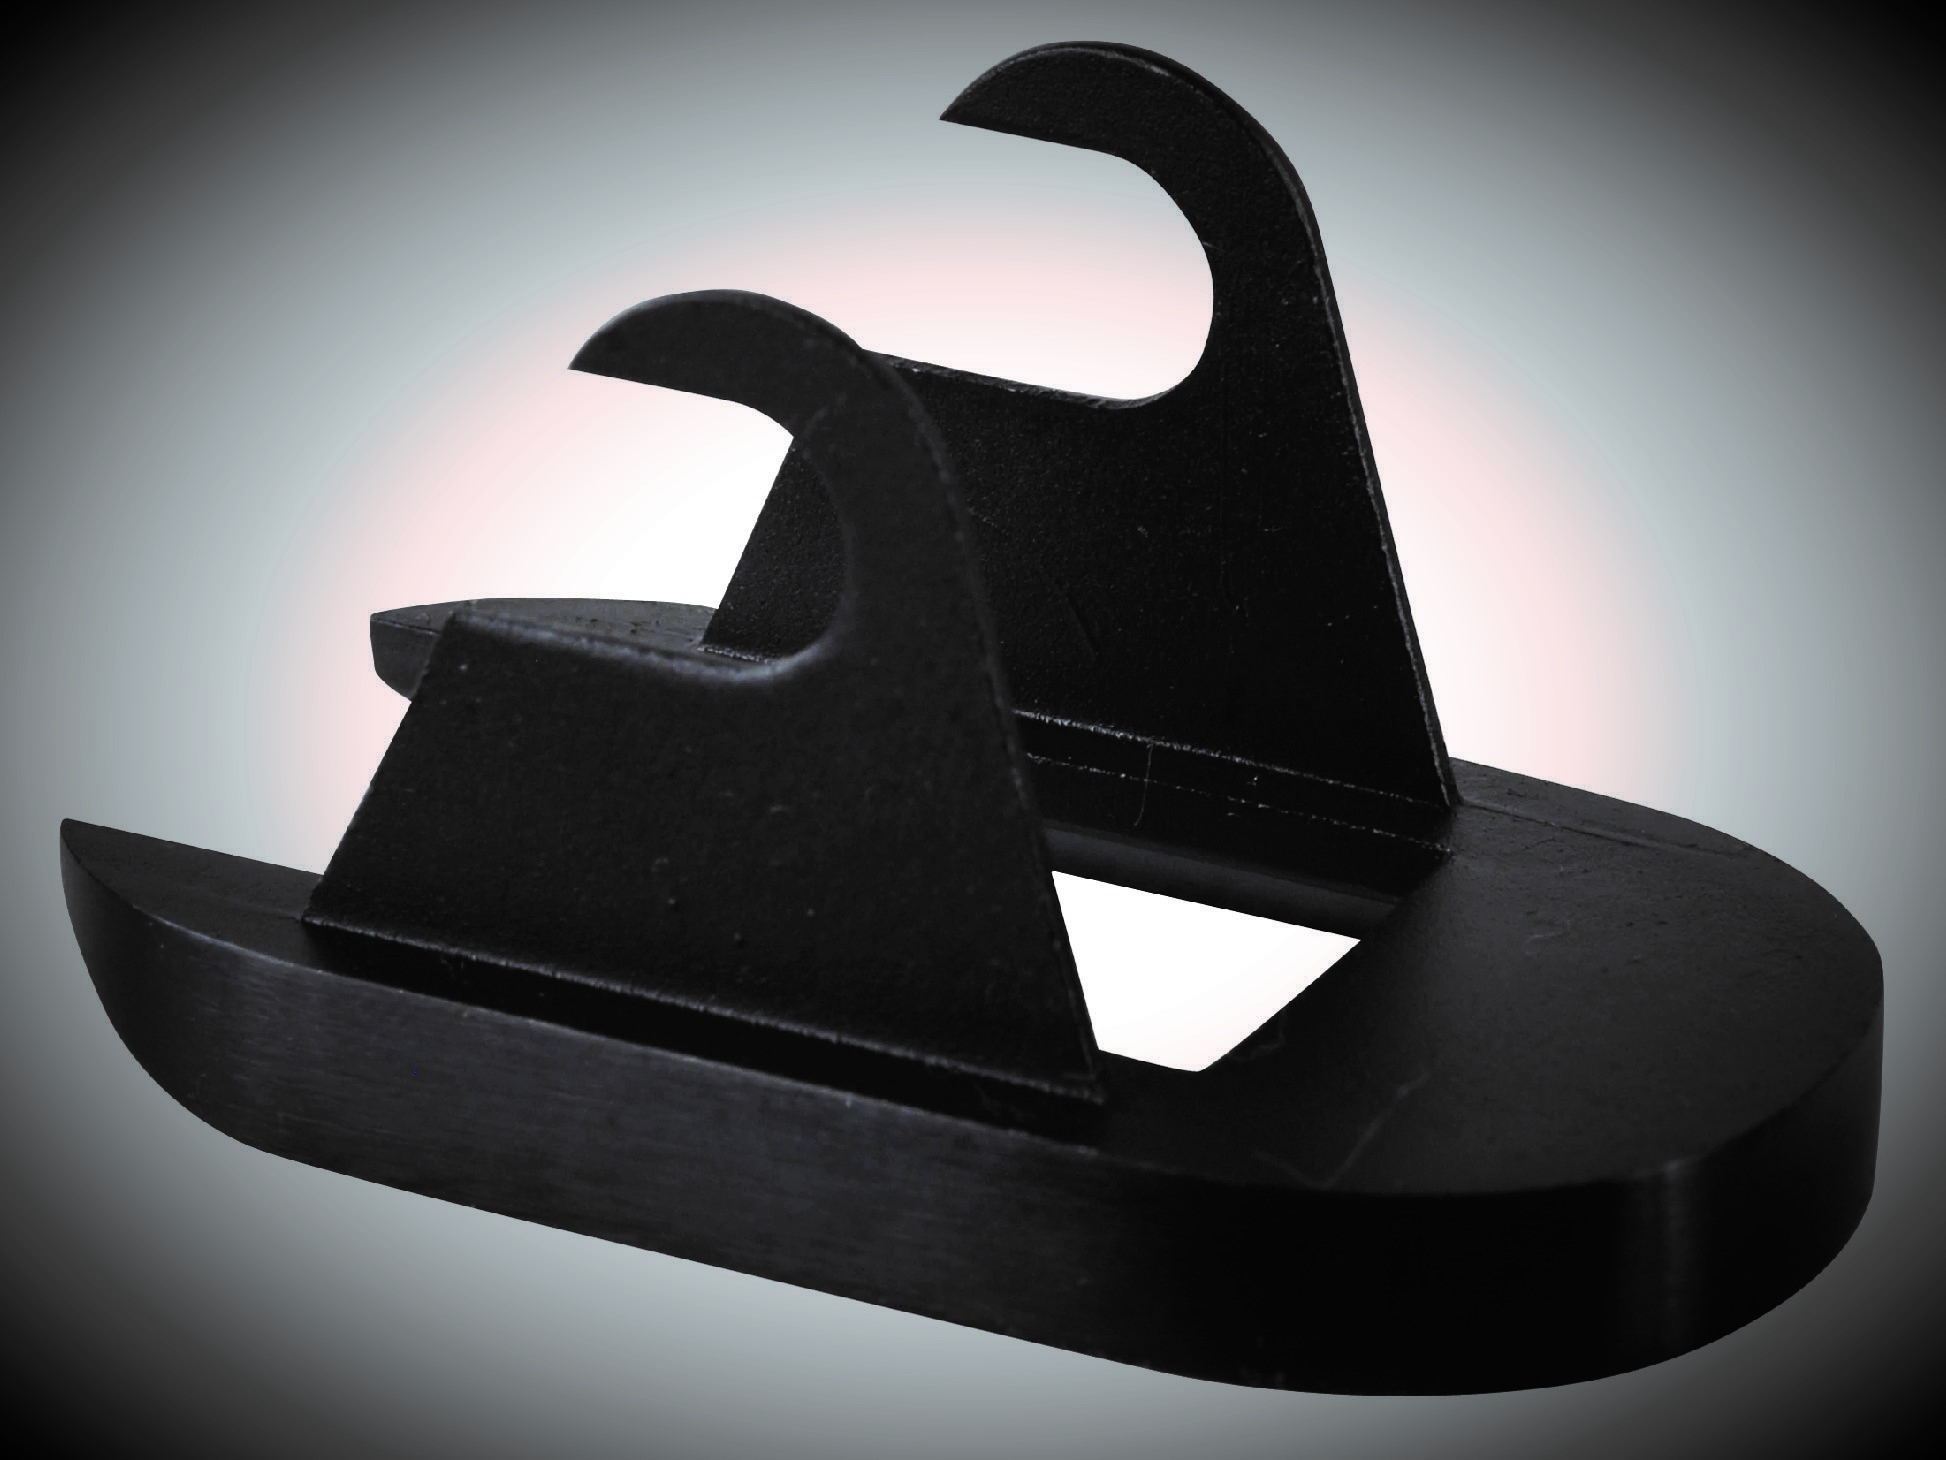
Wilson Combat ‘Slip On’ Magwell
The ‘Ultra’ series of Rock Island Armory pistols use the Wilson Combat magwell. Rather than being part of the mainspring housing, it hooks around the bottom grip screw bushings. As such, the grip panels must be relieved to allow the grip panels to fit correctly, flat against the frame, and this is an operation that most of us would rather not do. I cannot recommend this type of magwell. Not because it does not work, it works simply fine, but unless you have the means to relieve portions of the underside of the grip panels, the grip panels will not fit properly.
(Author’s Note: that if you elect to use rubber grips, the rubber will give and will form around the magwell mounts; the magwell will leave an impression in the rubber and the rubber will (somewhat) conform to the mounting flanges of the magwell.)
If you decide to install the Wilson Combat magwell, and are willing to do some (Dremel) relieving work to the underside of the grip panels, you may want to view: 1911 Mag Well Install. Otherwise, read on for other types of magwells. (Author’s Note: I may install a Wilson Combat magwell of this type in the future and will demonstrate how to better mark out the area to be relieved, and how to relieve the area, than what is shown in the reference video.)
Another consideration to make, speaking of grip panels, are what grip panels to use after the desired magwell housing is selected. You see, most standard 1911 grip panels are beveled at the bottom and are cut to expose the mainspring housing pin (grip panel set on the left in the image below). The idea with a magwell housing is to have a set of grip panels that are flat on the bottom to blend in with the magwell and cut so that the mainspring housing pin is hidden, like the ‘Magwell Cut’ set on the right in the image below.
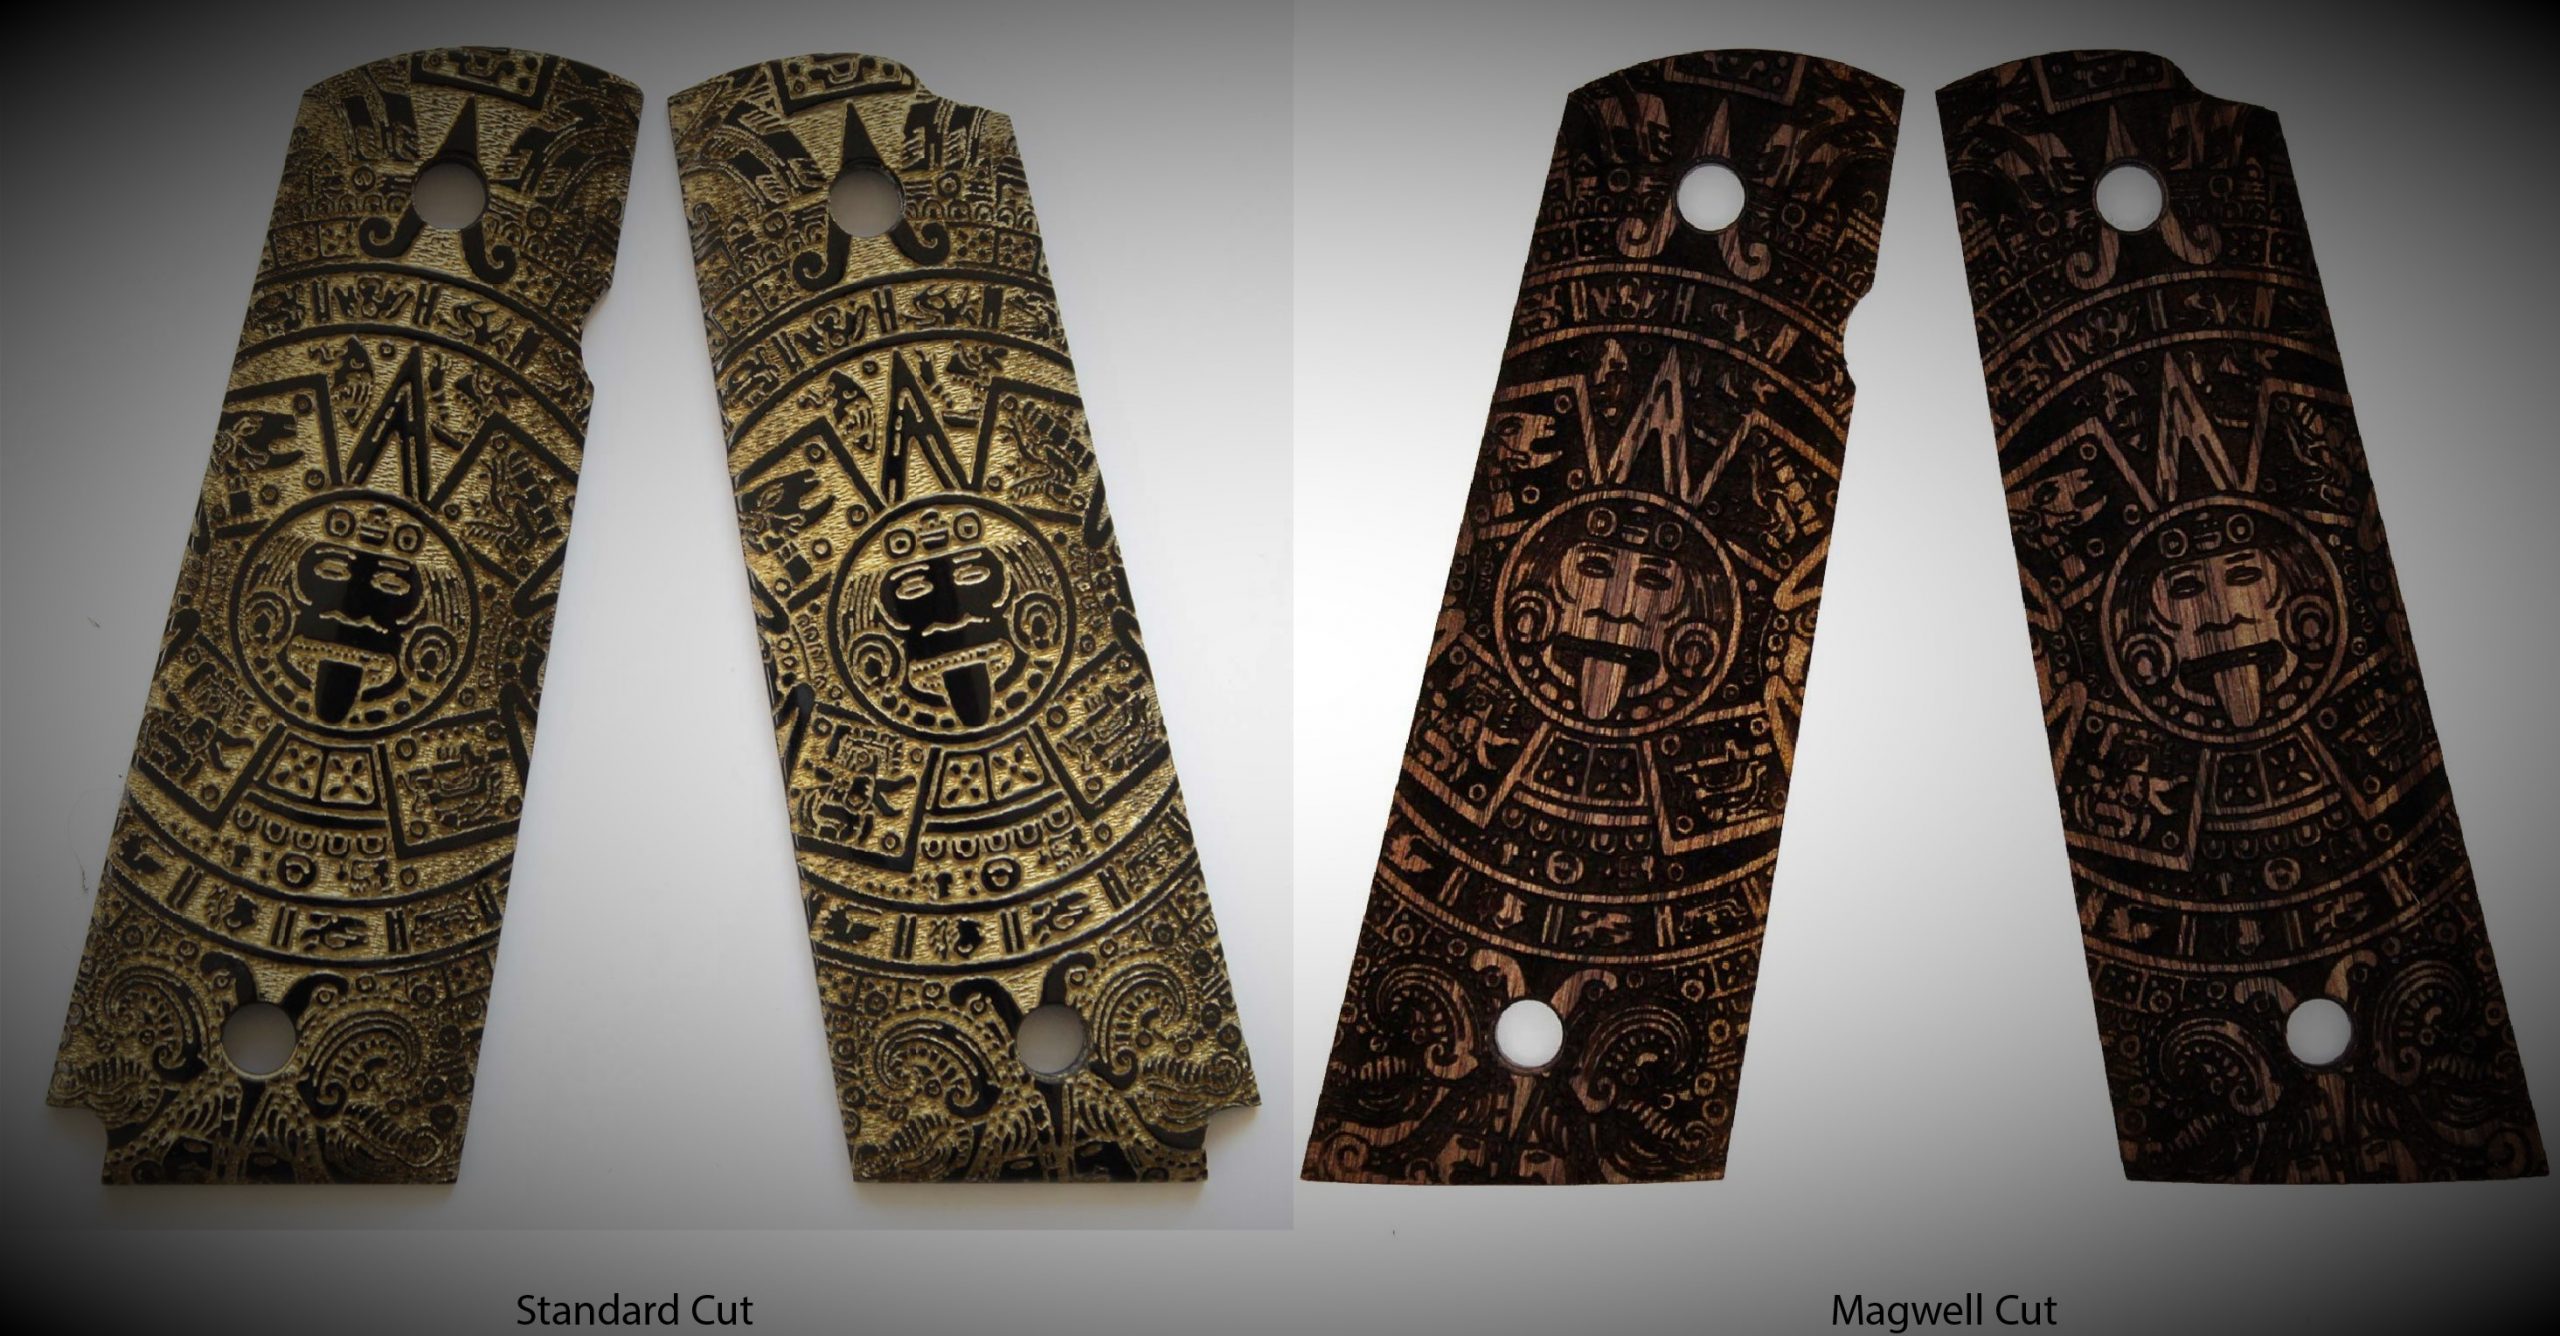
Standard and Magwell Grip Panel Cuts
Another consideration is the width and shape of the magwell housing. Some magwell housing are straight while some are more rounded, and that can make a difference as to what grip panels will fit.
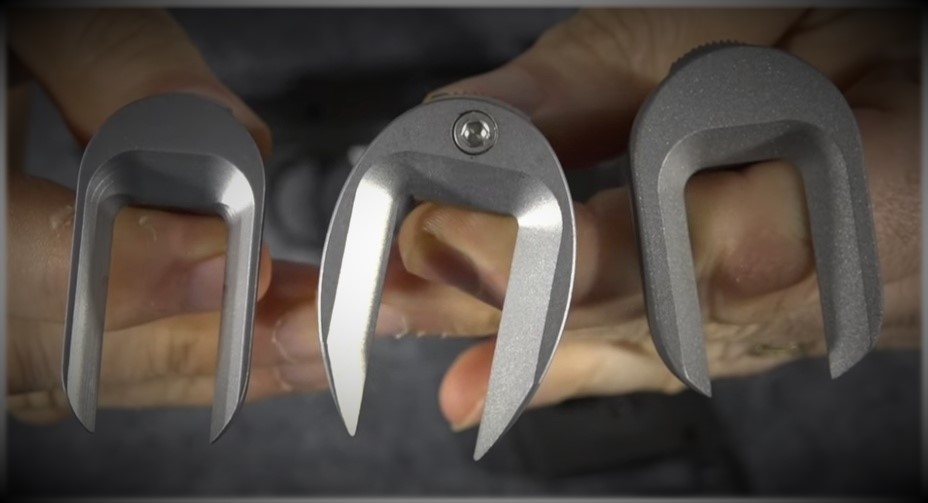
Nighthawk Custom (left), Ed Brown (Center), and an unknown magwell on the right.
If you like to keep the grip panels that you have, you can, and I might suggest the NightHawk magwell, shown on the left of the image above, as they will work with beveled grip panels. The magwell in the center of the above image, an Ed Brown unit, works with rounded and squared-off grip panels. The single-piece magwell on the right in the image above I do not recommend if you want a removable magwell, as they do not provide the option of removing the magwell should you decide to do so.
We then have three things to look at; the pistol that will be modified, the style of extended magazine well, and the grip panels to finalize the look of the pistol. Let us start with the pistol to be modified.
The Donor
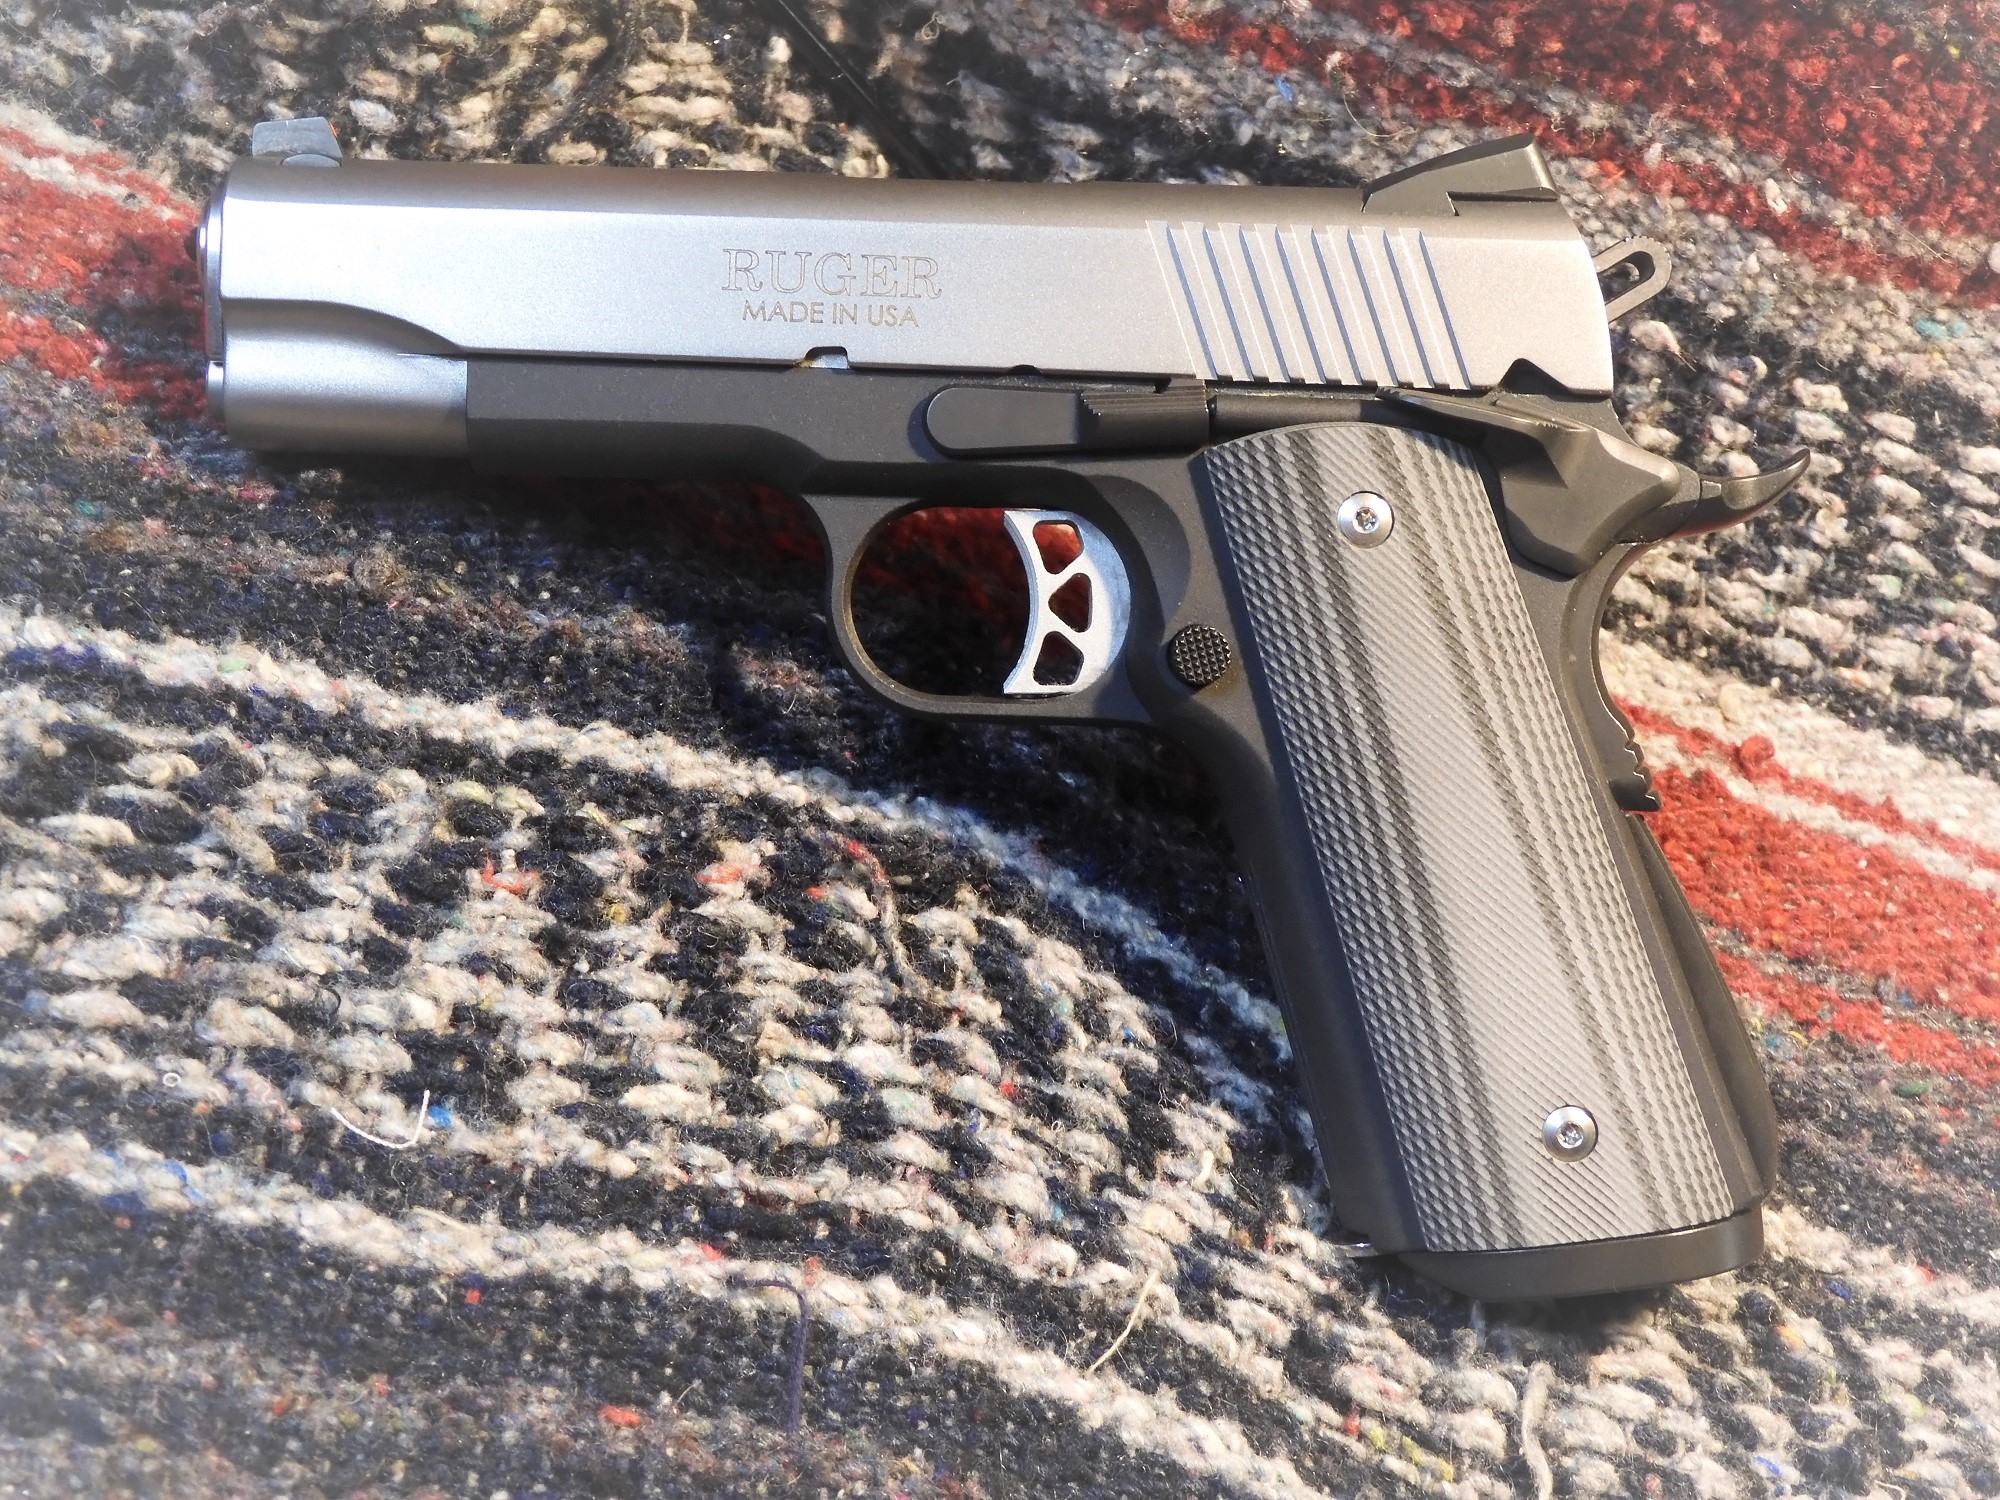
The recipient of the magwell exchange is one of my favorite carries, the Ruger SR1911 CMD-A Lightweight Commander, shown on the right in the image below.
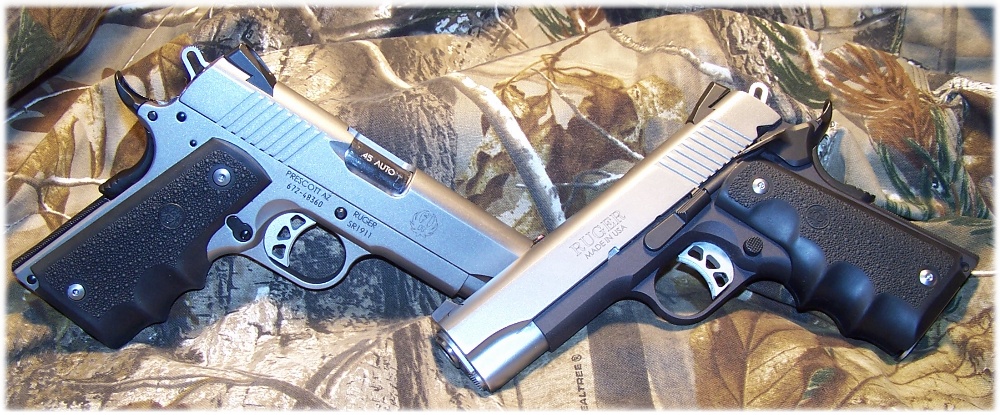
Ruger SR1911 CMD (Left) and SR1911 CMD-A Lightweight Commander (Right)
The Ruger SR1911CMD-A is an excellent example of a “Lightweight Commander” style 1911. The pistol came with two magazines; a flush-fit 7-round (shown above) and an 8-round extended magazine with base pad. The base pad, of course, extends beyond the bottom of the grip frame and that was what I wanted to cover.
The Magwell
Now that I have the pistol established, I must look at the proposed magwell housing.
The Ed Brown two piece arched serrated stainless magwell was selected, as shown below.
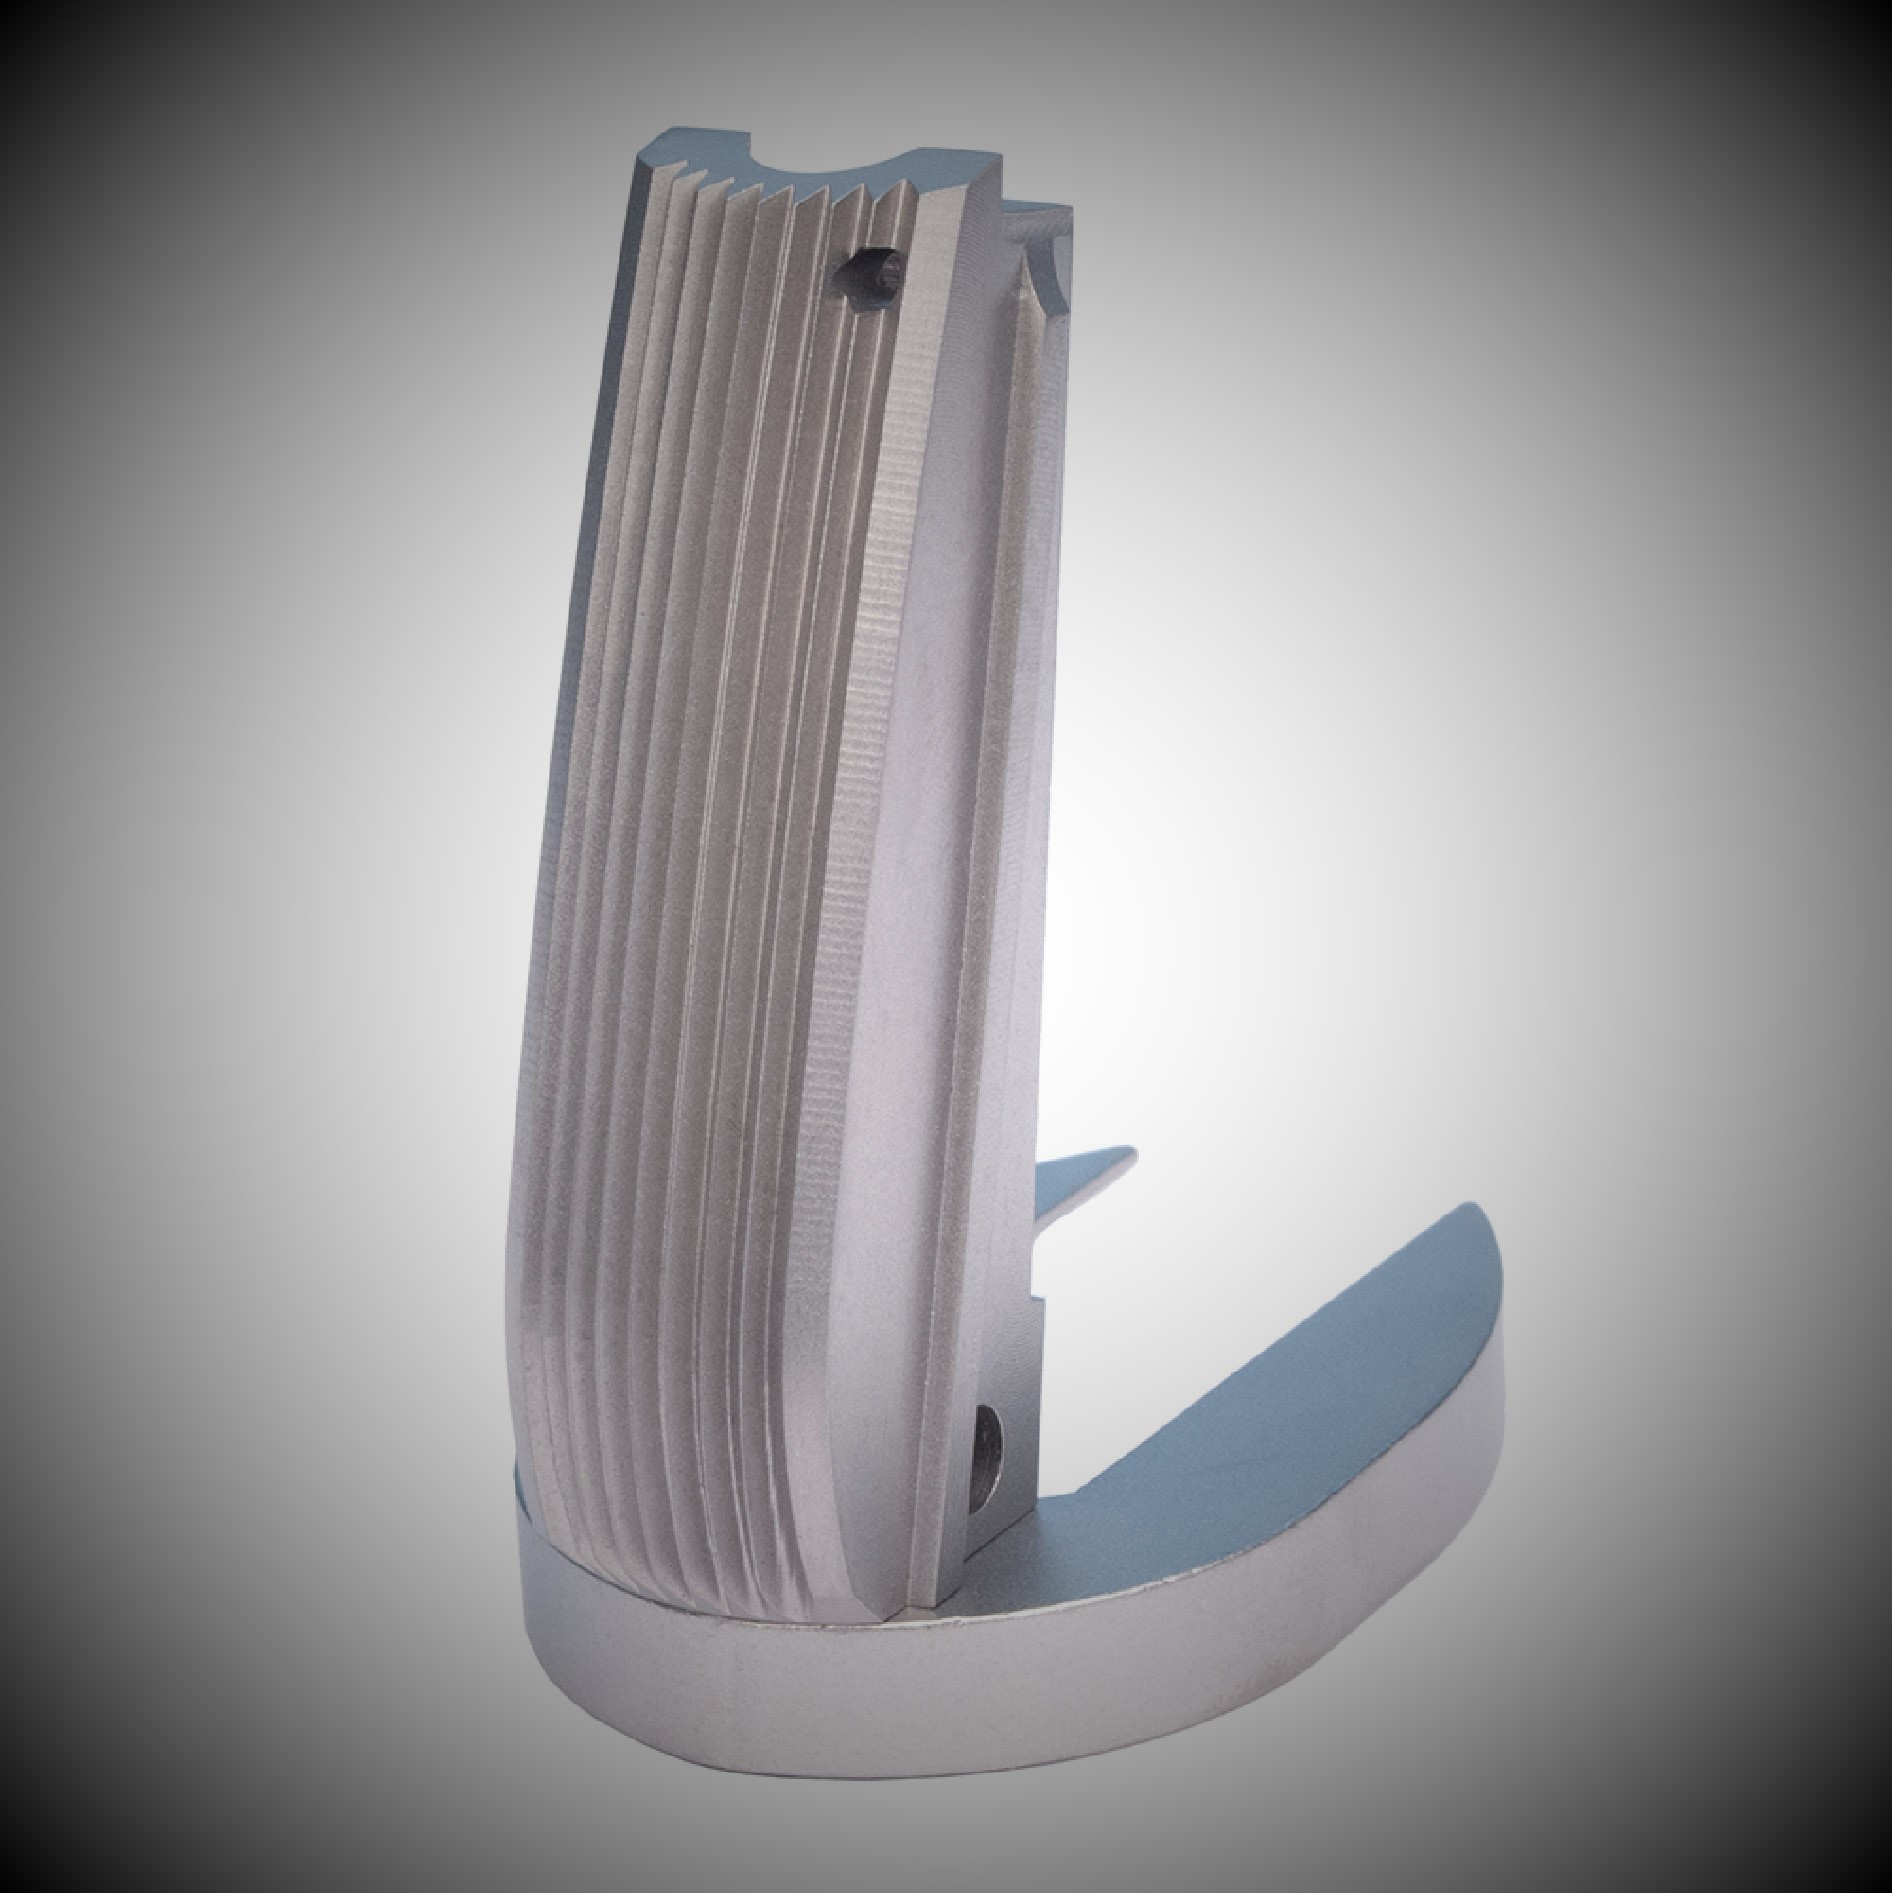
Ed Brown Arched and Serrated Magwell
You may have already noticed that the new magwell housing is arched rather than flat. I like the arched housing, as found on the M1911A1. It fits my hand better than the flat mainspring housing, which I have been accustomed to for so many years. I also wanted something different for the Ruger SR1911 CMD-A and this is different.
The new magwell housing does not include the internals, which leaves me with a choice; either use the internals from the existing mainspring housing that is being removed or buy internals for the new magwell housing, which is what I decided to do. Why, you might ask? If I need to re-use the original mainspring housing (which is metal on the Ruger SR1911 CMD-A Lightweight Commander), for whatever reason, it is already assembled. If I do not use it, then I have a source for mainspring housing parts.
For the new magwell housing, I ordered the mainspring housing internals that is also available from Ed Brown. The kit includes the mainspring (Government 19#), mainspring cap, mainspring housing pin retainer, and mainspring cap pin (blue and stainless). Note: the mainspring cap and mainspring housing pin retainer are stainless steel.
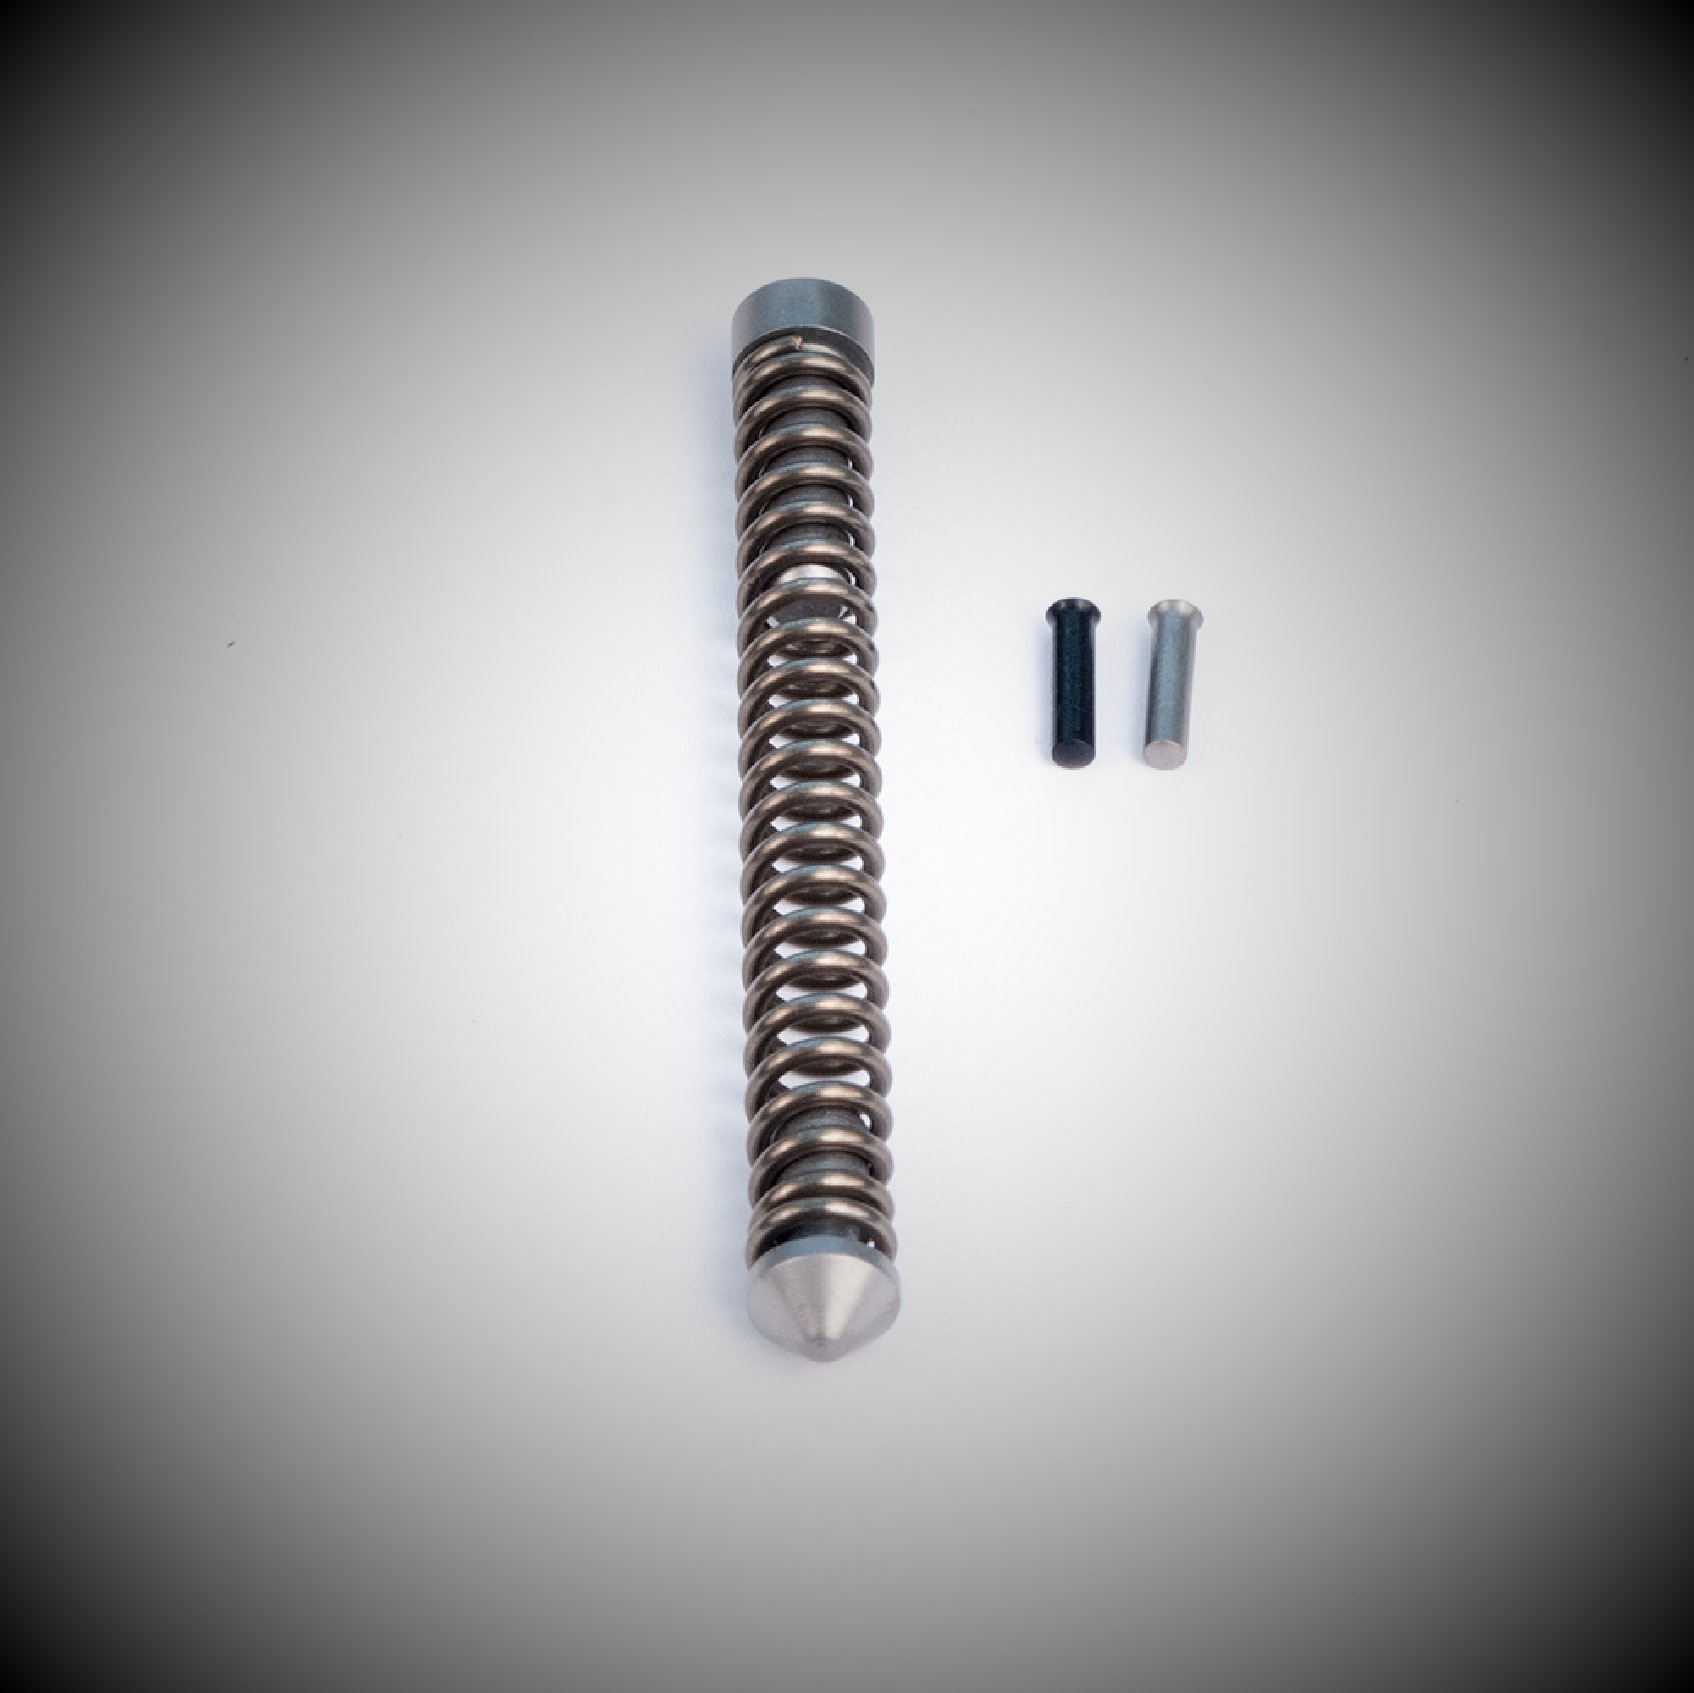
Mainspring Housing Kit
Replacement Grip Panels – Or Not!
Up to this point, I have taken care of the pistol and the desired new magwell housing. Now, on to the grip panels.
As I mentioned earlier, I could just keep the existing grip panels, which are an excellent set of engraved 1911 Govt. Fingergroove SilverBlack Checkered panels from the Altamont Company, a maker of gun grips for many firearm manufacturers like Smith & Wesson and Ruger. The wraparound grip; however, is beveled at the bottom and reveals the mainspring housing pin.
While I had several selections of grip panels to choose from, the CoolHand 1911 Full Size Magwell G10 Gun Grips Sunburst Texture H1M-J6MB in grey/black scheme.
I had used a set of these grip panels on the Kimber Camp Guard 10, with its round butt configuration, and really liked the texture that they provide.
The stippling would provide enough gripping surface, as the front strap of the Ruger SR1911 CMD-A Lightweight Commander is void of any texturing. An example of the new grip panels is shown below.
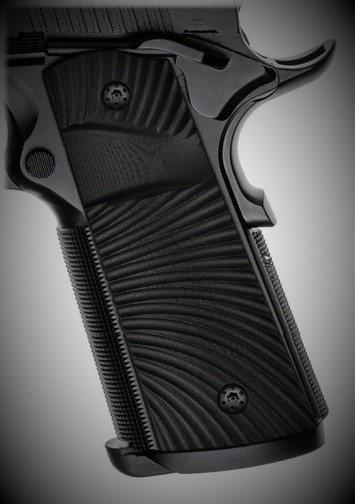
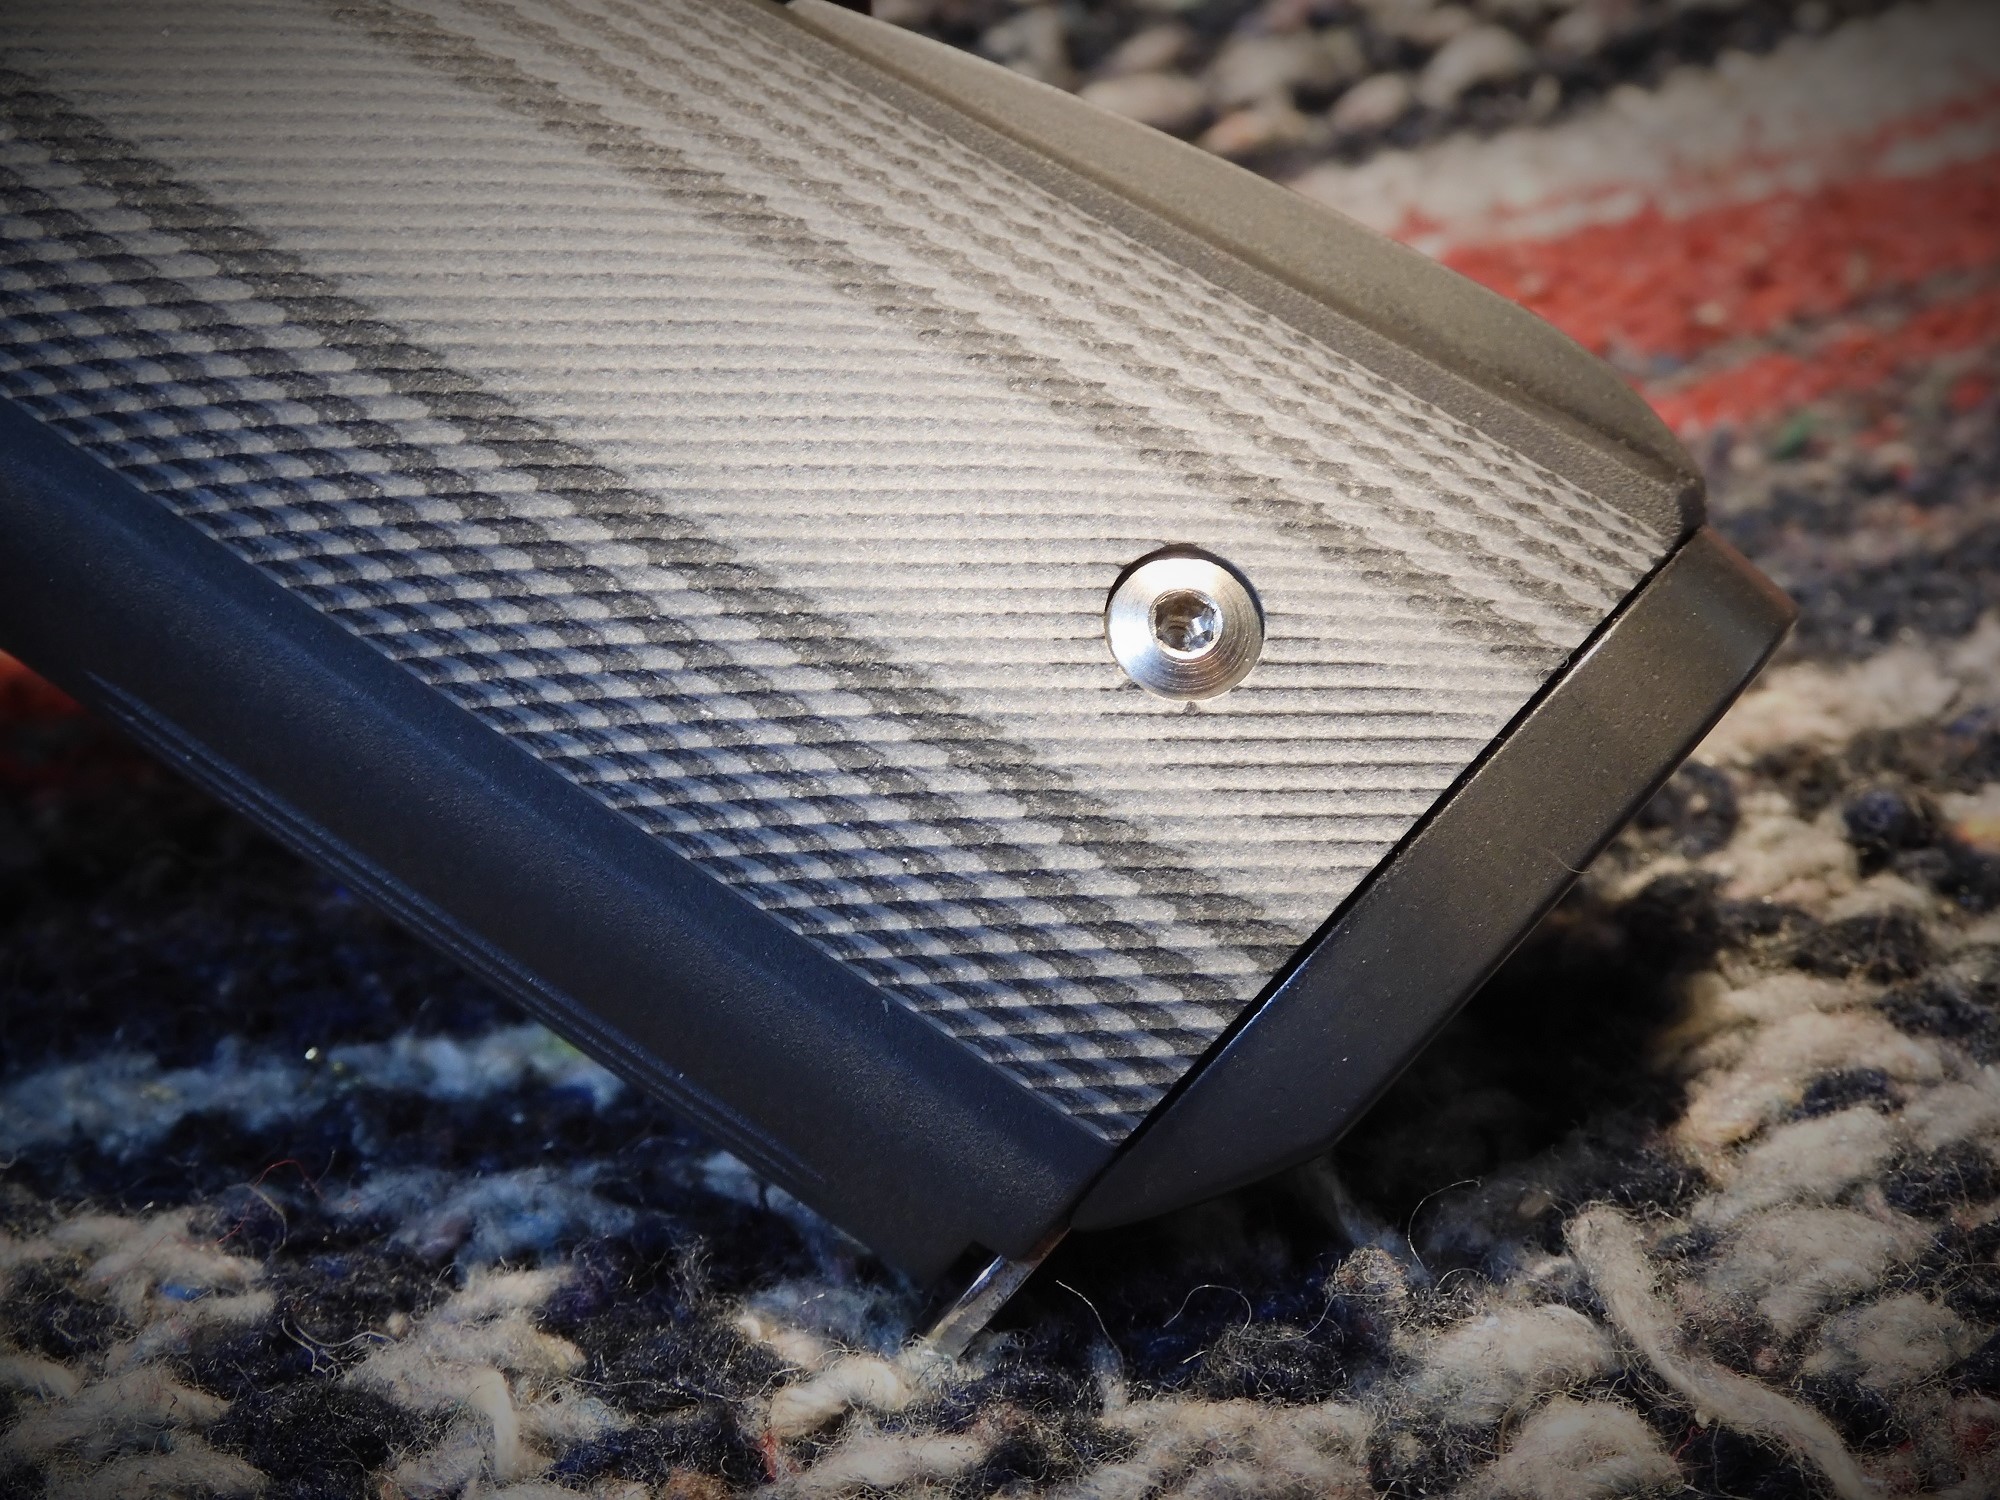
The grip panels were ordered with the extended safety, magwell, and grey/black coloring scheme options. The bottom of the grip panel is flat to blend in with the magwell and the bottom rear of the panels are extended to hide the mainspring housing pin. The black grips will look great against the charcoal grey of the frame, and the stainless steel magwell housing will add a final ‘completed look’ to the stainless steel theme of the slide. This is all my opinion, of course.
Although the grip panels come with mounting screws and O-rings, I already had a set of stainless-steel TORX grip panel mounting screws on the pistol and decided to keep those instead of getting fancy.
Now that I have all the parts needed to convert the Ruger SR1911 CMD-A Lightweight Commander to a Ruger SR1911 CMD-A Lightweight Commander with magwell housing, I will take you through a procedure for replacing the stock mainspring housing with the new magwell housing. First, let me identify the required (and optional) tools.
Tools
To replace a standard mainspring housing with an extended mainspring housing, the following tools and materials are required, and some of which are optional.
- Mainspring Housing Tool (or punch) to remove the pin that secures the mainspring housing in the frame.
- ¼-inch punch to press the mainspring cap pin while removing the mainspring cap pin retainer. Note that a large paper clip will also suffice, as the mainspring cap pin retainer normally will drop free once freed of spring tension, but some may need a little assistance.
- 1/16-inch punch to remove the mainspring cap pin retainer.
- Plastic-tipped small hammer in case the mainspring housing pin needs some encouragement when removing or installing.
- Non-marring bench block or means to secure pistol while removing the original mainspring and installing the new magwell extender.
- Tool (screwdriver, hex-head wrench, or TORX wrench, as necessary) to remove and install the grip panels.
- Padded vice for holding the mainspring housing being replaced and the replacement extended magwell.
- (Optional) A padded Quick Grip that extends to 6 inches. I use this to compress the magwell mainspring housing into the frame so that the magwell pin can be inserted. This beat pressing the pistol down onto a solid surface and trying to tap the magwell pin in with a padded mallet or hammer, and the padded grip tips protects the firearm from damage.
- Safety glasses or suitable eye protection wear.
- Tape or rubber band to secure the grip safety.
Mainspring Housing Replacement
!WARNING!
Always perform a safety check prior to performing any work on any firearm to ensure that the firearm is unloaded and safe. Failure to comply with this warning could result in severe injury or death.
Removal
- Perform a safety check and ensure that the pistol is unloaded and safe.
- Close the slide and lower the hammer to the rest position.
- Remove the grip panels from both sides of the pistol.
- Wrap tape or use a rubber band to compress the grip safety. (Note: The mainspring housing holds the sear spring in its mounting slot, thereby placing the sear spring under tension. Failure to secure the grip safety may result in the sear spring to dislodge from its mounting slot, which complicates the disassembly process.) An alternative is to hold the grip safety down throughout the removal of the mainspring housing and during the installation of the magwell. Once the magwell is in the grip far enough to secure the sear spring, the grip safety can be released.
- Place the pistol on a bench block or a supporting surface that will allow you to drive out the mainspring housing pin. Note the orientation of the mainspring housing pin; the dimpled end faces the left side of the frame.
- Use the Mainspring Housing Pin Tool (or equivalent) to push out the mainspring Housing Retaining Pin from the left side of the frame. A slight tap on the end of the Mainspring Housing Pin Tool may be needed, if the pin cannot be pushed.
- (Refer to Step 4). Slide the mainspring housing from the pistol.
- To disassemble the mainspring housing, go to Disassemble Mainspring Housing. Otherwise, go to Mainspring Housing Component Installation.
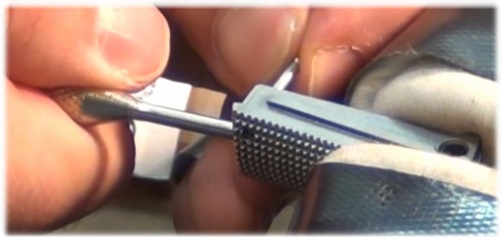
Disassemble Mainspring Housing
!Warning!
Use eye protection. Mainspring housing components are under spring tension. Ensure that mainspring opening is facing away from you when releasing the mainspring housing components. Failure to heed this warning could cause significant injury.
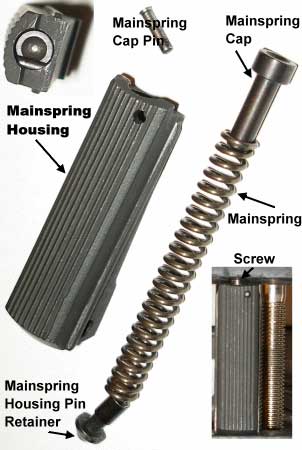
Mainspring Housing Breakdown
The mainspring housing is a simple assembly. There are at least a couple of ways it can be disassembled without getting popped in the head with a flying spring.
Method #1. As shown in the bottom right inset in the image above, place a grip screw against the mainspring cap, place your hand or something beneath the assembly to catch the mainspring cap pin, tighten the arrangement in a vise with the broad head end of the mainspring cap pin facing down until the mainspring is depressed and its retaining pin drops out. If the mainspring cap pin does not fall free, use the 1/16-inch punch (or suitable tool) to push it out. Open the vise gradually until the spring is unloaded.
Method #2. The second way is to hold the mainspring housing in one hand, press on the mainspring cap with a cap size punch with the other, cap pin head facing down. The pin will drop out and you can ease out the punch until the spring is unloaded. Caution should be used to prevent losing the pin.
Mainspring Housing Component Installation
Inspect the mainspring channel for any dirt or debris left over from the manufacturing process. If necessary, a few drops of alcohol on a Q-tip and swabbing of the channel will clean the channel.
Lubricate the mainspring assembly channel in the replacement magwell. I just use a couple of dabs of TW25B Extreme Performance Synthetic Grease on a Q-Tip or a small brush and swab the interior of the mainspring channel.
Note that the mainspring cap pin is flared. The pin must be inserted into the magazine well in the proper orientation; the non-flared end must be inserted from the inside of the mainspring housing with the flared end resting flush against the mainspring housing when fully inserted.
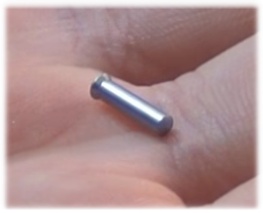
Mainspring Cap Pin
There are several methods available for assembling the mainspring housing components. A padded vice can be used to either hold the mainspring housing and push on the mainspring assembly with a punch (Method #1 below) or secure the punch in a padded vice and push the mainspring assembly onto the punch (Method #2 below). Both are awkward because of the magwell being mounted at the base of the mainspring housing, unless you are installing a two-piece magwell.
Method #1. Secure Magwell and Push Mainspring Assembly into Mainspring Housing.
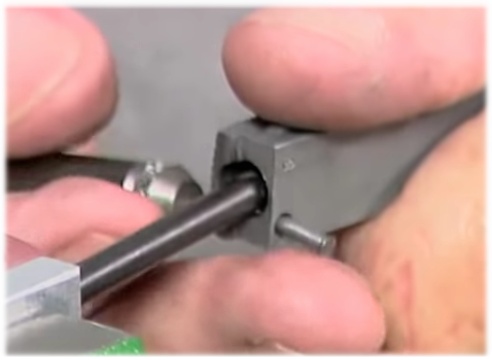
Method #2. Secure Punch in Vice and Push Mainspring Assembly into Mainspring Housing.
With my method, and with the mainspring housing on a solid surface, I was able to simply press down on the mainspring assembly with the mainspring pin removal tool with the cap pin hole facing toward me. Once the mainspring assembly has cleared the cap pin hole, I simply inserted the pin and pushed it until it was flush with the back of the mainspring housing. Then, I released the mainspring assembly, and then worked the assembly up and down a few times to detect any binding. There was no binding and I considered the job of installing the mainspring component to the mainspring housing done.
Time to move on to installing the magwell into the frame.
Install Mainspring Housing into Frame
- Lightly oil the slide of the mainspring housing to assist in insertion into the frame.
- Slide the mainspring housing into the grip frame. Ensure that the sear spring is in it mounting slot. When you reach the hammer strut, ensure that the hammer strut engages the mainspring cap, then push the mainspring housing further into place. At this point, the magwell is not yet under spring tension
- Press the bottom of the mainspring housing against a flat surface. (Option: Attach the padded Quick Grip clamp to the top of the side and to the bottom of the magwell. Use the Quick Grip clamp to squeeze the top of the slide and the bottom of the magwell until the magwell is seated in the grip of the frame. The magwell will now be under spring pressure by the hammer strut.
- Properly orient the mainspring housing pin. The dimpled end must face the left side of the frame and the rounded end to the right side of the frame.
- Insert the mainspring housing pin into the mainspring housing and frame. Use the Mainspring Housing Pin Tool to push the mainspring housing pin into the mainspring housing. If necessary, use the plastic tipped hammer to gently tap on the Mainspring Housing Pin Tool until the mainspring housing pin is fully inward and flush with the frame.
- Perform a function test by testing the operation of all safeties (thumb and grip). Ensure that the grip safety clears the magwell (backstrap) with no interference. In rare cases, the grip safety’s bottom edge may rub against the backstrap of the magwell. In this case, some material may have to be removed from the top of the backstrap. In most cases, this is not necessary.
- Install the grip panels.
Congratulations! The new magwell housing has been successfully installed!
Evaluating the Installation
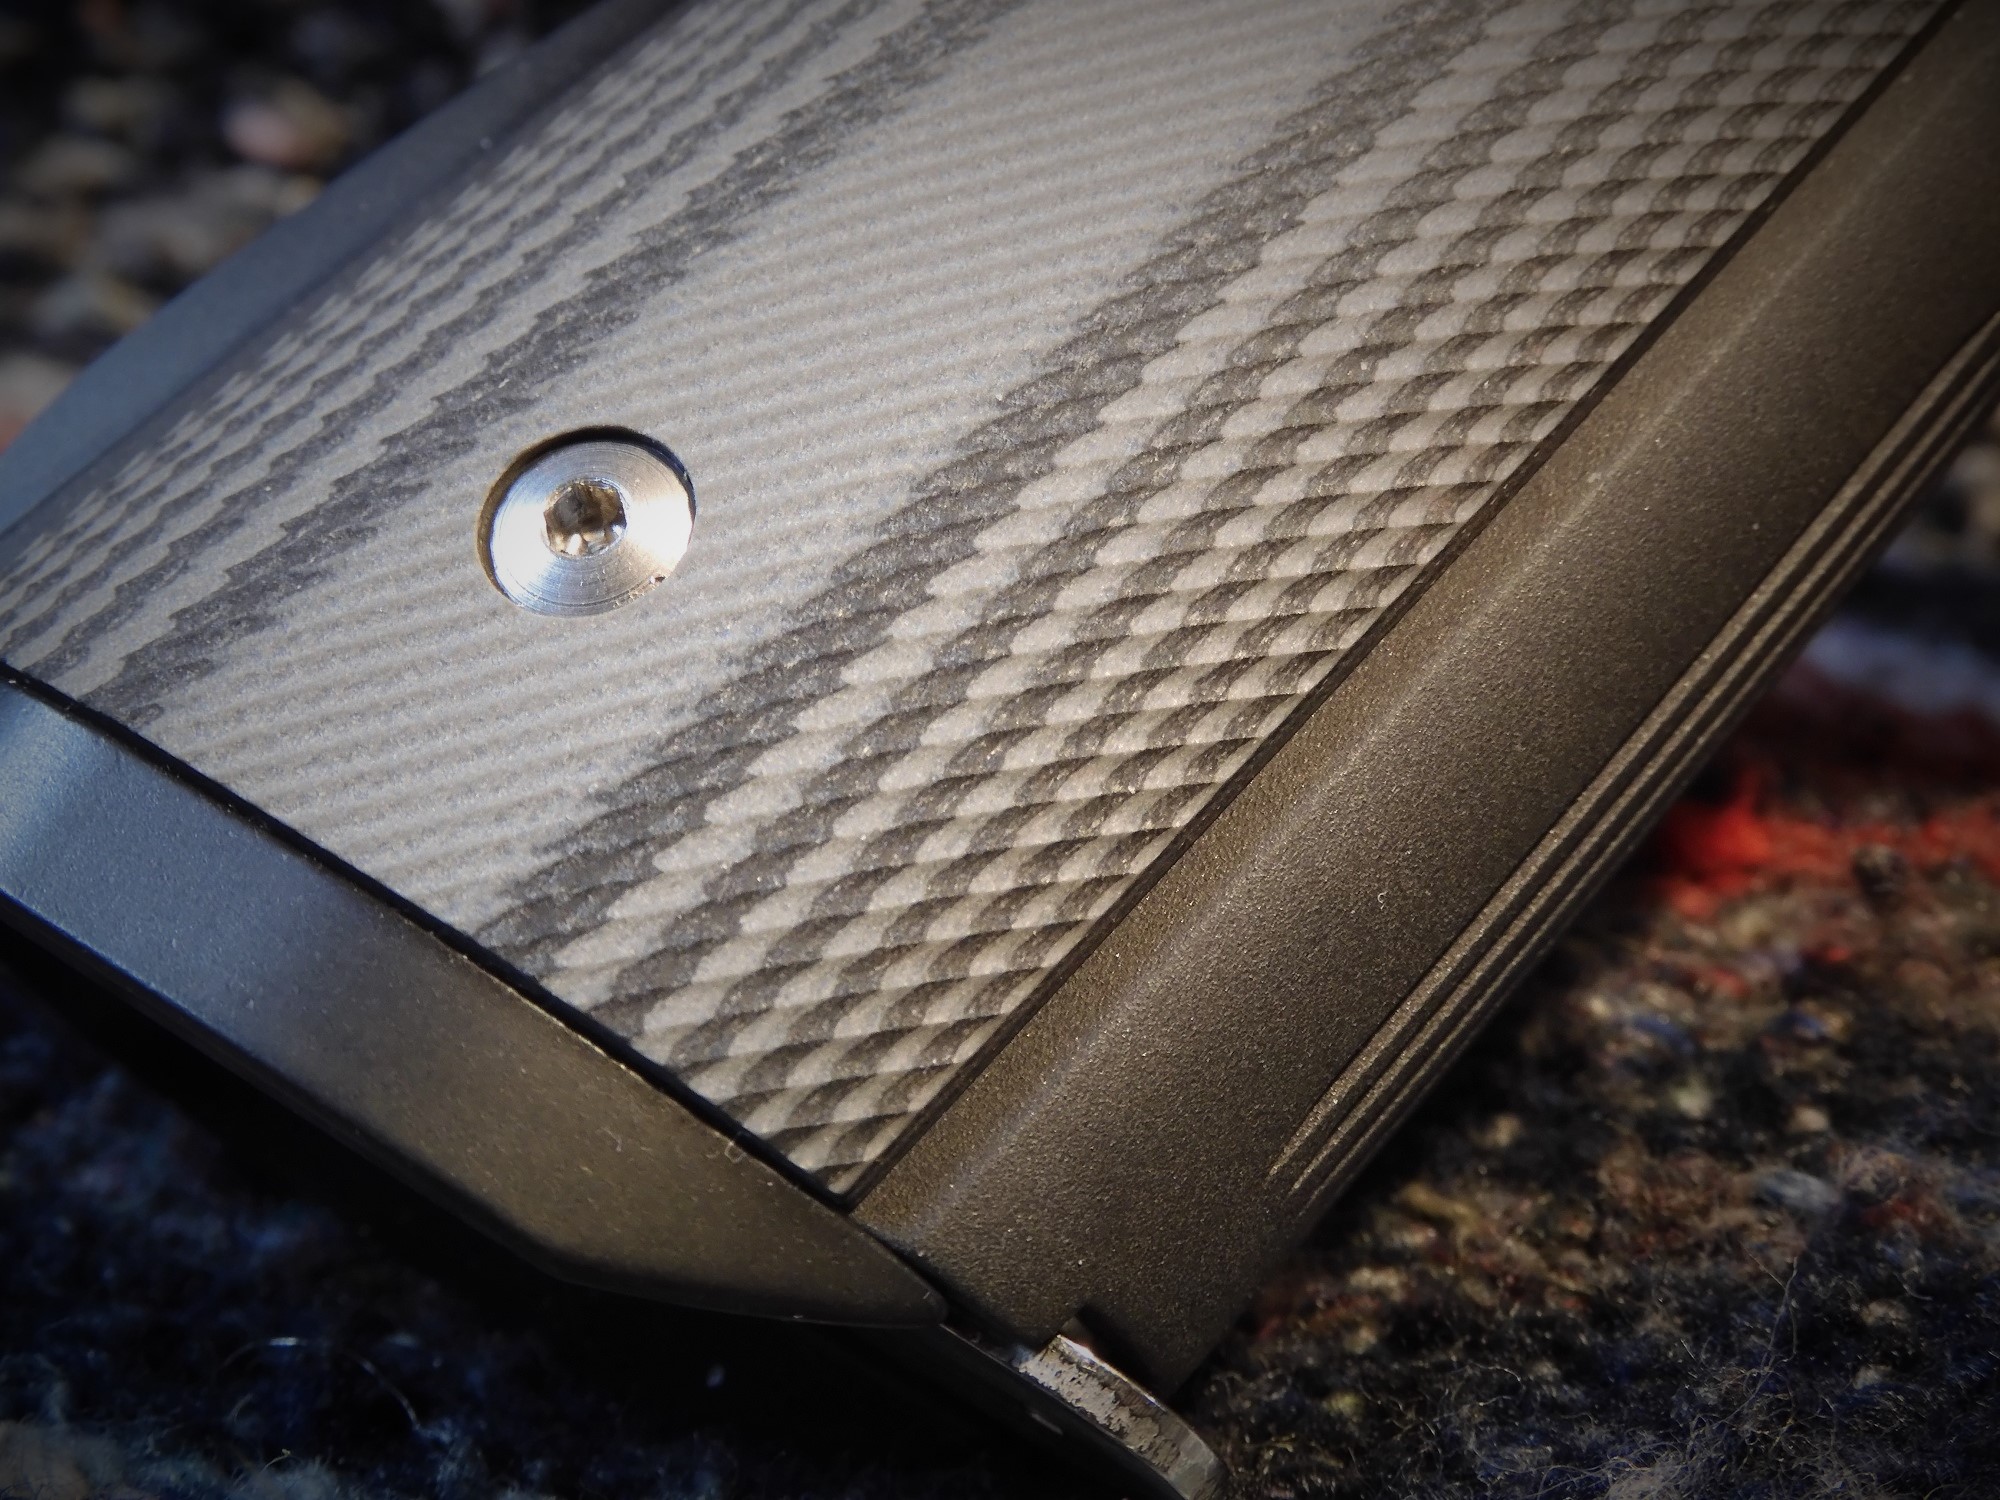
After the magwell was installed I checked for evenness around the base of the magwell and the frame. There was a tiny gap at the front of the magwell and frame, but not enough to matter. The gap would not be seen once a magazine was inserted into the frame. The gap is just simply due to tolerances. Otherwise, the magwell installation is a perfect fit.
Project Cost
Below is the cost of the (my) project, less sales tax. Giving this project to a competent and certified gunsmith would have put the cost far north of $200.00. While the job may well have been done by gunsmith, there sure would not be the satisfaction of doing it myself. For your convenience, links are provided to the source of the parts used in this project.
| Component | Cost (parts only) | Source |
| Magwell Component Kit | $8.95 | Ed Brown |
| Arched Serrated Magwell, Stainless Steel | $74.95 | Ed Brown |
| Grip Panels | $39.99 | CoolHand Grips |
| Mainspring Housing Pin Tool | $24.99 | Brownells |
| Muttering under Breath | N/C | Self-imposed |
| Total (tax not included) | $148.88 |
Given the cost and my personal labor (about 20 minutes) in the project, I still must ask myself If it was worth it. Sure, it was a chunk of change just to satisfy wanting to learn something new but being that I was able to do it myself is priceless. And I took the smile off a gunsmith’s face by not helping him pay for his Corvette.
The final test is at the range where the Ruger SR1911-A will be test fired to ensure that it is 100% functional with the new magwell.
Summary
The Ruger SR1911-A Lightweight Commander now has a distinctive look to it while being more functional than prior to the new magwell housing installation.
After the new magwell was installed, gripping the Ruger SR1911-A feels different. The arched mainspring housing fits nicely to my hand, especially with the new grip panels installed, although the girth of the grip is slightly smaller than with the wraparound grip panels.
The finish of the magwell matches the finish of the slide and only a discerning eye would detect any difference in the finish between the two. Overall, I am incredibly pleased with the outcome. The stainless steel magwell and mainspring housing adds a bit more of contrast to the pistol, and I like the contrast.
You may note that I decided to use the black mainspring cap pin over the stainless pin, as it added a bit more contrast to the final assembly, not that it is that noticeable.
Note that the new magwell can be removed from the mainspring housing should I decide not to run the magwell for some reason. Ed Brown provides an Allen wrench to do so.
Because of the cost of transitioning a 1911 from no magwell to a magwell, I cannot say that all my 1911 pistols will receive the same treatment. However, I can say that any 1911 pistol that I carry may be subjected to the transition and a few more ‘transitions’ are in the mill. The worth of the transition I leave solely up to you.
I now carry the Ruger SR1911 CMD-A Lightweight Commander with a Wilson Combat 8-round magazine installed as my primary loadout, and it looks good doing so. The plus is that I get one more round available to me for serious social work over the standard 7-round magazine.
I admit that I must do a bit of filling on the mainspring housing bottom, as there is just the tiniest of gap between the magwell housing and the frame. Otherwise, the fit of the mainspring housing and magwell is perfect.
Now that this project is completed, I can light a fire, grab a cup of cocoa, and settle in for a night of hygge.
Update: 01/24/2019
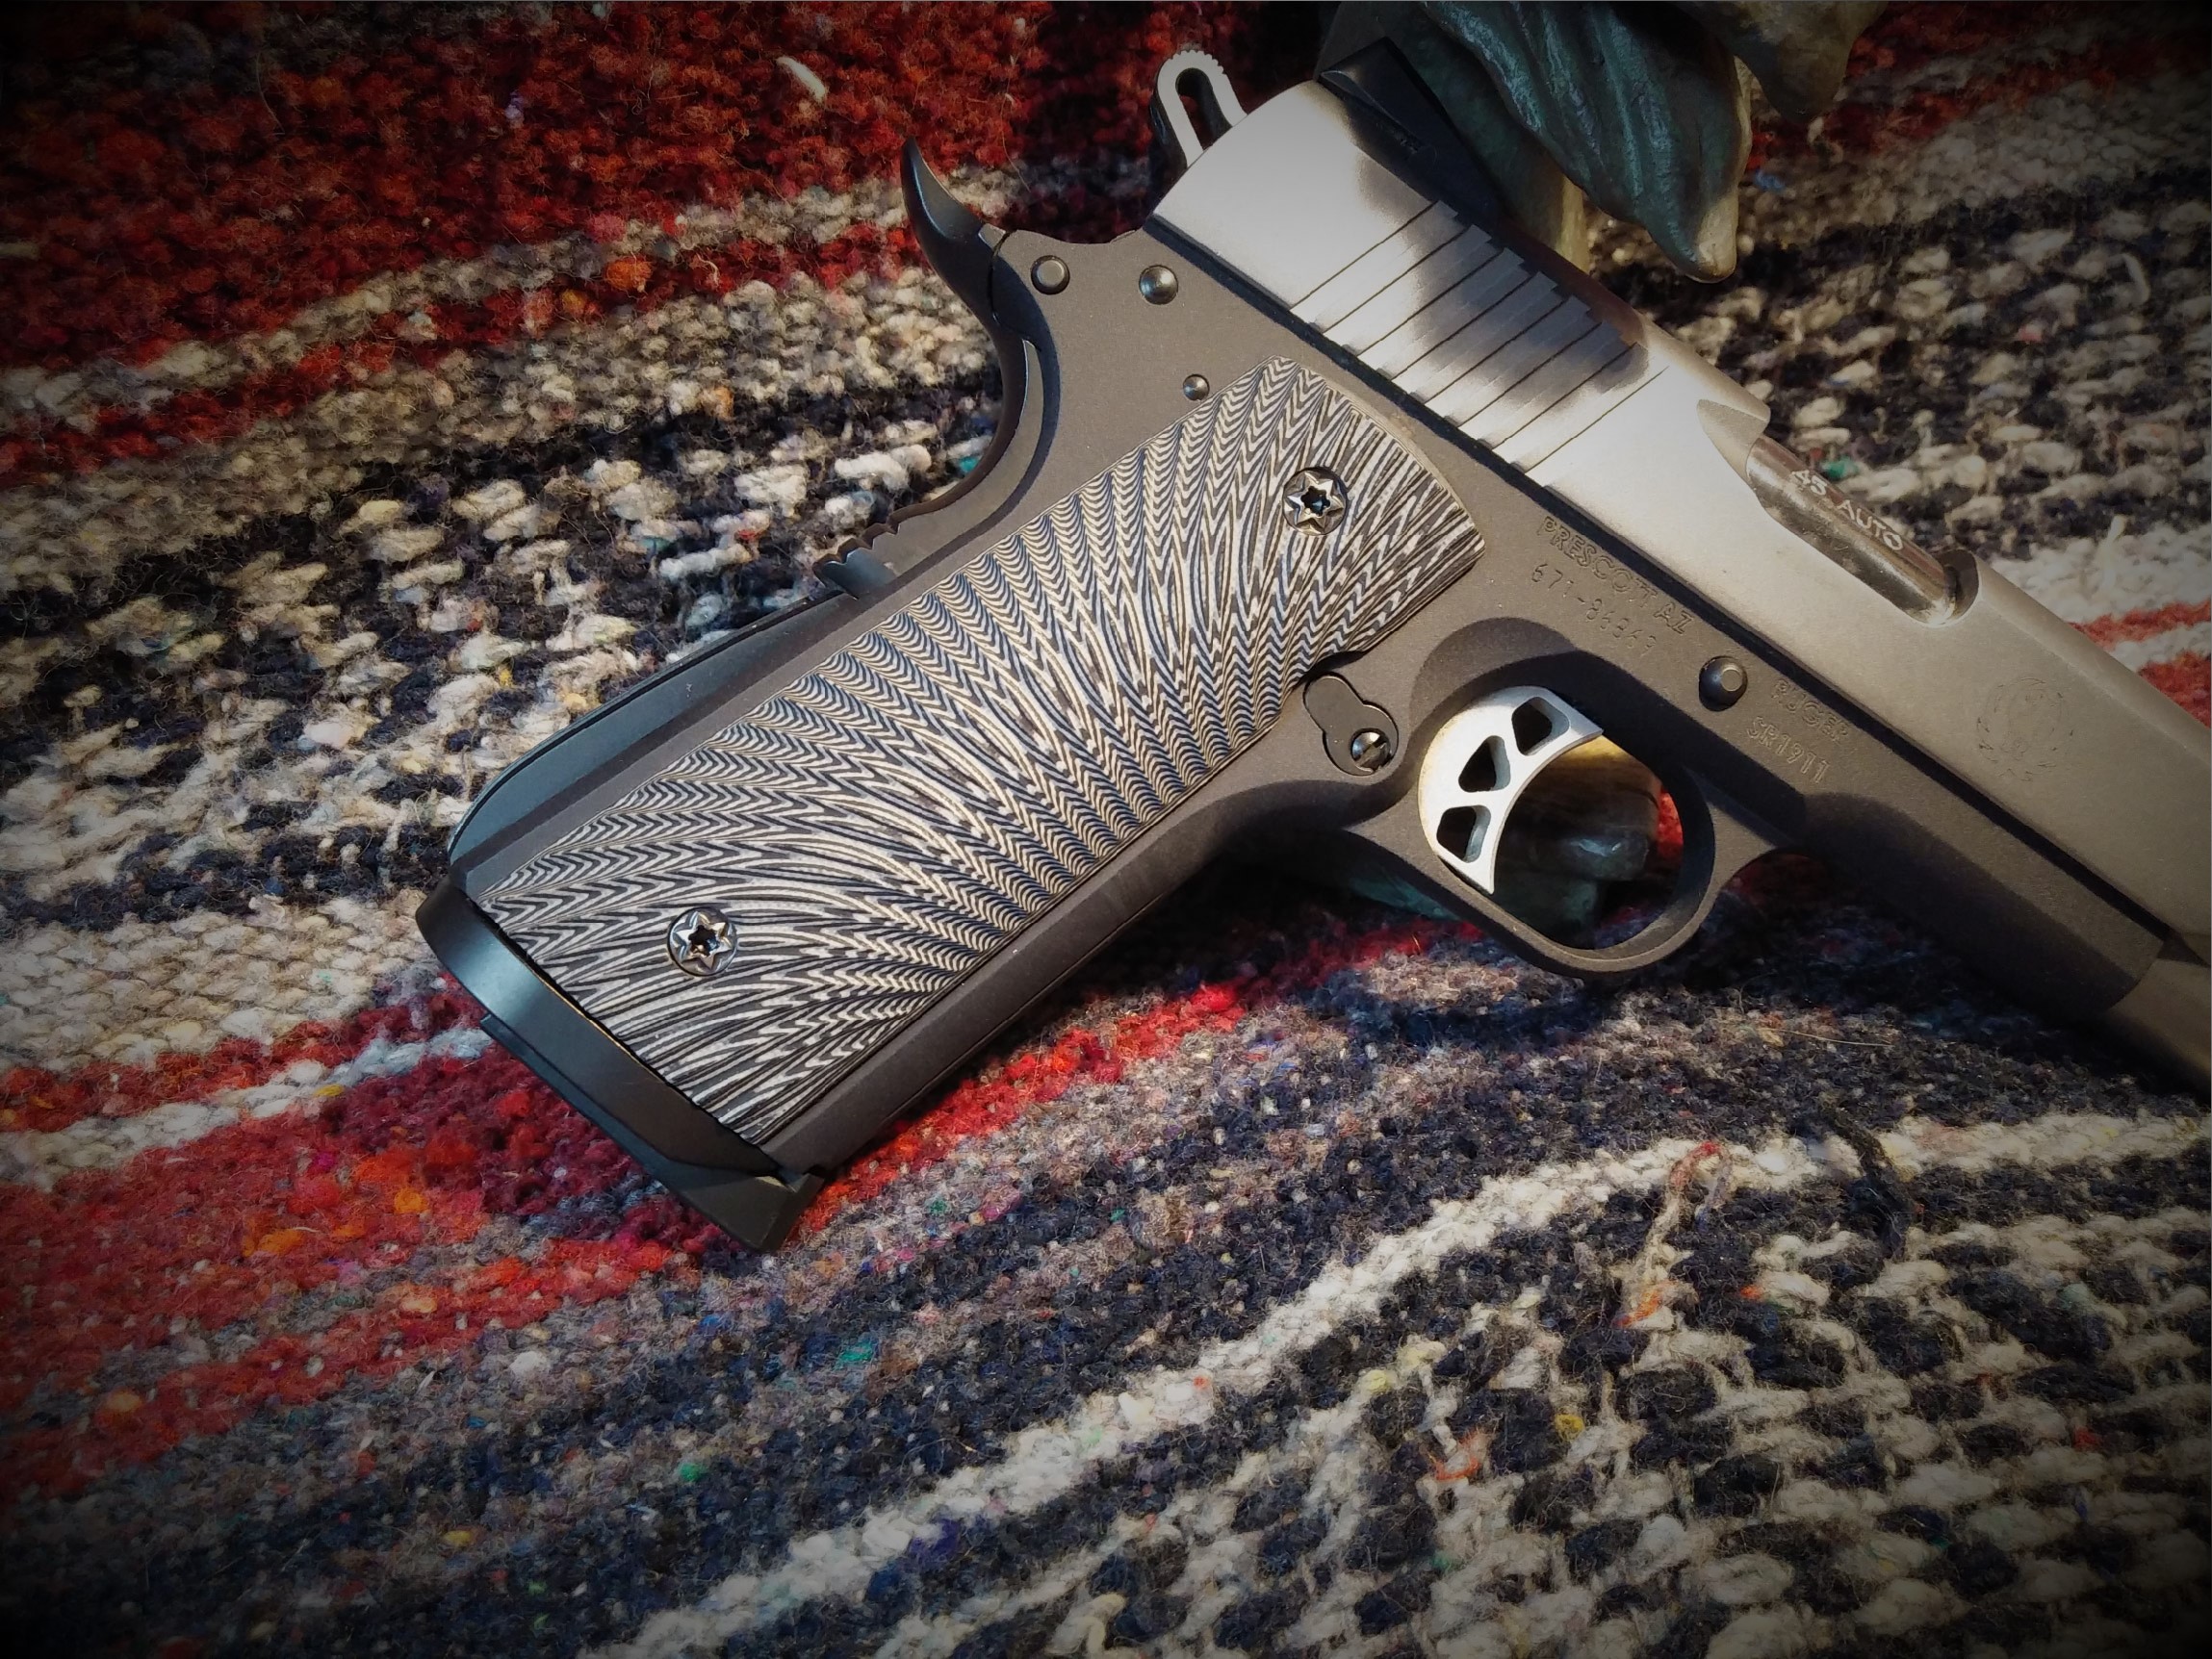
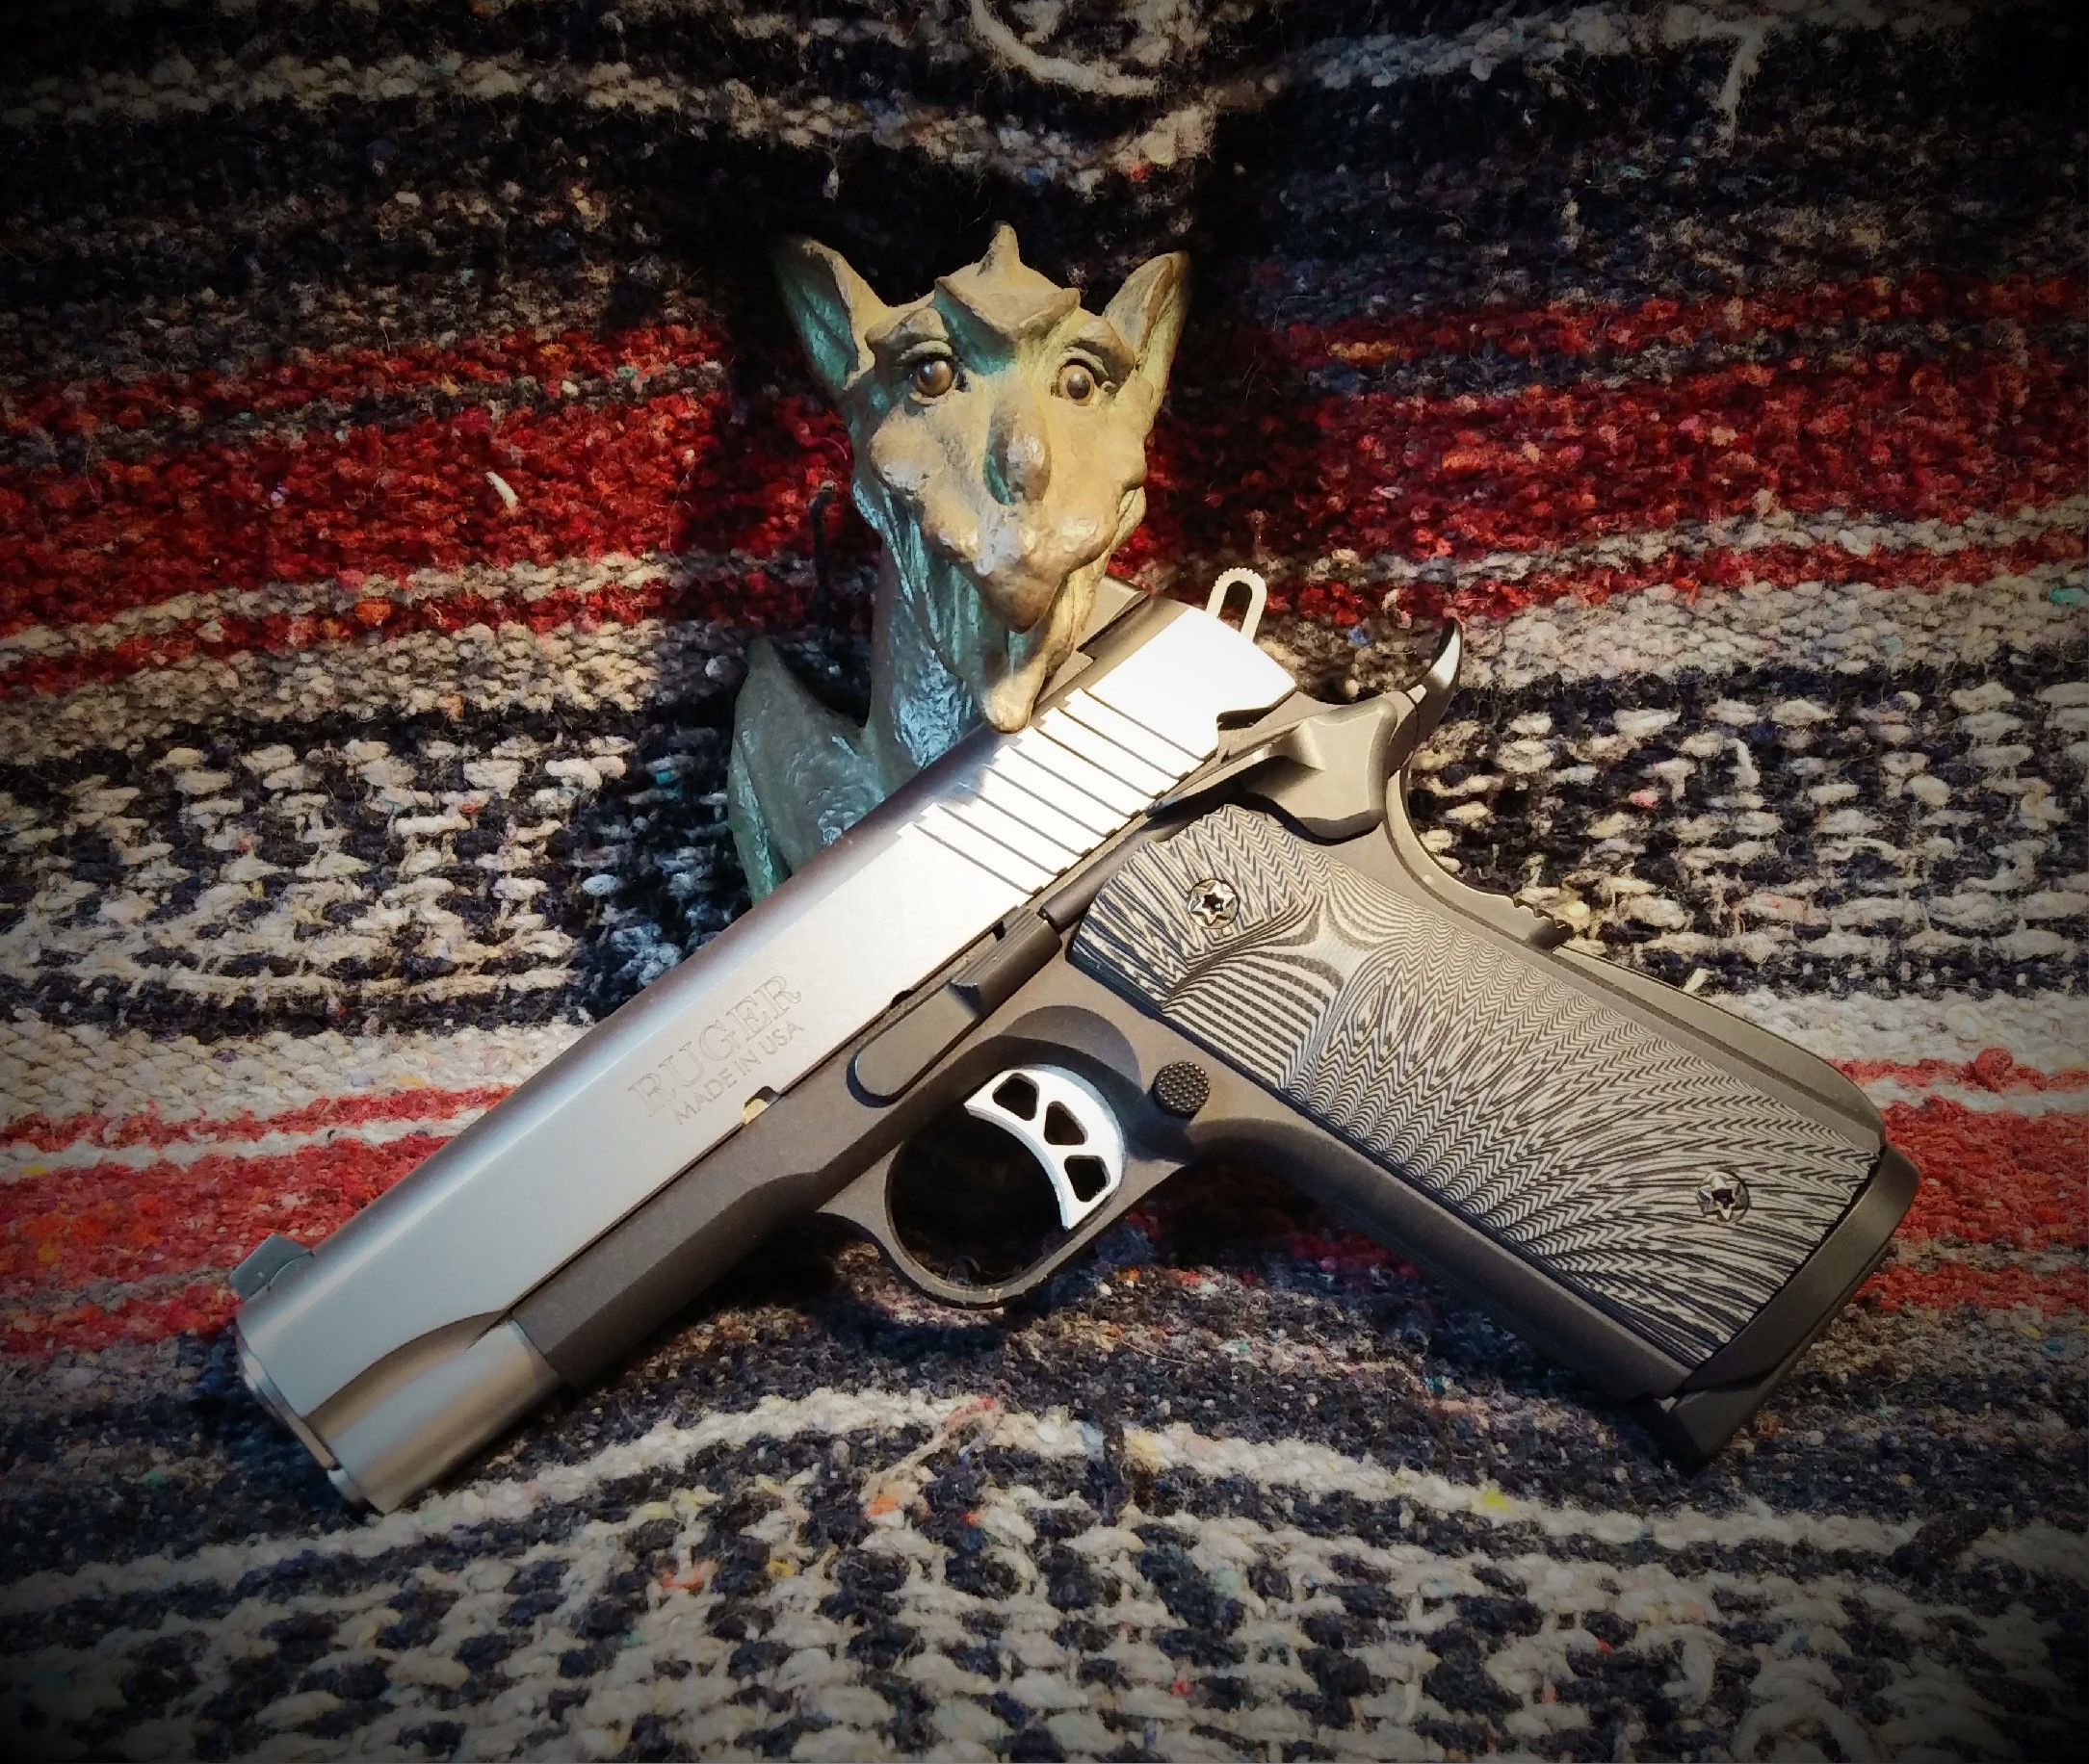
I was unable to repair the gap that existed between the frame and the magwell, as it seems that the product was incorrectly machined. I had another arched Ed Brown magwell, although it was in black. A test fit ensured that it would fit correctly. Again, a new mainspring housing kit was installed in the new unit. The new unit was installed, as was a new set of grip panels and screws. The images that follow show the result. Actually, I like this better than my original installation.
Update 12/05/2020
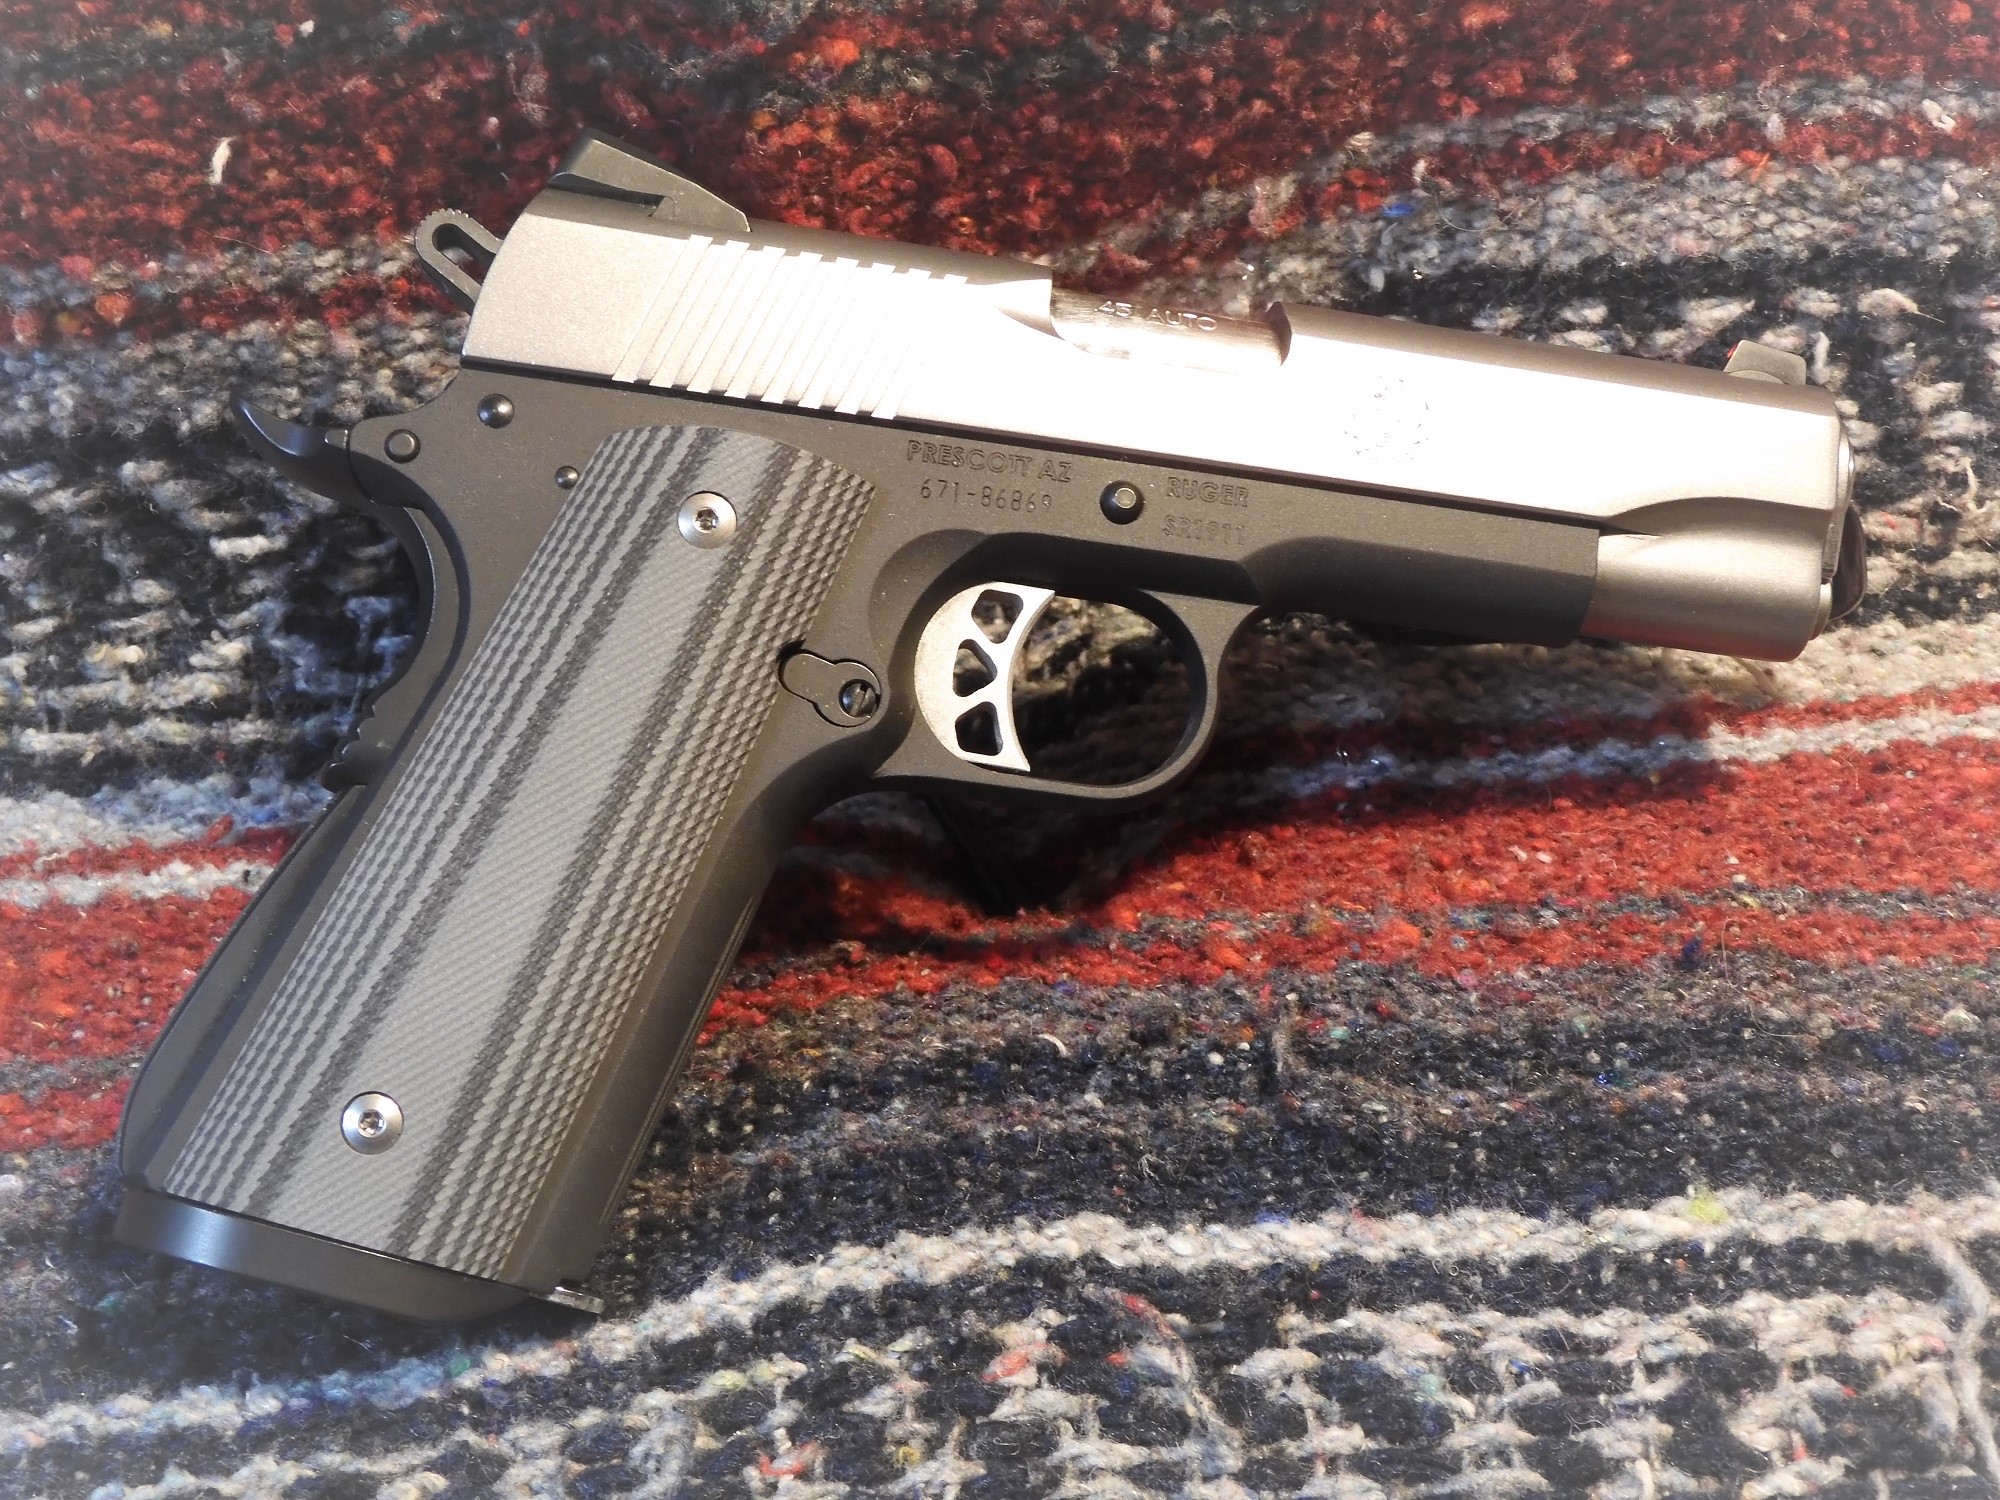
In keeping with my personality, and not leaving well enough alone, I felt that a grip panel change was warranted. Also I liked the look of the grip panels that I had chosen, I did not like the feel in the hand. They were way too coarse for my liking. These were changed out to a set of grip panel that, I felt, were way more friendly in the hand and enhanced the look of the pistol with their color and vertical lines. Below shows the finished product.
Resources
There is a plethora of videos available regarding replacing a standard mainspring housing with a magwell housing that include alternatives to the method I have written. Some are for specific firearms, but the principles of performing the work required to exchange a standard mainspring housing with a magwell housing remain.
- 1911 mainspring housing & magwell installation: https://www.youtube.com/watch?v=wn6r2jgaWsA
- How To Replace A Kimber 1911 Main Spring Housing: https://www.youtube.com/watch?v=9py1U-X2VZU
- Kimber Ultra Raptor – Installing New Main Spring Housing: https://www.youtube.com/watch?v=mhQPPgqWMCw
- Accessorize Your 1911: Mainspring Housing: https://www.youtube.com/watch?v=0peELOwo-QA
- Wilson Combat 1911 mainspring install: https://www.youtube.com/watch?v=5lhG0EbUVH8
- Armchair gunsmithing: Installing a flared mag well on a 1911: https://www.youtube.com/watch?v=PQKR9ET0d0Q
- Should You Run a MAGWELL on Your EDC 1911? Options? Differences?: https://www.youtube.com/watch?v=PRoHVZ_-Ji8
- Range Officer Champion: Installing Drop-in Magwell: https://www.youtube.com/watch?v=oYN5hIDYNX8
- Wilson Combat 626B Bullet-Proof One-Piece Magwell Review: https://www.youtube.com/watch?v=7Q-TKOn7Wfc
- Wilson Combat Magwell 1911!: https://www.youtube.com/watch?v=HwGV9uvmSeI
- Kimber CDP II steel mainspring housing install: https://www.youtube.com/watch?v=Ll-u_rMjxiA
- Wilson Combat 626B Bullet-Proof One-Piece Magwell Review: https://www.youtube.com/watch?v=7Q-TKOn7Wfc
- Brownells – Installing a main spring housing/mag well on a 1911: https://www.youtube.com/watch?v=0yL3-sb9_Jc
Taurian, 2020
![]()
One Response to 1911 MAGWELL HOUSING PROJECT – PART 1