

This was my introduction to Pietta firearms. It was also my introduction black powder percussion revolvers.
For all of my early West (cartridge) firearms, Uberti has been my top choice. However, I felt that it was time to take a leap of faith and try out the Pietta version of the popular 1851 Colt Navy in percussion persuasion.
“The Colt Revolving Belt Pistol of Naval Caliber (i.e., .36 cal), later known as the Colt 1851 Navy or Navy Revolver, is a cap and ball revolver that was designed by Samuel Colt between 1847 and 1850. Colt first called this Revolver the Ranger model; but the designation Navy quickly took over.” – Source: https://en.wikipedia.org/wiki/Colt_1851_Navy_Revolver
The Colt Navy was originally chambered in .36 caliber offering, and that is one of the reasons that I wanted this particular revolver (which was still called a pistol at the time, by the way). While there are reproductions in .44 caliber chambering they are not true to the original caliber.
Traditions Firearms offers this pistol in .44 caliber trim as part of a “starter kit” and it seems to be also a Pietta product. That was enticing, but I decided to take the long route and purchase the revolver first to determine exactly what I was going to need for shooting a percussion revolver.
The 1851 Navy Colt was manufactured from 1851 to 1873.
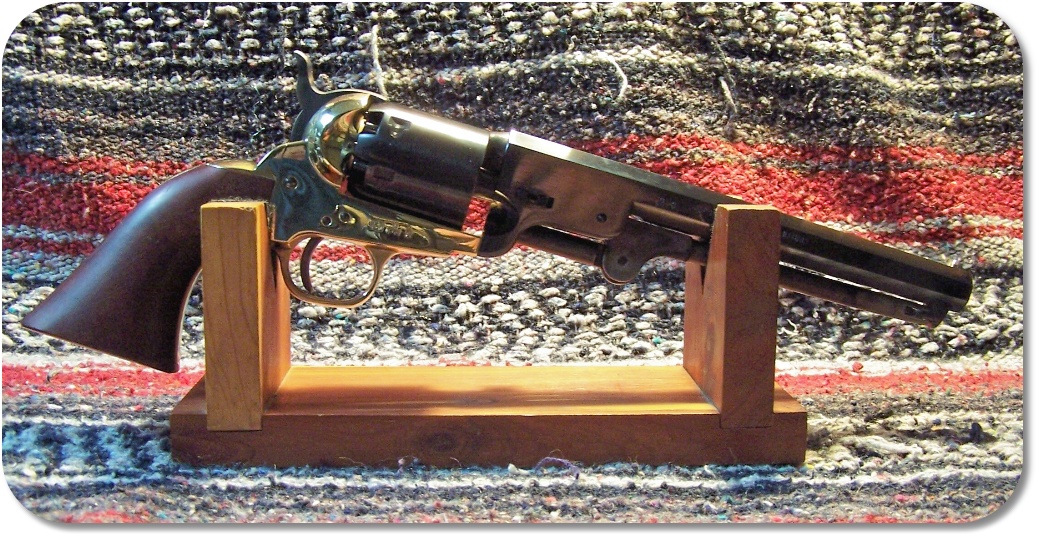
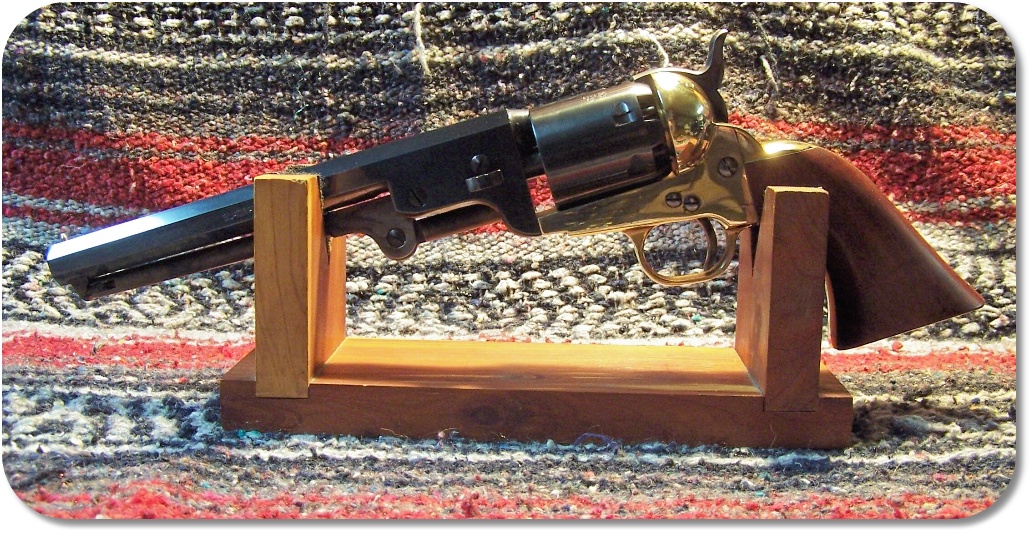
Let’s take a look at this Pietta version of the 1851 Navy Colt.
Normally seen with a brass back strap and trigger guard, the Pietta version of this revolver also has an all-brass frame. However, there is a little secret to the Pietta version of this revolver.
What you normally find in the 1851 Colt Navy is that it has a steel barrel, frame, and back strap with a brass trigger guard. There was also the “London” version with steel everything (a future review is planned). The North could afford to make these firearms, as they had plenty more resources than the South.
An historical note is that the back strap and grip was carried over in the design of the 1873 Colt Single-Action Army due to it being larger than that used with the 1860 Colt and was in better favor among users.
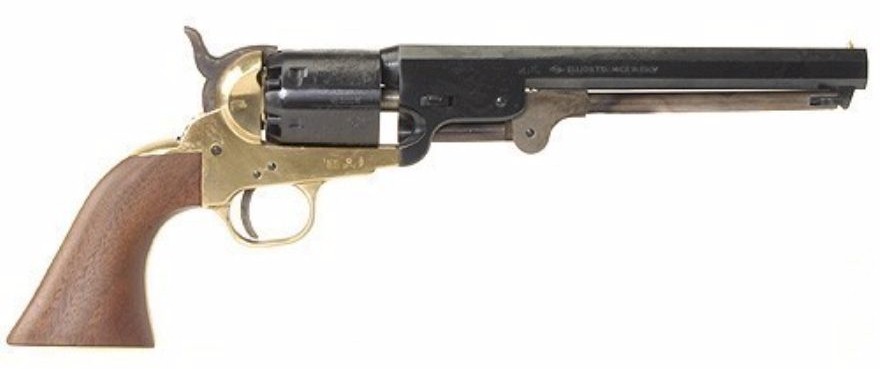
So, what is the secret of the Pietta version of the 1851 Colt Navy? The Pietta version that I have would be a representation of the Confederate manufacturing efforts of Griswold and Gunnison. This six-shot percussion revolver of .36 caliber loading was made under contract to the Confederate government. It is a brass framed copy of the Colt 1851 Navy revolver. Connecticut Yankee Samuel Griswold set up a cotton gin factory in Georgia in 1830. The village of Griswoldville grew around the factory. In 1862, Griswold produced pikes for volunteers from the state of Georgia. The factory soon began producing revolvers for the Confederacy. No other Confederate factory produced more revolvers than Griswold & Gunnison. However, production was soon stopped by the lack of steel: churches bells, sword’s handles and cannon parts were used.
“An interesting footnote is that a Georgia historical marker at the site of the Griswold factory states that the pistols were manufactured at a cost of about $50. Albaugh’s sources, however, indicated that Griswold and Gunnison first sold their revolvers to the Confederacy for $40 but later were given $50. It is unlikely that the Griswold was ever sold at a loss. The Navy Colt, it can be noted, sold for under $15 each.
Union forces destroyed the Griswold and Gunnison pistol plant in November 1864 during the first battle of Sherman’s march to the sea. Griswold and Gunnison started over again but with a much smaller operation that continued until April 1965.
The Griswold is now one of the rarest of Confederate firearms. Only a few originals remain, many with broken parts. In poor condition, a Griswold might bring $25,000 at auction. An unconfirmed report, however, was that a Griswold in excellent condition brought an auction price exceeding $1 million.” – Source: The Cowboy Chronicle, June 2012, pages 26-27.
The version that I have would be the same version as the Pietta Reb Nord Navy with its octagon barrel, yellow cast brass frame, brass trigger guard, and back strap of the same color of the frame.

Cullen Bohannon (Anson Mount) “Hell on Wheels” with a “Griswold” Revolver
Another interesting note is that the character Cullen Bohannon (Anson Mount), carries a Confederate-made Griswold & Gunnison Revolver in the “Hell on Wheels” “Pilot” (S1E01) episode, by which he is recognized. This weapon is only mainly seen in the pilot episode, after which Cullen Bohannon carries a Colt 1860 Army revolver and an 1858 Remington Army as his main sidearm for the rest of the season. The Griswold & Gunnison revolver is also seen firing during a continuity error in “A New Birth of Freedom” (S1E03).
The Griswold & Gunnison Revolver has been used in many a movie, to include; Quigley Down Under, and virtually any “Spaghetti Western” starring Clint Eastwood. However, it was “Hell on Wheels” that made me research the Griswold & Gunnison revolver, as I never knew that it existed before then. Now, I have a reproduction of the very same revolver. It is funny how things work out sometimes.
Anyway, back to the revolver itself.
Specifications:
| Capacity: | 6 |
| Weight: | 2.6 Pounds |
| Overall Length: | 13 Inches |
| Barrel Length: | 7.5 Inches |
| Black Powder Caliber: | 36 Caliber |
| Barrel Finish: | Blue |
| Sight Type: | Blade Front |
| Ignition Type: | Percussion |
| Grip Material: | Walnut |
| Frame Finish: | Brass |
This particular percussion revolver was ordered through Dixie Gun Works, my first time with them, but I hope not the last as they seem to be the premiere source of things that go bang using flint and percussion caps and also the necessary “Possibles” to support these firearms.
The “Possibles” are about the same as with a muzzle loading pistol sans the ram rod; none is needed since these load through the cylinder chambers and the “ram rod” is built into the revolver.
This was also my first time with a “Pietta-made” product and I was a bit more critical than I am with Uberti firearms. I felt that a close inspection was necessary, and I had a few inspection points to cover. So, let’s get to it.
First, I have to say that it is strange to receive a firearm at my doorstep. But, that is totally legal (at least in the State that I reside – aside from the State of Confusions) to whit: “‘Antique’ firearms need not be shipped to a licensed dealer. These can be shipped directly to the buyer. An antique firearm is a firearm built in or before 1898, or a replica thereof. The exact ATF definition of an antique firearm is:
Antique firearm. (a) Any firearm (including any firearm with a matchlock, flintlock, percussion cap, or similar type of ignition system) manufactured in or before 1898; and (b) any replica of any firearm described in paragraph (a) of this definition if such replica (1) is not designed or redesigned for using rimfire or conventional centerfire fixed ammunition, or (2) uses rimfire or conventional centerfire fixed ammunition which is no longer manufactured in the United States and which is not readily available in the ordinary channels of commercial trade.” – Source: ATF ‘Federal Firearms Regulations Reference Guide’ (ATF P 5300.4) B8.
The 1851 Colt Navy “Griswold” falls under that definition, but an 1851 Colt Navy cartridge conversion revolver would not, as it fires a modern cartridge, and would require shipping to a FFL holder.
Upon receiving and unpacking the revolver an inspection began from stem to stern and everything amidships (this is a Navy replica after all, even though the Army used it more).
The cylinder of this revolver is not engraved with a scene of the victory of the Second Texas Navy at the Battle of Campeche on May 16, 1843, as is found on most other versions of the 1851 Colt Navy. “The Texas Navy had purchased the earlier Colt Paterson Revolver, but this was Colt’s first major success in the gun trade; the naval theme of the engraved cylinder of the Colt 1851 Navy revolver was Colt’s gesture of appreciation. The engraving was provided by Waterman Ormsby. Despite the “Navy” designation, the revolver was chiefly purchased by civilians and military land forces.” – Source: https://en.wikipedia.org/wiki/Colt_1851_Navy_Revolver.
First of all, if you expect “pretty” right out of the box, you will be disappointed – unless you expect “pretty oily.” The revolver is wrapped in a plastic bag, the inside of which is oiled. You have to remember that these firearms are shipped from Italy and corrosion from salt is a definite concern. I know how to clean up the oil coating so I was not concerned; I knew that there was no rust – anywhere.
The caliber was the correct caliber for the pistol, which is .36-caliber.
The 7 ½-inch octagon barrel is integral with the barrel lug and the bluing is excellent on both but not, in my opinion, as that found on Uberti replicas.
The cylinder is finished just as well as the barrel. The Flash Gap (the distance between the face of the cylinder and forcing cone measured approximately 0.0025 – inch. However, the cylinder has some very slight forward and backward play and also some slight laterally play when the revolver is in “full-cock.” The timing seems right, but the play bothered me a bit.
The Colt revolvers were known to “shoot loose” and the brass-framed revolvers were prone more so than the steel-framed versions. The frame will “stretch” after numerous firings. Hot loads would exacerbate the problem. After a while, the frame stretches to a point to where the revolver is unsafe to fire, due to “flash-over” and the “subsequent “chain-fire” that would occur. The “flash-gap,” the gap between the chamber and the forcing cone, had to be as tight as possible to help mitigate “flash-over.” Applying grease in the chambers, on top of the ball, helped to mitigate “flash-over,” but I would say that on the battlefield there was not much time to lube the chambers, powder charges were not precise, and the possibility of all chambers firing at the same time probably happened often, which was not good for the revolver nor the person holding it. The Remington revolvers were not as prone to “shoot loose” because of the thick top strap that Remington incorporated into all of their revolvers of the time, and was probably why the 1858 Remington was favored over the Colts; albeit, it was more expensive.
The Loading Lever locked into place nicely at the front of the barrel. One of the failings of these pistols (at least with some models like the Colt Walker) is that the Loading Lever would fall from its position just below the barrel. In doing so, the ‘Rammer’ would drop into a chamber in the cylinder, effectively locking up the action until the Loading Lever was put back into place. A common cure was to wrap and tie a strip of leather around the barrel and Loading Lever.
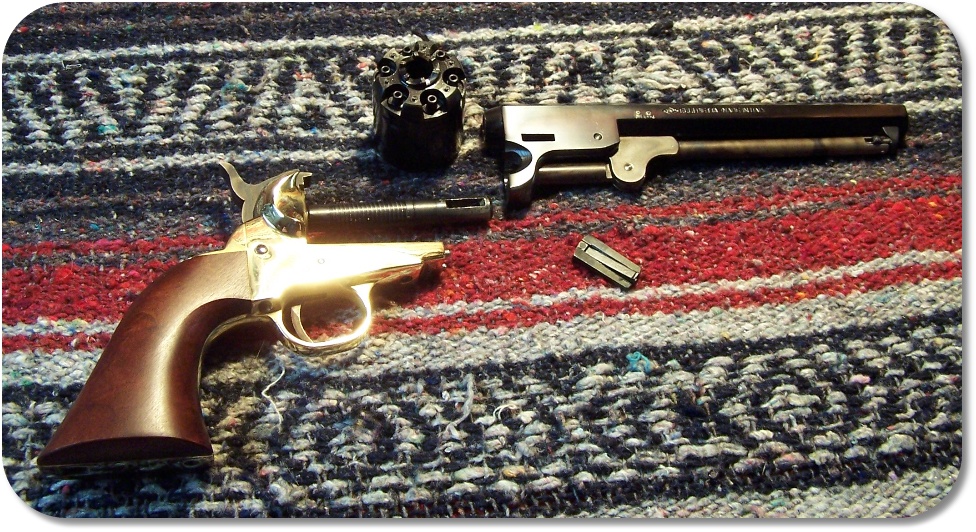 The barrel assembly is held in place by a spring-type wedge. The wedge has a lip that is captured by the frame and this is what holds it in place. The Wedge is knocked out from the right side of the revolver (I use a plastic punch, but a small plastic-tipped hammer can also be used), and then the entire barrel can be removed, but it takes some work to do so. The left side Wedge Screw is used to capture the Wedge once it is tapped free of the Cylinder Pin; thus, keeping the Wedge in the revolver and less prone to loss. However, the Wedge can be removed by simply applying finger pressure to the Wedge Spring. Two pins at the front of the frame serve a guide pins for installing the barrel assembly. I normally put a bit of grease on these pins before installing the barrel.
Once the barrel is removed, the hammer is placed at half-cock to release the Locking Stud, and the cylinder simply slides out of the revolver. A cylinder inspection point is the cylinder star (or ratchet as some call it), which should be free of burrs. Each chamber should be checked for roundness and size.
Next comes the grip-to-frame fitting. While not perfect, as the front of the Walnut grip is not even with the frame. Overall the grip is a nice fit. I would tend to say that the grip-to-frame fit was not perfect on the original, since these were mass-produced firearms and hand fitting was very time consuming.
The brass was in bad shape, very bad shape. The oil coating inside the shipping bag discolored the brass fame to the point that Flitz and a lot of rubbing took care of some of that. However, there was much more work to be done. I can’t say for sure, but it seemed that this pistol had been fired (by the factory). The bore seemed to confirm that, or there was a lot of debris left over after the rifling process. Now, I don’t mind that it had been fired, but somebody needed to take the time to clean the firearm before boxing it up for shipment.
Black powder is corrosive, and I believe that, possibly combined with the shipping oil, is what attacked the brass. I removed the back strap and grip from the revolver and set out to try and polish the brass the best that I could to remove the effects of the whatever caused the brass to stain. While it cleaned up fairly well, the frame would require additional work to clean up totally, if indeed it was to clean up. There may have also been some imperfections in the brass casting process, which resulted in not all of the imperfections being eradicated. The pictures that I should have taken (pre-polishing) would have told the story. But, I was so confident that I could polishing the imperfections out that I did not bother to take pictures of the ‘before’ condition. If this is the quality that I can expect from Pietta firearms, I’ll stick to Uberti, thank you.
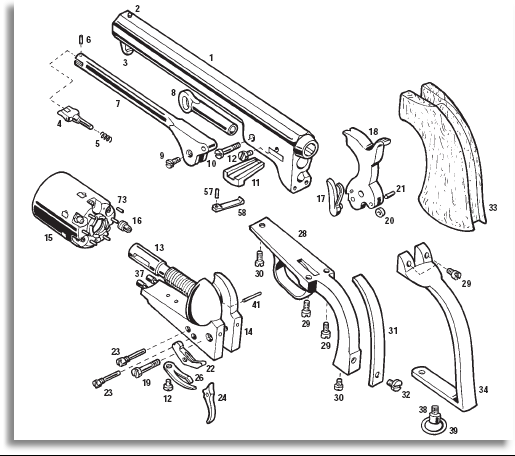
Pietta 1851 Colt Navy Parts Breakdown.
I decided to completely disassemble the revolver to its component parts so that I could polish the brass and, hopefully, remove the staining that had taken place. Also, I wanted to inspect, clean, and properly lubricate all trigger components that needed to be properly cleaned and lubricated. Luckily, I found a video on U-Tube (link provided in the Resources section of this review) that explained the entire disassembly and assembly process and that was used to guide me in this first time adventure.
Sadly, I could not remove the “staining.” I can only surmise that the casting was not clean and might have contained some impurities. When ebony polishing compound doesn’t work, it’s a sure bet that nothing else will either, as ebony polishing compound is the coarsest of compounds.
I did learn one important thing about assembling this revolver – do not tighten the Hammer Screw (Item 19) until the Back Strap is attached and secured to the revolver. If the Hammer Screw is tightened without the Back Strap being attached (and secured), the frame will wedge against the Hammer, and the Hammer will not be able to be cocked. This could be due to the ‘flexing’ of the brass frame. The Back Strap must be attached and secured first, and then the hammer screw can be tightened. The two top Back Strap screws prevent the frame from wedging against the Hammer. This also means that the Hammer Screw, if the Back Strap/Grip assembly is to be removed, should be loosened first, and then the two top Back Strap screws can be removed without tension being applied to them by the Hammer Screw.
Unlike a cartridge single-action revolver, the chambers cannot be cleaned from the rear of the chamber, because that is where the nipples are mounted. So, a thorough cleaning of chambers is in order. Note that I said clean and not lubricate. This is a percussion revolver where oil is not a friend to percussion caps or chambers. However, I do run a seasoned patch into each chamber before storage, which helps to prevent corrosion.
When the cylinder is out of the revolver is a good time to check the nipples. In fact, it is a good time to remove the nipples (a Nipple Wrench is needed for removal and installation), clean them, and place a dab of grease on the threads before they are re-installed. This will help to remove them later for cleaning and maintenance. Nipples do wear out and they do need to be cleaned after every range session, regardless of the number of shots fired.
The nipples on this revolver; to my dismay, and with the exception of one, refused to be loosened. A Traditions Nipple Wrench was destroyed in the attempt to do so. I ordered a heavy-duty ratcheting-type nipple wrench (reportedly to be the best), and it too would not remove the nipples, although I did keep from destroying the Nipple Bit (it works great on my single-shot pistol nipples). I am currently working on a solution to get the nipples loosened so that they can be properly cleaned and the nipple threads treated with an anti-seize compound. Since I am not going to destroy a cylinder in an attempt to free the nipples, this revolver may become a “wall hanger,” and I am not very happy about it.
My second attempt at removing the nipples (with a better nipple wrench) resulted in four of the six nipples being removed. Two nipples; however, refused to budge. SeaFoam Deep Creep penetrating lubricant was sprayed around the two offending nipples as well as in the chambers, in an attempt to help loosen the nipples. More penetrating lubricant worked in for a bit, and I was able to get one more nipple loose and removed, but still had to tap at the end of the nipple wrench with a small brass hammer to do so. Still, one nipple refused to budge. It was time for more drastic measures – a bigger hammer. Finally, and with the help of a bigger hammer tapping on the nipple wrench, I was finally able to free the one remaining nipple. It took a $20 heavy-duty nipple wrench to remove $2 parts. The tool that did the trick was the Ratcheting Nipple Wrench For Cap & Ball Revolvers, Order Number 18-1124 ( http://www.possibleshop.com/s-s-nipple-wrench.html). Several sizes are available for various size nipples. This is a heavy-duty tool; albeit expensive. However, when you are trying to get a nipple loose that does not want to come loose, this wrench will help greatly in doing so.
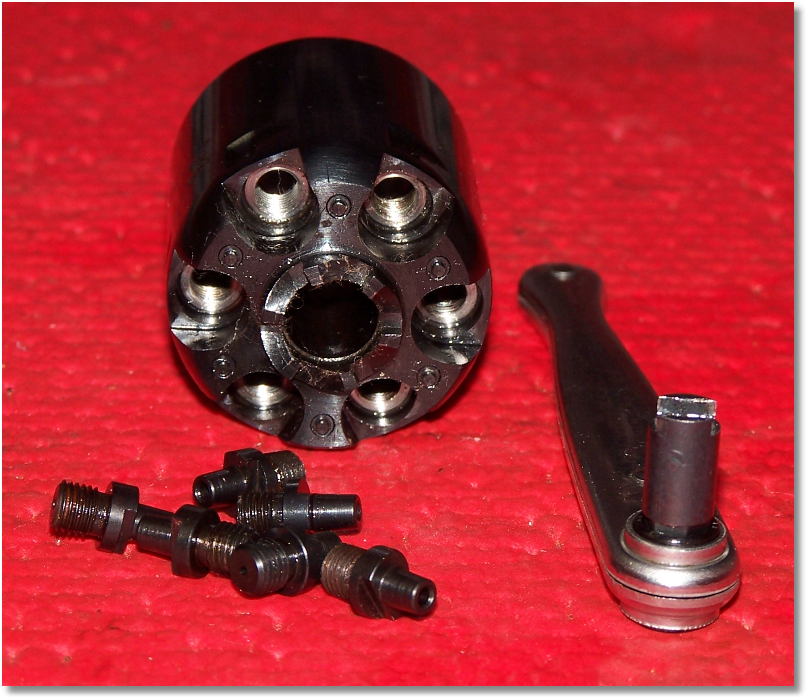
Finally, and after much consternation, all nipples were removed! By looking at the nipple at the far left, I suspect that red thread-locker was used – a definite no-no.
Next would be thoroughly cleaning and sizing each nipple. But first, let’s talk about ‘Nipple Sizing’ a bit. If you read the article that is linked @ https://guntoters.com/blog/2018/10/14/pull-me-in-part-3-whada-u-mean-my-nipples-are-too-small/ you will know what I am talking about – not all #10 nipples work with #10 percussion caps, which are commonly installed by the manufacturers of percussion revolvers (there are exceptions that install #11 nipples in large caliber percussion revolvers, but the statement remain in place). The nipple and percussion must be as close a match as possible without relying on a digital caliper. And, you need to find this out prior to shooting the revolver (or single-shot pistol, or muzzle-loading rifle.
The nipples on this reproduction, although not stated by the manufacturer, were supposed to be #10. Each nipple: however, once cleaned, was checked against a CCI and Remington #10 percussion cap. A #10 percussion cap fir all nipples just right. While the nipples are out of the cylinder, it is a good time to thoroughly clean each nipple mounting hole. A Q-Tip is handy for doing this.
Next comes the coating the threads (I use a very small hobby brush) and base of the nipples with an anti-seize compound, while ensuring that all nipple holes were free of compound, and then installing the nipples – but not as firmly as they had been installed at the factory. (Do not, as may have been indicated after visually inspecting each nipple, use any thread-locking compound of any type on nipple threads.)
All that is needed to install the nipples is a “snugging” and not a “firming.” I do not use the heavy-duty nipple removal tool for installing nipples. The nipple bit fits nicely in a bit-type screwdriver handle, which is then used to install the nipples without applying only enough torque to seat them. You only need enough pressure to hold the nipples in place and prevent them from backing out during firing that, of course, could bind the action. (Note: It is good practice to check for screw and nipple looseness during the firing session periodically.)
Now, let’s return to finishing the assembly of the Pietta 1851 Colt Navy “Grizzy.”
Before installing the cylinder, I always put some white Lithium grease on the cylinder star to lubricate the metal-to-metal contact from the hand and the rear of the cylinder. I also grease the front of the cylinder where it meets the barrel assembly and also the Cylinder Pin in the Frame. Anything to keep rotation at its best is worth the effort.
Installing the barrel of the revolver is not very easy, although it should be. The barrel was being cantankerous when attempting to assemble it to the frame. A tap of a plastic-tipped hammer to the muzzle end removed its contentious nature. I can only assume that the Barrel Locking Pins (Item 37 in the parts diagram) are not correctly oriented to the corresponding holes in the barrel assembly, as I have cartridge revolvers of this same type of revolver where the barrel simply slides over the Barrel Locking Pins without effort (note that the Barrel Locking Pins are also lubricated). Next is the insertion of the Wedge, which is fairly easy. The flat spring of the Wedge must be compressed and the Wedge aligned with the slot in the barrel. Once slightly inserted, it can be driven home with slight tap of a small, plastic-tipped hammer. Just ensure that you do not over-drive the wedge. As I mentioned earlier, the Wedge Spring has a lip that catches the opposite side of the barrel. Only a light tap is needed to seat everything.
After assembly is completed, I check the action for proper functioning. This revolver and ones like it only have two hammer positions; half-cock and full-cock. There are not like the 1873 Colt single-action revolver with four clicks. Pull the hammer back to half-cock and the cylinder should rotate freely. Pull the hammer to full cock and the cylinder should be locked by the Bolt and Cylinder Bolt Lug mating together. All cylinders should align with the Forcing Cone of the barrel when fully locked up for each cylinder. Note that ‘dry-firing’ a ‘Capper’ revolver or pistol is not recommended, as ‘dry firing could damage the nipple(s) or the inside of the hammer. The Hammer should be held, and the Hammer slowly lowered, when the trigger is pulled.
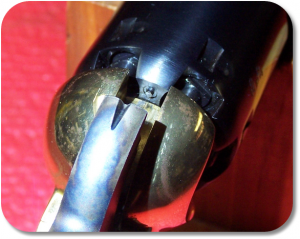 The “Grizzy” that is a reproduction of the 1851 Colt Navy (as with most other reproductions) also has “safety slots” for lack of a better term. Small pins are between the chambers that allow the hammer to rest safety between chambers. The pins mate with slots in the hammer. Like many revolvers of the time, and including reproductions, a revolver should not be carried on a “loaded” chamber. In most cases, only five chambers are loaded with the hammer resting on the empty chamber. I continue this practice, even at the range.
The trigger pull is approximately 2.5-pounds. This is definitely not a revolver to be resting the trigger finger on the trigger until you are ready to shoot. The trigger pull is very similar to a 1911 pistol, but lighter. The break is crisp and there is no hint of over-travel.
Author’s Note: As stated previously, it is advised not to ‘dry-fire’ percussion pistols or revolvers. Doing so my damage the nipple.
With the brass polished (as best that I can do), the “The Grizzy” revolver is a handsome piece. But, just being handsome, of course, is just not going to cut it.
Shooting the Darn Thing
As with all single-action revolvers, with the exception of new single-action revolvers, always keep an empty chamber below the hammer or rest the hammer on one of the “Safety Pins” if the revolver is equipped with such. With this revolver, as is common to percussion revolvers, there is a notch between chambers where the hammer can be rested. I still prefer to load five as I would any of my replica single-action revolvers and then rest the hammer on an empty chamber or within the “rest” pins.
Once I was (somewhat) satisfied that this Pietta replica of a “Confederate” 1851 Navy Colt was ready for action, it was time for the range. But, before that happens, an inventory of “Possibles” has to be taken, as with a muzzleloader, but different, as no ram rod is included with the revolver.
- Powder flask
- Powder measure (pre-set at 10 by volume)
- Black Power or Pyrodex P (powder loading is 9 – 12 gr. of FFFg or Pyrodex P for this caliber)
- Swaged lead balls of the proper diameter (.375-inch round ball)
- Lubricated wads of the correct diameter.
- Chamber grease (because I do not fully trust lubricated wads, but that may change).
- Possibles bag (or other method of carrying all of the above).
Unfortunately, and after having second thoughts, I was not confident enough in the “Grizzy” to shoot it. First of all, the all-brass frame of the Pietta reproduction gave me some concern, although I have seen many of these revolvers shot on TV and in movies. Those revolvers are; however, shooting blanks and do not build the chamber pressure as would firing a “real” projectile. I do not want to possess a “Shot-Loose” revolver, because I don’t need a paperweight.
While I have not yet decided, the Pietta 1851 Colt Navy “Grizzy” may become either simply an example of the original 1851 Colt Navy Griswold and Gunnison revolver, or it may become a shooting reproduction of the 1851 Colt Navy Griswold and Gunnison revolver, or it may be traded for something better – like macramé tools that I will need for cat hair macramé (four family cats provide plenty of source material to work with).
If and when I decide to shoot the darn thing, I will update this article.
The Wrap Up
The Pietta reproduction of the Colt Navy Griswold and Gunnison revolver has, sadly to say, not met my expectations. That is not to say that a different Pietta reproduction of the Colt Navy Griswold and Gunnison (or Rebel) revolver would have the same issues as this one did (and still has), but I can not recommend it based on my findings.
A lot of work was needed to get this piece to “acceptable” standards, if the poor quality of brass for the frame is not taken into consideration (and is still below my acceptable standards). The Pietta reproduction of the Colt Navy Griswold and Gunnison revolver was inexpensive (on clearance) and was my choice for a first percussion revolver. After receiving several Uberti replica percussion revolvers after the purchase of this one (even one’s on clearance at a reduced price), the difference in quality between the Pietta reproduction of the Colt Navy Griswold and Gunnison revolver and any Uberti percussion revolver is evident, with the latter being of better quality. However, Uberti does not make a reproduction of the all brass framed “Griswold.”
Sometimes you eat the bear, and sometimes the bear eats you. In this case, the latter applied.
Resources:
1851 Colt Navy: https://www.dixiegunworks.com/index/page/product/product_id/8675/category_id/321/product_name/SSB204+1851+NAVY+BRASS+FRAME+REVOLVER
How To Disassemble Colt Cap and Ball Revolvers, Dustin Winegar: https://www.youtube.com/watch?v=5tCdfnoIbSQ
How To Prepare A New Gun For Black Powder, Dustin Winegar: https://www.youtube.com/watch?v=P9D_lv7exJI
How To Clean A Cap-And-Ball Revolver, Dustin Winegar: https://www.youtube.com/watch?v=ozFb6b3NhK4
![]()