

I recently wrote an article about mounting a scope to the CZ 527M Carbine and the challenges that I faced when doing so. Surprisingly, placing an optic on the Henry AR-7 U.S. Survival rifle is no less a challenge due to the nature of the firearm.
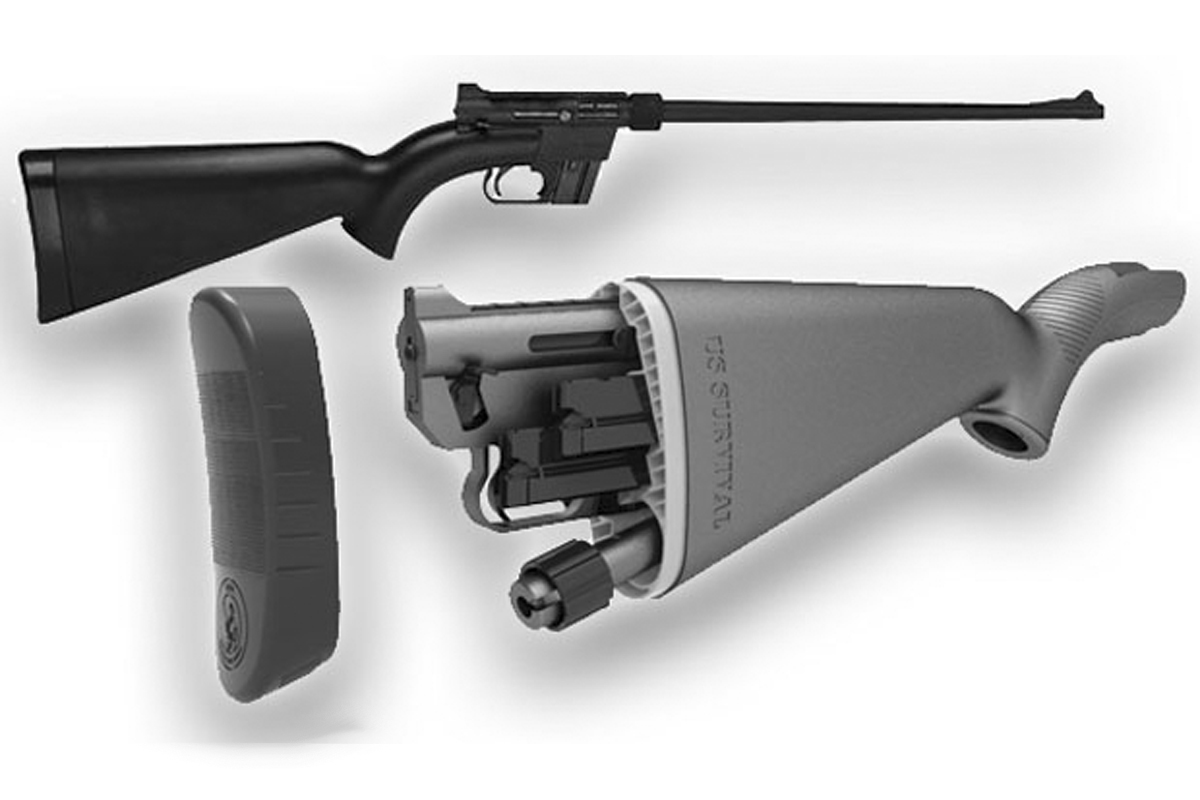 The intent of the Henry AR-7 U.S. Survival Rifle is to provide a firearm that is compact and highly portable. From that standpoint, the Henry AR-7 U.S. Survival Rifle fits the bill. The Henry AR-7 U.S. Survival Rifle’s action, barrel, and magazine can be stowed within the firearm’s stock. I would suspect; however, that the entire firearm in its compact form would be stuffed into a bag or pack of some kind; perhaps a backpack or even a range bag outfitted to serve as a survival center of goods that could be easily stowed away in a vehicle without taking up a lot of space. When I travel, I have a “survival” box that would support me for at least three days, if not more. The Henry AR-7 U.S. Survival Rifle, by itself, can also be stored in the box. Should I have to do some trekking, the contents of the box are transferred to a backpack that is also stored in the box. The AR-7 may or may not be deployed, depending on the severity of the situation.
The Henry AR-7 U.S. Survival Rifle would not be alone, however. There would be an ample supply of magazines, ammunition, and spare parts. These are my “support” item, if you will. Also along for the ride would be an optic, and maybe even two.
The sights on the Henry AR-7 U.S. Survival Rifle are adequate for most work, and the AR-7 has acceptable accuracy out to a point. But, as with anything that we can shoot, we like to enhance our accuracy, and that usually means an optic of some sort. Optics usually come down to two types; magnified and non-magnified.
The average going price for a Henry AR-7 U.S. Survival Rifle is around the $250 mark or so. I don’t know about you but I am not going to mount an optic that cost more than what it is being mounted on. What I am looking for is some help in the accuracy department at the lowest cost. On the same token, I also am enough of a realist to understand that my environment may not be so friendly and I would need equipment that would hold up, as long as possible, to an unfriendly and harsh environment. I also want an optic that can be attached or detached quickly should the need arise to do so. One possibility is that the plastic front sight is damaged and become unusable. The front sight on the Henry AR-7 U.S. Survival Rifle is; however, easily replaceable and two spare front sights (one in orange and one in black) are among my “running” spares.
The challenge of placing an optic on the Henry AR-7 U.S. Survival Rifle is like that with most .22 rimfire long guns. With the Henry AR-7 U.S. Survival Rifle, a segmented rail also serves as a grooved receiver that accepts dovetail optic mounts. You can purchase rail adapters that convert a 3/8” dovetail to a wider Weaver or Picatinny type rail that would allow you to mount the more popular Weaver or Picatinny optic mounts. These adapters; however, primarily serve those who wish to permanently mount the adapter to the dovetail slot, which requires a tool, and negates quick removal and installation of the adapter. With that said, if the Henry AR-7 U.S. Survival Rifle had storage slots that would accept these adapters it might not be an issue, but unfortunately it is an issue.
With the Henry AR-7 U.S. Survival Rifle, any adapter must be able to allow an optic to clear the rear sight housing, which sits approximately 0.341 inches above the top of the rail, or allows an optic to sit in front of the rear sight housing but yet not interfere with the installation or removal of the barrel. With these things in mind, I started a search for suitable optics and optic mounts.
A RED DOT OPTIC:
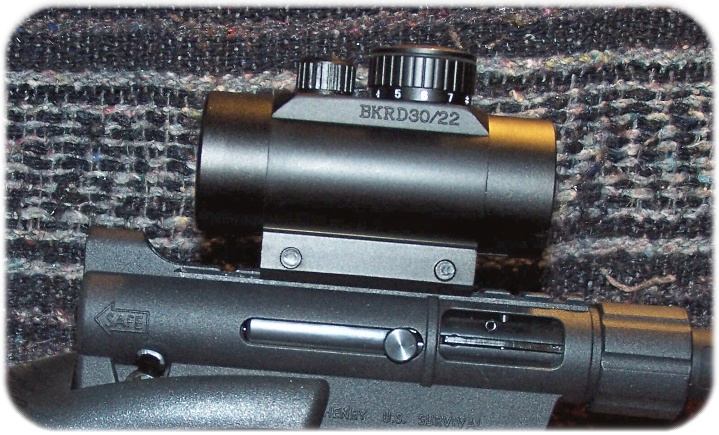
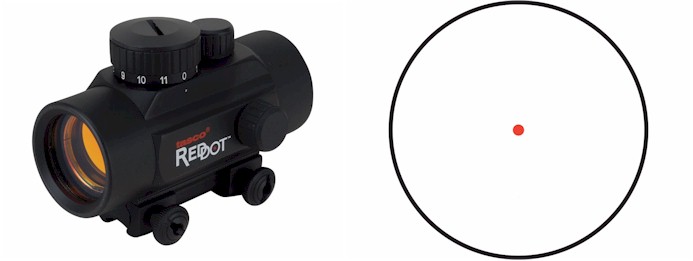 With the adapter rail being a concern, my search for a red dot optic that would serve my needs would not take long, as my choices were extremely limited. A Tasco Red Dot Sight 38mm Tube 1x 30mm Airgun/Rimfire 5 MOA Dot with Rimfire/Airgun Mount would fit my requirement of a QD sight.
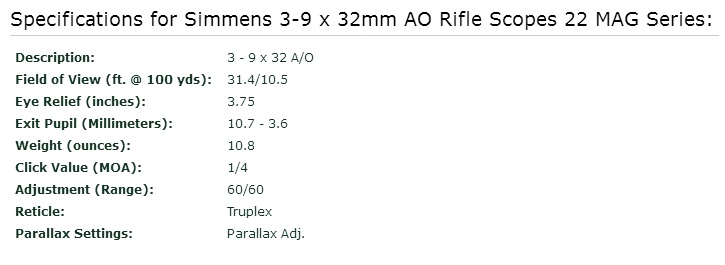
The technical specifications are shown below.
This Red Dot Sight has bright optics and an exceptionally wide field of view. It features an illuminated dot with an 11-position rheostat and an integral mount that fits the 3/8″ rail found on many popular rimfire rifles and airguns. Powered by a 3 volt lithium battery (included) and covered by a 1-year factory warranty.
- Model: BKRD3022
- Tube diameter: 38mm
- Field of view at 100 yards: 57 feet
- Dot size: 5 minute of angle
- Adjustment (windage and elevation): Each click of adjustment moves the point of impact ½” at 100 yards, ¼” at 50 yards, and 1/8” at 25 yards.
- Mount: Fits 3/8 inch grooved receiver or Weaver Tip-off base.
- Batteries included: Yes
- Battery Type: CR2032
- Accessories: Lens Caps.
- Length: 3.75 inches.
- Weight: 6 ounces
- Focus: Fixed.
- Eye Relief: Unlimited.
- Warranty: One Year Limited.
- Matte Black All Weather Finish.
- Illuminated Red Dot with 11 position rheostat.
- The packaging may say this is a 30mm scope. This number is the actual diameter of the lens. The tube diameter is 38mm.
The Tasco Red Dot Sight can be stored easily in a vest pocket or pouch of some sort. The use of thumb screws allow for quickly attaching and detaching the sight, as needed.
The 5 MOA dot is sufficient enough to use from distances from close up to about 50 yards with any degree of accuracy, in my opinion. The closer a target, the less area is covered by the dot. For example, at one-hundred yards approximately five inches is covered by the dot, at fifty-yards approximately 2.5 inches of the target is covered by the dot, and at twenty-five yards the dot covers approximately one-half inches of the target.
The height of the optic mount is such that none of the sight optical path is covered by the rear sight shroud on the AR-7. The front sight can just barely be seen when looking through the optic, but is not at all bothersome; the eye tends to disregard the front sight and focus on the dot.
The center line of the Tasco Red Dot Sight is 1.5 inches above the bore-line when fully mounted, and this is “need-to-know” information that will help me understand what I need for zeroing and also what I can expect out of the projectile before and after my zero distance.
I ran a quick ballistics check according to the ammunition that I would be using and the height of the sight, and it resulted in the chart that follows. My objective was to have a group of shots no larger than the diameter of the red dot at twenty-five yards. In other words, I wanted a group no larger than 0.50 inches at twenty five yards, which was the distance limit at my local indoor range. After zeroing, it would be up to the AR-7 and me to determine if that objective could be reached.
Windage and elevation adjustments follow the standard one-quarter inch at one-hundred yards. As with a magnified optic, this means that at my zero distance of twenty-five yards, each click is only worth 0.0625 inches; I need sixteen clicks to move the dot one inch at twenty-five yards and eight clicks of adjustment to move the dot one inch at fifty yards – assuming that the adjustment clicks are linear.
A down-side to the optic is that it requires a battery, which we know deplete when we don’t need it to; simple Murphy’s Law at work. The obvious answer is to carry a spare battery or two that will get us through the crisis.
The Henry AR-7 and the TASCO Red Dot sight just seem to blend well.
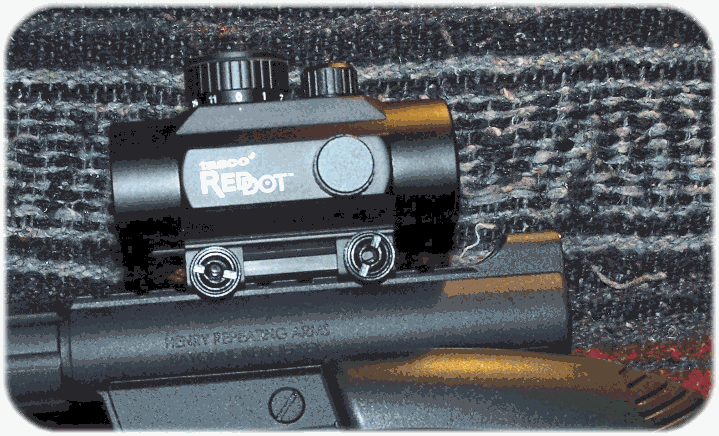
TASCO Red Dot on the Henry AR-7
The real test is how well the optic will hold zero after being removed and re-installed. I get into that later in RANGE TESTING.
Another test is how well the optic will aid in my attempting to obtain a degree of accuracy over the fixed sights of the AR-7, which I also address in RANGE TESTING.
A MAGNIFIED OPTIC – PIECING IT TOGETHER:
The greater challenge was selecting a magnified optic and a mount for the optic that would allow clearance between the optic and the rear sight housing. Due to the LOP and the width of the stock on the AR-7, eye relief was also a concern.
Obviously, the advantage of a magnified optic over a non-magnified optic is the magnification properties. While a dot optic can be magnified, it takes a separate component (in most cases) to provide the magnification. A magnifier on an AR-7 is beyond the realm of common sense.
While the search for suitable scope rings went quite well, the search for an optic that would work with the rings and the AR-7 proved to be a simple affair; simply rob Peter to pay Paul, as it turned out.
During an AD moment, I turned to the Ruger “International” project that I had completed not too long ago. I wasn’t satisfied with the scope setup. I had used a set of lever-lock rings from some source yet identified, and I really wanted a more permanent set of rings. While I liked the Center-Point 3-9×32 scope, it just did not fit the lines of the Ruger 10/22 full stock. I decided that a new arrangement was in order. However, the Center-Point 3-9×32 might just be a good candidate for the AR-7. There was enough scope length to work with the 3.5-inches of eye relief, and I did not have to worry about the front sight. I did; however, have to worry about the rear sight that the eyepiece housing would have to clear in one form or fashion. It was time to crunch some numbers.
I have found three conditions usually exist when I try to mount a scope on a firearm; (1.) I have a scope but no rings, (2.) I have rings but no scope, or (3.) I have neither scope nor rings. In this case, I did have a scope that (I felt) would suit the AR-7, although I felt the magnification was overkill. But, it is better to have a little more magnification that what is needed than to have less.
The first sets of numbers to crunch are in regard to the scope itself, and more specifically, the diameter of the eyepiece housing at its widest point. Author’s Note: In most cases, it would be the objective lens housing diameter that has to be considered, and especially when a barrel-mounted rear sight is used. The AR-7 is, in essence, is no different from mounting an optic on a MSR.
Another Authors Note: At this point I am going to work in millimeters simply because I can.
The outer diameter of the eyepiece housing is 43.5mm. This value is cut in half to determine the center line of the scope, which in this case is 21.75mm. Then, I need to add in a small bit of clearance that I need between the eyepiece housing and the rear sight housing; 3.175 millimeters will do (I felt that 1/8” minimal clearance would be sufficient). Next was to add in the rear sight shroud height of 8.66mm.
I would need a scope height of 33.585 millimeters of scope height. Now, to determine what height the mounting rings needed to be ordered.
There were three prerequisites for the scope rings:
- The rings had to fit a 3/8” dovetail slot.
- The rings had to be the quick disconnect type.
- The rings had to be high enough to provide the needed scope clearance.
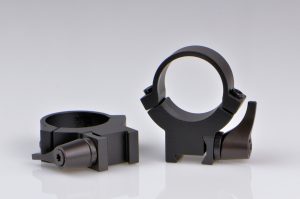
For scope rings, I decided on the Burris 1″ Deluxe Rings 22 Rimfire Steel.

- Color: Matte Black
- Finish: Matte Black
- Material: Steel
- Height: High
- Style: 3/8″ Dovetail
- Extended: No
- Tube Diameter: 1″
- Height (Base to Bottom of Tube): 0.46 Inches (11.684mm)
The issue at hand was the AR-7 rear eyepiece housing clearance that was going to be needed. Given the reasonable cost of the Burris rings, I decided to give them a chance first after I ran the second set of numbers.
The height of the Burris rings is measured from the base to the saddle. Then, one-half the diameter of the scope tube is added. So, what we have is 11.684mm + 12.7mm = 24.384mm. Next, the scope height determined by comparing the first number to the second number. If the second number is greater than the first, I am in good shape. If not, a different set of rings has to be found. Unfortunately, 24.384 millimeters is not greater than 33.585 millimeters and I am not good to go. But, is that really the case?
Remember that “Eye Relief” thing that I mentioned earlier. I needed an optic with a tube length long enough to adjust for eye relief. The LOP of the stock dictated that the scope would have to be moved rearward. Luckily, the Center Point scope has an eye relief of 3.5” at full magnification. I knew that I was going to have to balance things a bit, but I did not know to what extent. I decided to set a scope ring to the rear of the mount as far as I dared and hoped that the scope would clear the rear sight shroud while providing me with enough eye relief. As it turned out, my gamble paid off.
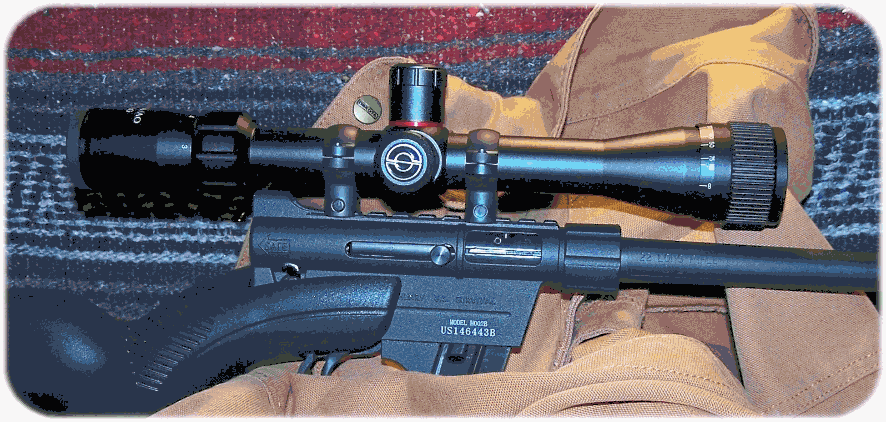
As you can tell in the image that follows, there is plenty of clearance all around the scope. There is no clearance issue with removing and attaching the barrel. The scope, while seemingly far to the rear, is actually approximately centered above the trigger, and the AR-7 actually feels more balanced than without the scope. The center line of the Center-Point 3-9×32 scope is 1.5 inches above the bore-line of the barrel when fully mounted, and this is “need-to-know” information that will help me understand what I need for zeroing and also what I can expect out of the projectile before and after my zero distance. A 1.5 inch scope height is standard for most ballistic programs.
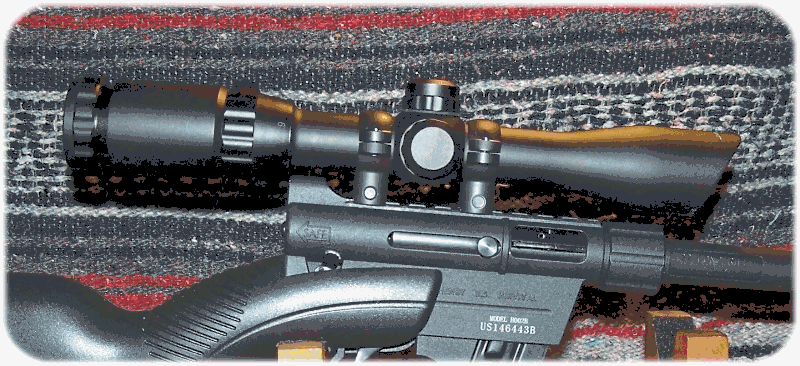
Remember that I had to consider the outer diameter of the eyepiece housing, which was 43.5mm, and which is cut in half to determine the center line of the scope, or 21.75mm. However, the diameter of the scope tube is 25.4mm, which cut in half is 12.7mm. If I use 12.7mm as my first number, then I end up with a scope height of 24.535mm, which is greater than the 24.384mm ring height. The scope tube was going to clear the rear sight housing and I just had to make the eye relief and scope ring positioning work.
As it turned out, the actually distance between the top of the segmented portion of the mount on the AR-7, upon which the scope ring base mounts, and the bottom of the scope tube, is 11.98mm, which is actually higher than the 11.684mm quoted by the scope ring manufacturer.
The current scope setup keeps me from crowding the stock to get a proper scope picture, and also allows for a good (but not perfect) cheek position on the stock. It’s all pretty comfortable, really.
Although the Center-Point 3-9x32mm scope does come with flip-up lens caps, I prefer to protect the entire scope with an appropriately-sized product from Scope-Shield. Scope Shields provide: Protection, Simplicity, and Speed.
- Protection – A scope protection device MUST protect both scope lenses from any weather or field condition confronted WITHOUT FAILING. Rain, humidity, snow, changing temperatures, dust, dirt, mud, etc. – None of these should affect your scope, your scope protection device, or any of its protective functions in any way.
- Simplicity – It must be easy and foolproof to use in the field while hunting.
- Speed – It must not slow down the hunter or his reactions in any way.
If my scope mounting calculations had not worked out, my second alternative was the much more expensive Warne 722LM 1 inch 7.3/22 Quick Detach High Matte Rings shown below.
The Warne 722LM 1 inch 7.3/22 Quick Detach High Matte Rings would provide a .525-inch (13.335mm) rise and a lever-operated detach/attach feature. I was hoping not to use these rings; however, because the scope height to the center of the bore would not be as low as possible. Also, and while I like lever-locking scope rings, and could obtain better leverage for locking the rings to the base, the greater cost suppressed my enthusiasm in this case.
Shall I progress to the bitter part? The Center-Point scope was not working out. The eye relief of this particular scope was forcing me to take an uncomfortable shooting position, when bench resting, while trying to attain a proper scope picture. Fortunately, I could re-use the rings. The scope; however, had to be replaced.
Allow me to interject here that you (I) can make costly mistakes in our choice of scope/ring combinations. It is well worth the while to do a lot of research before deciding on scope/ring combinations. While there are some optic manufacturers’ web sites that provide a search mechanism to choose a scope (and rings) based on a particular firearm for their products, most often you are left to your own research. Finding specific, let alone general, information about scoping a Henry AR-7 is not an easy task.
Scope lengths can very widely, and in fact, do. For a “survival” rifle, such as the Henry AR-7, shorter is better. Unfortunately, given the LOP of the firearm; a CER scope is all but impossible to obtain a correct sight picture. An IER scope is much better and you just may need a scope with some length for adjusting the scope forward or backward between the mounting rings to provide the best sight picture. Of course, adjusting for eye relief is just part of mounting the scope, but if you don’t have a scope with your needed eye relief in the first place, it just makes life more difficult.
The Center –Point scope was replaced with a Simmons .22 Magnum 3-9x32mm, Truplex-Reticle AO Rimfire Riflescope.

RANGE TESTING:
I have shot the AR-7 with the sights that came with it, but that was at a distance of fifteen yards. I had yet to exercise it at greater distances and the best that I could muster up was twenty five yards, which I felt was enough to evaluate what the AR-7 might be capable of at greater distances in my hands.
The game plan was simple. I would shoot as best that I could at twenty-five yards with the open sights, then with the red dot sight, and then with the magnified optic, and all shots would be bench-rested. With the optics, I would have to mount each one, zero it, and then go for broke. In doing so, I would be using the same ammunition. Since I was short on CCI Mini-Mag, Winchester Super-X, 40-grain .22LR ammunition running at about 1280fps would have to do. I was not expecting astonishing results, to tell the truth.
Tasco Red Dot Sight 38mm Tube 1x 30mm Airgun/Rimfire 5 MOA Dot:
 The Tasco Red Dot sight was initially sighted in at ten yards to get on paper and then again at twenty-five yards as close as I could get it zeroed at that distance. Then, as with shooting with the opens sights at the same distance, I shot five rounds for group. I was somewhat surprised at the result.
Shooting five rounds with open sights resulted in a group of 1.25 inches just right of my point of aim. I was actually surprised that I pulled that off, to tell you the truth. With the red dot sight, what resulted was a group of the same approximate size but more centered around my POA. Some of this might be attributed to the fact that I was rushing a couple of shots; as soon as the dot was back at my POA, I was back on the trigger. I think that had I slowed a bit, with more concentration, the group would have been smaller. But, I won’t know that until next time at the range with this combination. As it was, the AR-7 is definitely a MOS gun at twenty-five yards with a red dot sight.
I was able to remove the optic and then re-install it to determine if there was any shift in zero. There was a slight sift and a few clicks of left windage adjustment brought things back in line. With the flat top of the rail, the optic can be firmly seated on top of the rail before tightening the optic clamp. That might aid in keeping zero shift at a minimum. Another point is that the Henry AR-7 has substantial real-estate for mounting an optic, unlike numerous .22 caliber firearms that have a round receiver and very shallow grooves. With that said, I can’t say if the shift in zero was caused by the optic or human error.
Simmons .22 Mag. 3-9×32, Truplex Reticle, AO Rimfire Riflescope:
 Initial zero of the Simmons .22 Magnum 3-9x32mm, Truplex-Reticle AO Rimfire was at twenty-five yards at a 4x power setting. The AO (Adjustable Objective) feature is really great. Simply dial in the distance. Once the distance was set, I had to set the eyepiece to clear things up for the first time and the target became crystal clear in the lens. The scope was zeroed and five shots were then fired for grouping. Three of the five shots were in a single hole while two were just north of the group by about a half-inch. I may have mistimed my shots and I’ll take the blame for the fliers. But, I must say that seeing three rounds in one hole said something about the accuracy of the Henry AR-7 if the operator does his or her part.
Unfortunately, I did not have time to dismount and re-mount the scope to determine if there was any shift in zero. I will update this article with that information when that comes about.
Inn addition, i want to test if removing and re-installing the barrel will cause any shift in zero. But, as with the scope, I will update this article with that information when it happens. I had spent my time shooting and and wanted to give those in waiting time for their shooting; I had hogged the range enough for one day.
PACKING IT ALL UP:
Storing the Henry AR-7 is simplicity in itself. Adding an optic to the package does complicate matters. Out of the two optics, red dot and scope, the red dot is the most convenient to pack separately from the AR-7. Between the optics, a magnified optic is going to provide the best means of being accurate, but the red dot would suffice in most cases and at intermediate distances. The drawback to the red dot is that it requires a battery. The drawback of the scope is its size and weight. Of the optics, I would have to go with the red dot and just have a spare battery at hand. The TASCO Red Dot provides me with enough confidence to accurately shoot out to about thirty-five yards with my eyesight. In keeping with my one-inch “window of opportunity” while also being able to correctly identity my target, the magnified optic is the top dog. While shots out to one-hundred yards would not be impossible, I would have to dial in clicks of elevation, or use the correct hold-over, to make it so. Given the foundation of the Henry AR-7, and its inherent accuracy, I would want to keep shots as close as I felt comfortable, and fifty yards would be the limits of my comfort level.
CLOSING IT ALL DOWN:
I know that a lot of you are saying that I was just wasting my time doing all this. Why not just buy a Ruger 10/22 Takedown, scope it, and be done with it. Well, to put it bluntly, not everyone can afford the Ruger 10/22 Takedown, In fact, they may be hard-pressed to afford the Henry AR-7, but one is within reason for most folks.
I feel, sometimes, that the most inexpensive firearm requires the most attention simply because of the materials used for its construction, or in the manner in which it was built, or in the manner in which it was intended to be used. The Henry AR-7 U.S. Survival, like its predecessors, is considered a expendable firearm. I am just not ready to expend it, but I would like to extend it a bit longer.
While the Henry AR-7 is an inexpensive firearm, any attempt to make any firearm more accurate should not be avoided, in my opinion. Your options in optics for the Henry AR-7 may differ from mine, and I am alright with that as long as they work for you. In fact, you may find that the open sights are more than adequate for your needs.
The Henry AR-7 is just one of those firearms that beg to be upgraded. However, with the cost of the firearm as it is, it can be one heck of a decision to spend additional funds to upgrade it. That is something that I had to decide, and if you own one of these, or are thinking about owning one of these, will the investment going to be worth the return. Some may think about this in a financial sense, and for some that does makes sense. To me, and if I was to use the AR-7 as a true “Survival” rifle, then I want the best upgrades that I can afford for it because my survival just may be at stake with this firearm.
For me, I like options. The more options that I have, the better I like it.
Author’s Note: Read my review of the Henry AR-7 @ https://guntoters.com/blog/2017/03/12/henry-ar-7-u-s-survival-rifle-model-h002b-product-review/
RESOURCES:
- ProPoint® Riflescopes – 1x 30mm: http://tasco.com/products/index.aspx?ClassID=13&FamilyID=163&ProductID=685
- Burris 1″ Deluxe Rings 22 Rimfire Steel: http://www.midwayusa.com/product/629868/burris-1-deluxe-rings-22-rimfire-steel?cm_mmc=se_service-_-shippingconf-_-shippingconf-_-ProductShippedTodayLink
- 3-9x32mm CenterPoint Rimfire Scope: http://www.crosman.com/optics/scopes/3-9×32-mm-rimfire
- Scope covers by Scope Shield: https://scopeshieldcover.com/
- Simmons .22 Magnum 3-9x32mm, Truplex-Reticle AO Rimfire Riflescope: http://www.simmonsoptics.com/riflescopes/22_mag.aspx
![]()