

In my original article, “Working the (Trajectory) Angles?” I mentioned something called the “Natural Zero” and I would like to expound on that a bit in this article.
In the article, I stated that:
“The “natural” zero of any firearm is the result of the barrel-to-bullet relationship after the bullet is fired. With that said, one must consider at what point distant from the muzzle could be considered a natural zero. The answer is fairly simple. The point at which the bullet impacts a target, using the sights that currently exist on the firearm – as delivered in your hands out of the box, with the operators desired POA, and with the target at a known distance on the same plane as the firearm.”
I also mentioned, in the article, the “Natural Point of Aim” without going into a lot of detail about it. It should be obvious that there is a relationship between the POA that is made by the operator and the POI of a projectile when it hits the target.
SIGHT ALIGNMENT vs. SIGHT PICTURE
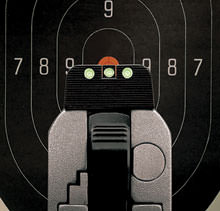
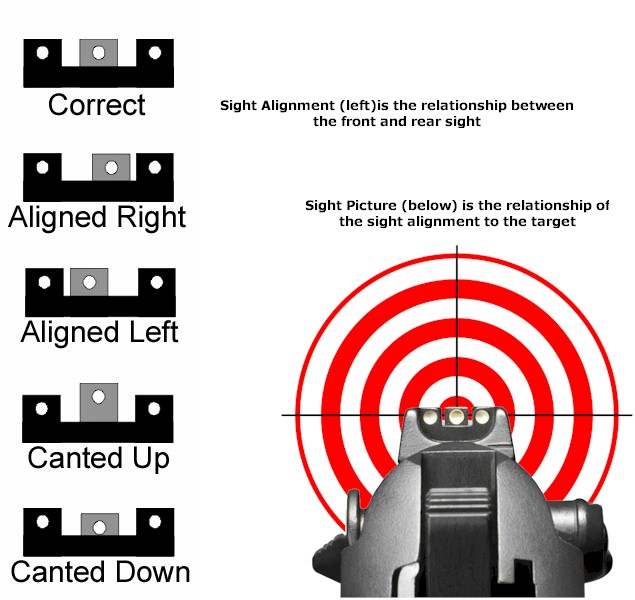 Sight alignment and sight picture are two different things. Sight alignment simply means that the front sight is aligned with the rear sight in such a way that the two work as a single unit. Once we have sight alignment, and place that alignment on a target, we have a sight picture. The point at which the properly aligned rear and front sights constitutes the POA (Point of Aim).
Then, we get into sight “holds” that are referred to sometimes as “six o’clock.” “Covered,” and (in my terms) a “Twelve o’clock” or “bore-sighted” hold. Note that I sometimes consider a “12 o’clock” hold as a “covered” hold, but there is a difference, as I will explain.
A “six o’clock” hold means that the POA is just below the intended POI to some extent. A “covered” hold is where the POA covers the intended POI. The “Twelve o’clock” or “bore-sighted” hold means that the POA is somewhere above the intended POI to an extent that the bore is aligned with the intended POI. There is also terms like, “Hold-Over” and “Hold-Under” that simply means that the sight are aligned to a point above (as with hold-over) or aligned to a point below (as with hold-under) to the desired POI, and which is more extreme than a 6 o’clock hold or a 12 o’clock hold on the target.
The critical thought is not that we have the sights properly aligned, and a sight picture established, but what is the sight alignment relationship to the bore axis of our firearm – is it level or canted in some fashion. Any angular displacement from the desired parallel-to-the-bore plane not only affects the “natural” zero of the firearm but it also affects the “forced” zero of the firearm and the downrange impact of a bullet is somewhat dependent on any angular displacement from the desired parallel-to-the-bore plane caused by the height relationship of the rear and front sight.
Please notice that I have not mentioned windage, nor will I, in this presentation. It should be obvious that windage can be affected by the positional differences between the rear and front sight, but that is on a different plane that I am not flying with this presentation. I want to address the vertical and not the horizontal aspect of a projectile’s flight.
NATURAL ZERO REHASHED BUT NOT REFRIED
I mentioned in “Working the Trajectory Angles?” that I like to use ten yards as my reference distance for checking the “natural” zero of a handgun. I like this distance simply because it falls within what I consider my most common shooting distance for the handguns that I normally carry. However, this distance can vary considerably.
If I carry a short-barrel pistol or revolver, I may move my test distance to seven yards. If I had a revolver with an 8” hunting barrel and a magnified optic, I may move my evaluation distance out to one-hundred yards. In short, you set the “natural” zero evaluation distance to any distance that you are comfortable with, which might be a widely-accepted “combat” distance of seven yards. For most pistols and revolvers that I shoot; however, distances from ten-yards to twenty-five yards seem to be good distances depending on the handgun.
I tend to remind myself that if the “natural” zero is so low (or high) at seven yards that I can’t adequately compensate for it without drastically shifting my sight picture, I won’t adequately be able to compensate for it at greater distances. But, I leave it up to the reader to decide what distance is right for the reader. I will only ask this, “If you are expecting to engage a target at only seven yards, why bother checking for zero at all?” At a seven yard distance, it is highly unlikely that you need the sights because you are only going to have time to point and shoot – maybe.
The object here is to know what your firearm and ammunition combination is doing in your hands under your control at whatever distance.
I also suggested that a rest of some sort be used to stabilize both you and the handgun. If that, to you, means getting good night’s sleep, then so be it.
Have we decided on an evaluation distance yet? Got it, get it, good!
At this point, POA does not matter as long as it is a known point on the target. But, since the target may be a piece of paper with a bulls-eye on it, why not pick out the “X” as a POA. It also does not matter what “hold” you use as long as you are comfortable and consistent with it. But, I caution, you may have change your sight hold.
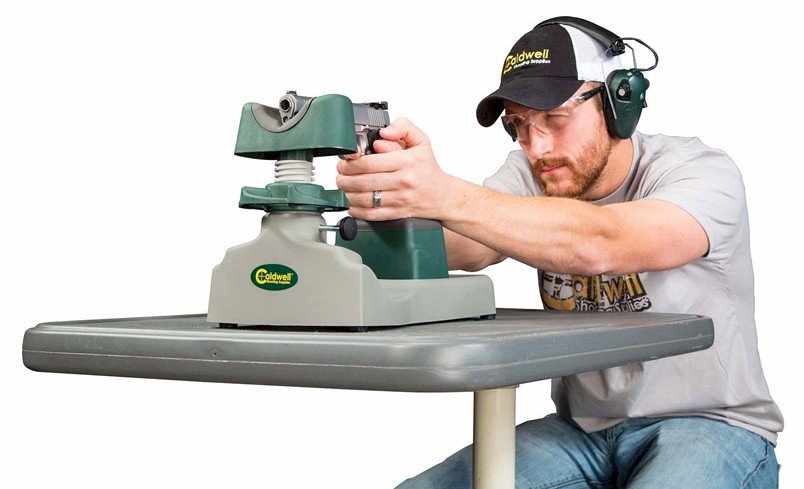
A Shooting Rest Provides a Stable Platform
Load up your favorite handgun with three rounds, using a pistol rest and your favorite hold, exercise your trigger finger and shoot three, slow, well-aimed shots.
Congratulations! You have now established the “natural” zero for your firearm. If you did your job well, you should now have three holes on the target and (hopefully) in a relatively tight group. What is important, if you have a relatively tight group, is where that relatively tight group is located on the target in respect to you POA.
Again, I am not concerned with the windage (horizontal plane) at this point, just elevation (that up and down thing).
Since identical pistols often use different front sight heights, you need to be able to determine the height that you need. For example, if you would like to raise your point of impact, use a shorter front sight. Likewise, if you wish to lower your point of impact, use a taller front sight. However, if you are happy with your current point of impact, order a replacement front sight of the same height as your current sight. In other words, you may have some work to do to force the “natural” zero to a new “natural” zero to better suit your purposes.
As I mentioned in “Working the Trajectory Angles?” the impacts of the bullets with my Rock Island Armory FS 1911 Tactical were too low for my liking at twenty-five yards, which was my desired zero distance at the time. I returned home and filed the front sight down just a bit and then returned to the range. But, did I do the right thing?
SIGHTS, MATHEMATICS, and QUANDRIES
A correction in sight height can actually be estimated through mathematics. To determine how much sight height correction is needed, use the following formula:
Sight Change = Sight radius x Impact distance/Target distance
Where:
Sight radius: Distance between front and rear sight
Impact distance: Measurement from point of aim to bullet impact
Target distance: Measurement from muzzle to target
Sight change: Amount of correction needed
Sight rule note: Move rear sight in the direction you want the bullet to move. Move front sight the opposite direction you want the bullet to move
With the sights that came with the pistol (fixed sights), and in order to achieve zero at my desired distance, I had to lower the front sight. How much would I have to lower my front sight? Using the previously presented formula, the following figures need to be my variables:
Sight radius: 6.625”
Impact distance: 2”
Target distance: 900” (25 yards)
The result was that I needed to reduce my front sight height by 0.0147-inches. But, I didn’t know that at the time I started filing on the front sight.
I took just enough material off the front sight to make it as level with the bore axis as I could and then returned to the range to evaluate my work. In short, I was “forcing” a new zero. But, was I helping or hurting myself?
As I found out, removing some sight height did help raise the impact of the bullets at twenty-five yards, but the results were an eye-opener.
FORCING A NEW “NATURAL” ZERO
After the sight adjustment, and at twenty five yards, the impacts from bullets that I shot averaged out to about 1.5” low from my point of aim (the center of the target); that was a ½” improvement over the results with the original sights.
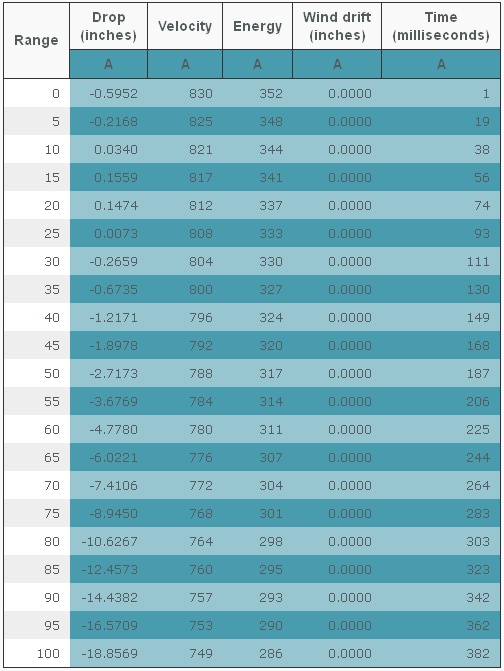
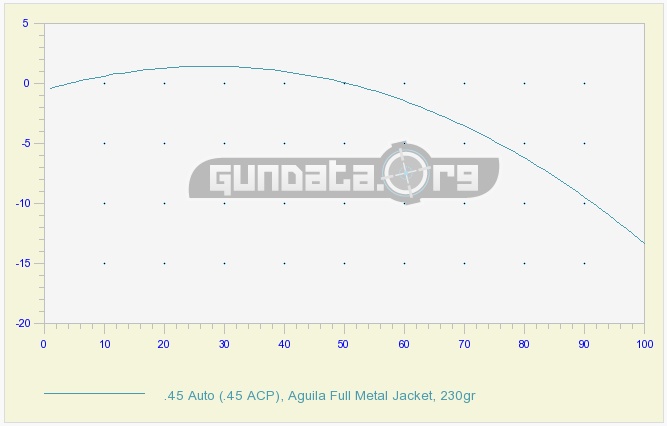
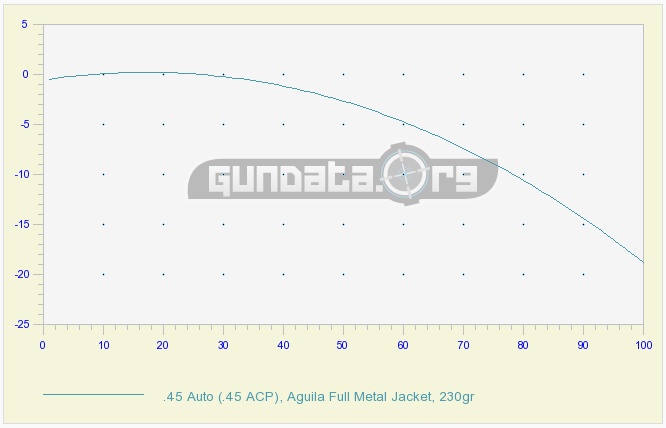
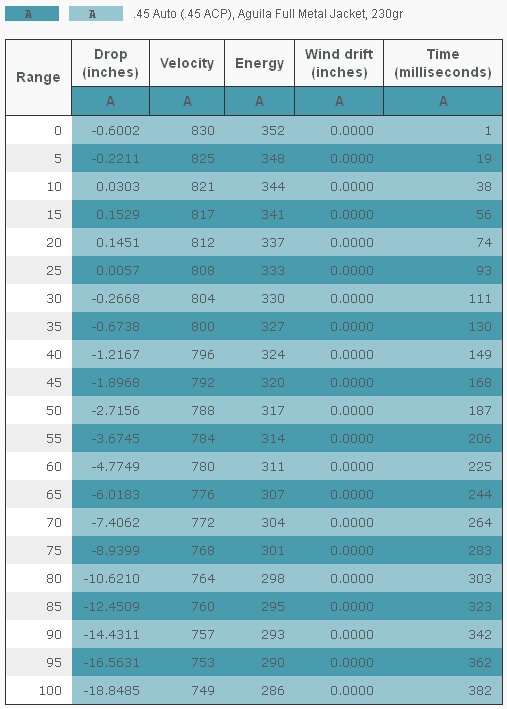
Doing some more research via my favorite ballistic website, GunData.org, I could chart the bullet path pretty close according to the ammunition that I was using (Aguilla 230-grain FMJ) and adjust zero distances until I was as close to that 1.5” drop at twenty five yards as possible. In doing so, I could get a rough estimate of the new “natural” zero of the pistol. The research results indicated an approximate new fifty-yard zero “natural” zero for this pistol.

Fifty Yard Trajectory – Note Mid-range trajectory at 25-yards and at 7-yards
But, I was incorrect in my analysis! A fifty-yard zero result in an approximate +1.5” impact at twenty-five yards – not a -1.5” at twenty five yards! In my haste, while I had read the figure correctly, my brain did not register that it was a positive value and not a negative value. I had to reevaluate big time!
To force a zero, a zero point that is other than the “natural” zero, you essentially have two choices; make changes to the sights or make changes to your POA. Being the human spirits that we are, we are reluctant to change ourselves, but we do have the ability to adjust, and the line between change and adjustment is fine one indeed.
Since I had lowered my front sight already, and since the impacts were 1.5” low at twenty five yards, I could have filed on the front sight down more than I already had to produce a twenty-five yard zero, or I could simply establish a “forced” zero at twenty five yards based on my point of aim. Raise my point of aim and I shift the trajectory upward. Now, here is where it gets interesting. (I could have simply adjusted the rear sight to produce a new “natural” zero at twenty-five yards, if the rear sight on the Rock Island Armory FS 1911 Tactical been of the adjustable persuasion.)
With my current fixed sights and a modified sight alignment setup, I have a near zero at 7 yards, which means I can place my sights on a point at 7 yards and I should see a hole appear at that point after the cartridge fires, and that is almost equal to my POA. At twenty-five yards, however, I would have to hold-over 1.5” to obtain a zero. That is not acceptable to me. Zero is, after all POI=POA. I still had work to do.
If I was to remove some more of the front sight, to accomplish a twenty-five yards zero, what was going to happen with the bullets at a greater distance?
First of all, I had to consider what my sight height would be to achieve a 25-yard zero with the ammunition that I was using (which approximated ammunition that I would be carrying). I had to go back to the sight height correction results and then reevaluate form there.
To bring up the 1.5” low group to zero at twenty five yards, I need to remove 0.0147” from my front sight. Doing the math, that meant that my true sight height would be 0.610″ above the bore-line. Plugging in the new sight height resulted in the following ballistic information:

25 Yard Zero w/.610 Sight Height
You can see from the ballistics that although I would be essentially zeroed between seven and twenty-five yards, I would have to hold-over approximately 3” at fifty yards, 9” at seventy-five yards and just shy of 19” at 100 yards. The question I had to ask myself was, “Is that acceptable?”
Let’s go a little further. I wanted to find out what would be the trajectory difference if I chose fifty-yards as a zero. What adjustment to my current sight height of .625” would I have to make a fifty-yard zero work? The graph and chart that follows tells almost the whole story.

50 Yard Zero w/.625″ Sight Height
To bear you the burden of research, let me sum things up. In order to achieve a fifty-yard zero with my current sight setup (0.625 sight height), I would have to hold-over 1.378” at twenty-five yards PLUS another 1.5” due to my present -1.5” bullet impacts at that distance. This means that I would have to hold-over roughly 3” at twenty-five yards to get close to a zero at fifty-yards. In essence, I would have to hold that 3” above the bulls-eye at fifty yards to obtain a zero. I had to ask myself, once again, “What is the purpose of this pistol?” A flat trajectory between distances of muzzle to twenty-five yards would be ideal in a self-defense situation. I knew the answer would be a twenty-five yard zero.
Reverting back to the math; my current sight height was 0.625” and my current bullet point of impact was 2” low. I simply needed to remove some additional material from the front sight to bring the POI up to my desired POA. I simply needed to change the impact distance from 2” to 1.5” since nothing else had changed.
So, I now have the following to work with:
Sight radius: 6.625”
Impact distance: 1.5”
Target distance: 900” (25 yards)
Working the math, I should only have to remove approximately .01” of material more material from the front sight, which will provide a sight height of approximately 0.615” above the bore-line. But, let’s run the number and see what ballistics results we get. See below for the results.
25 Yard Zero w/.615″ Sight Height
As you can tell from the results, the sight height of 0.615″ would work out very well for me; it produces a relatively flat trajectory out to my “zero” at twenty-five yards and there is very little guessing where to place my POA at that distance. At greater distances, and knowing what is expected out of the cartridge, I can quickly adjust for holdover out to fifty yards. At seventy yards, and if I do my part, I should be able to contact with the target within my 8-inch “Magic Window” by adjusting my POA to the correct amount of holdover.
In my original article, “Working the (Trajectory) Angles?” I mentioned my “Magic Window”, (the “Window of opportunity,” or “Comfort Zone” if you will), and made comparisons to the “Reality Window” that amounted to the following:
My “Magic Window” for a handgun is a two-inch circle at 7 yards, a four inch circle at twenty-five yards, a 6-inch circle at fifty yards, and an eight-inch circle at seventy-five yards while shooting offhand.”
You can see from the ballistic data that having an 8” window at seventy yards is entirely possible – and that’s good enough for “Combat Accuracy” – if I can do my part with the Rock Island Armory FS 1911 Tactical pistol with the new “natural” zero sight setup.
THIS “COMBAT ACCURACY” THING
 My absolute favorite “hold” is to place the top of the front sight (or the dot, if present) so that it is centered on my desired POI. Not being a creature to change easily, I would like to be able to use that sight picture and have the bullet strike that point at any distance. Bullets, of course, do not follow a straight path beyond the muzzle (the projectile dysfunction analogy) and that fact makes my wishes a moot point. As long as I know what do adjust; however, I am usually capable of doing that. Becoming a “Combat Accurate” shooter takes a lot of adjustments, but not as many as a long-range, precision shooter. Changing the height of the front sight on the Rock Island Armory FS 1911 Tactical, and knowing what adjustments that I needed to make when operating it for varying shooting distances, I hope has made the pistol and I more capable of achieving “Combat Accuracy.”
The one thing that you might have picked on is that I am using a cartridge for zeroing purposes that, for many, is considered as “Range Ammunition.” Although I vary my defensive carry ammunition, the differences in trajectory really don’t start taking effect until about sixty yards. This means that, with the exception of projectile speed and energy, the two projectiles act similarly at “Combat” distances up to my fifty yard zero. You can see that even the differences between “holder over” requirements at distances of twenty-five yards, seventy-five yards, and one-hundred yards are not that great. Remember that I am trying to achieve “Combat Accuracy” with a fixed-sight pistol. I could, theoretically, achieve “Combat Accuracy” with either cartridge, but the nod would have to go to the Speer 230-grain GDHP for effectiveness once the cartridge hits the target. Due to the characteristics of the Speer GDHP, it is far superior to the FMJ for defensive work, but that does not mean that the FMJ bullet is ineffective. The effectiveness of the 230-grain FMJ round has been battle tested and battle proven to be effective.
I have often stated that I don’t have “range” ammunition; I have ammunition that I use at the range.
THE WHOLE IS THE PRODUCT OF THE SUM(MARY)?
There are several lessons to be learned. The first is that you don’t go whacking at stuff until you know what you really have! The result of my whacking just happened to work out and my work was close enough to provide me with “close enough for combat work” accuracy for most applications.
The second lesson is to determine whether what you want is really what you want. My desire was to have POA=POI at twenty-five yards. But, I needed to know if a longer distance, say, fifty-yards, was more desirable. By running a few figures, I could determine which distance was better for my applications.
With the information that I have linked you to, and the formula I have presented for sight correction, you should be well on your way in doing things the right way rather than my original way when it comes to adjusting fixed sights on a pistol (or revolver) for your desired zero distance.
One thing to keep in mind is that firearm manufacturers tend to know what they are doing when they provide a set of sights with their firearms; they have done the research. Manufacturers like Glock also make available different heights of front sights that can be easily changed. Using the “sight change” formula, you could determine what height of front sight you needed for your particular application, order it, and do the installation yourself or turn the pistol over to a qualified gunsmith.
To use our sight change formula, let’s assume that your gun shoots 2 inches low, at 15 yards (540”). The sight radius is 6.9” and your front sight height is .210”.
(6.9 x 2) / 540 = .026”
Subtracting the sight height correction figure from your current sight height; .210” – .026”, tells you that your new sight height should be .180” tall. Conversely, if your rounds were impacting high on the target, you would add the sight height correction to your existing sight height.
In closing, I will say that have an adjustable rear sight makes adjusting for different ammunition much easier. I could have simply dialed in a few clicks of the rear sight adjustment to change the zero from fifty-yards to twenty-five yards and then dialed out the same number of clicks to return to a fifty-yard zero. Or, if I decided to try out a new cartridge with a lighter weight of bullet, say from 230-grain to 110-grain, I could have simply adjusted the rear sight for a fifty-yard zero with the new ammunition.
If I had one pistol that was my EDC forever and ever, and if my current sights were inadequate for me, I would seriously consider a low-profile, snag-free, adjustable rear sight for it.
Changing, adjusting, and adapting are just some things that make shooting firearms so darn enjoyable and contentious at times.
THE LAST WORD
As a last word, I have to go along with the recommendation of M1911A1 in his article ““How to Zero Your Sights (When you can’t hit the broadside of a barn)”; whereas, he mentions about keeping a log about your firearm(s). I have to admit that I rarely do this, but I do admit that I should.
 I shoot a variety of firearms and I can’t remember how each firearm is going to perform when I decide to shoot it. I may not shoot my EDC for a month, and I am reminded that I can’t remember some stuff about it, if I have not shot it on a continual basis, when I do shoot it. Just keeping some simple notes, that you can take with you to the range (for example; “shoots low at 15-yards with such and such ammunition,” or “Hold on 6 for twenty-yards,” or POI dead on!”) can save some frustration at the range. Turn an, “Oh, yeah! I remember that now!” into a “Here’s what I need to do!” moment.
RESOURCES
GunData.org: http://gundata.org/ballistic-calculator/
![]()