

— by M1911A1 —
OK, I agree with you that the ideas behind “minute-of-angle” and “point-blank zero” are confusing and mysterious. But they’re one of those things that every shooter, and most specifically every rifle shooter, needs to know and understand.
So, lets start with the basic concepts themselves, and then, when the words finally carry some useful meaning, you can learn how to put the measurements that they represent to work.
An “angle” is formed when two straight lines meet at a point. That’s any two lines, and at any point. Angles come in three types: “acute,” “right,” and “obtuse.” A “right” angle is formed when two lines meet at 90 degrees, like clock hands at exactly three o’clock. An “acute” angle is any meeting of two lines at less than 90 degrees, like clock hands at one o’clock; and an “obtuse” angle is any meeting of two lines at more than 90 degrees, like clock hands at five o’clock.
Angles can be seen as pie-shaped sections of a circle, if the point at which the two lines meet is the center of the circle. Using the section-of-a-circle concept shows us the way that angles are measured, in “degrees,” “minutes,” and “seconds.” Aha! Minutes and seconds! The clock face is a circle, and the distance around the circumference of the circular clock face from
12 o’clock to three o’clock represents an angular measurement of 90 degrees! This is written in math-speak as “90°.”
Now, a clock face has only 12 numbers on it, but a complete circle that is not the face of a clock actually measures 360 degrees (360°) from top-center, all the way around the circle, and back to top-center again.
So any circle is 360 degrees (360°) all the way around, halfway around it (from 12 o’clock to six o’clock) is an obtuse angle of 180°, and one quarter of it (from 12 o’clock to three o’clock) is a right angle of 90°. And therefore one 360th of a circle is an angular measurement of one degree (1°), which is a very small acute angle indeed.
One degree (1°) is not the same angular measurement as a clock-face’s minute of time. A minute of time is one sixtieth of the distance around the clock face, and the angular measurement of that is 360° divided by 60, or six degrees (6°). This is where angular measurement can start to become confusing.
It becomes confusing because the 360° circle is divided into 1° segments, not minutes of time, and then each 1° segment is further divided into 60 segments, each of…shudder…one minute (0°1′) of angular measurement. So we mustn’t confuse one minute of time with one minute of angular measurement, because they are not the same.
This is where we drop the clock-face example and its hours and…shudder…minutes of time, and go onwards with only the concepts of angular measurement and its…shudder…minutes-of-angle.
So any ordinary, everyday circle can be divided into 360 separate acute angles, every one of them with its two-line meeting point at the center of the circle, and each one of them only one degree (1°) wide. And then each single one-degree angle can be further divided into 60 minutes-of-angle, each of them only one angular minute (0°1′) wide. Note that since this is angular measurement, it is independent of the size of the circle. Any circle, no matter how big or how
small, can still be divided into thousands of separate, one-minute (0°1′) angles.
But wait a bit. If that last statement is true, then that means that the distance between the two lines that makes one of those acute one-minute (0°1′) angles, when measured in inches, gets bigger and bigger as it gets further and further from the center of the circle. Could that be right?
Yes, it’s really, truly right!
OK, now it’s time to look at “Minute-Of-Angle.”
MINUTE-OF-ANGLE:
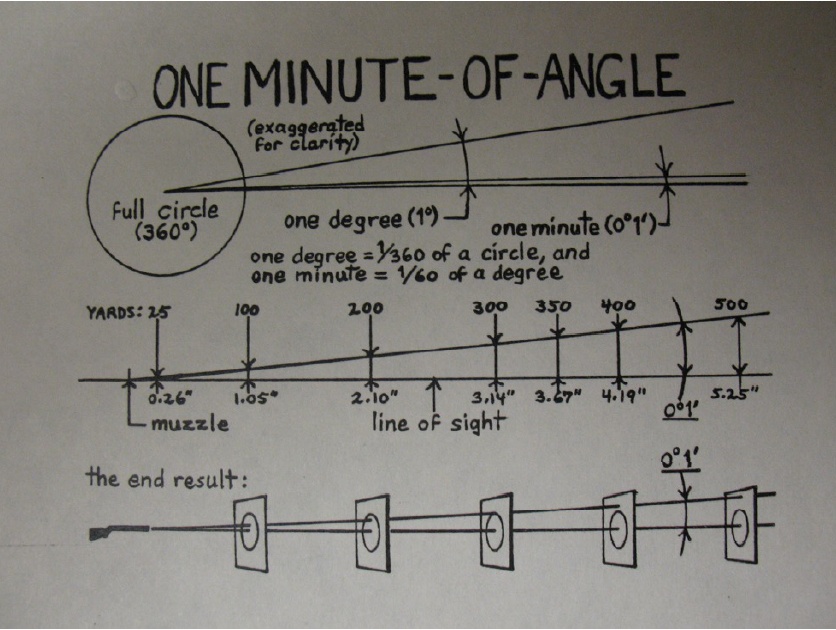
In the first part of the “One Minute-Of-Angle” illustration, above, we see a circle with both one degree (1°) and one minute (0°1′, a “minute-of-angle”) named and pictured. Note that the angles are not accurate, but rather are exaggerated to make them clearly visible. One degree is 1/360th of a circle, and one minute-of-angle is both 1/60th of a degree and 1/21,600th (!) of the complete circle. Both are pretty small, which is why the illustration is exaggerated.
In the next part of the illustration, we have the measurement between the two lines that are one minute-of-angle (0°1′) apart, as the two lines get further and further from the center of the circle. The muzzle of your rifle marks the center point of the circle, and the distance shown in yards is the distance from your rifle’s muzzle to a target which is that far away.
You can see that there is an easy-to-remember relationship between the distance to the target and the distance that separates the two lines to form the minute-of-angle. In practical terms, one minute-of-angle equals just about one inch (1″) of width on a target out at 100 yards, 2″ at 200 yards, 3″ at 300 yards, and so on. The measurement is so close that using the whole number without its decimal fraction is accurate enough for practical shooting.
Going the other way, the measurement gets smaller. But there’s still an easily remembered relationship between the distance from the muzzle to the target, and from one line to the other. At 50 yards, half of 100 yards, the relationship is one-half of the 100-yard relationship, and a minute-of-angle equals 1/2″ on the target. At 25 yards, a quarter of 100 yards, the relationship is one-quarter of the 100-yard relationship, and a minute-of-angle equals 1/4″.
The third part of the illustration serves only to make the ever-widening measurement that is a minute-of-angle a little clearer and easier to understand.
So how are we to use this minute-of-angle information? Its most important use is helping us to make sight adjustments.
All adjustable sights, scope or “iron,” include reference increments to let you know the amount of your adjustment. These reference increments can be marks along a straight scale, marks around a rotating dial or turret, or audible (and even tactile) “clicks” you hear (and maybe also feel) while turning a knob.
Scopes and the adjustable iron sights used for target shooting, and other high-quality sighting systems as well, indicate the amount of their movement through increments of “quarter-minute” marks and clicks. Other systems use half-minute marks and clicks instead, and some, like types of rifles used by our military, use full-minute clicks.
Now that you know what a minute-of-angle is, you can figure out that a sight that adjusts with full-minute clicks will be moving the sight through one whole minute-of-angle, each time you hear or feel a click. This means that every click of adjustment will move your bullet’s impact one entire inch, relative to your aiming point, on a target that’s 100 yards away from you.
Similarly, each click will move the bullet’s point of impact (POI) two inches, relative to your point of aim (POA), on a target that’s 200 yards away. The POI will move three inches relative to your POA at 300 yards, four inches at 400 yards, and so on.
If your sighting system uses half-minute increments or clicks, it will take two clicks to move your POI one minute-of-angle, or one inch, relative to your POA, at 100 yards. But at 200 yards, two half-minute clicks will move your POI two inches. At 300 yards, two half-minute clicks will move it three inches. Similarly, it will take four clicks to move a sight that adjusts in quarter-minute clicks through one minute-of-angle, or one inch at 100 yards, two inches at 200 yards, and three inches at 300 yards.
So you fire a shot at a target that’s 200 yards away, but the bullet hits (POI) one inch high and three inches to the left of your aiming point (POA). So now what?
Let’s say, for this example, that your sighting system uses half-minute clicks. You now know that two inches on a 200-yard target equals one minute-of-angle of movement (which is two half-minute clicks). So now you also know that to make your POI (which is one inch high and three inches to the left) coincide with your POA, you have to move your scope or rear sight one half-minute click (one inch at 200 yards) down and three half-minute clicks (three inches at 200 yards) to the right.
Knowing all of this makes both zeroing your sights and changing from one distance to another a lot easier. This is especially true if you are using bullseye or gridded targets, because the width of each of a bullseye target’s rings and the distance between a gridded target’s lines are both known quantities. If you know how many inches you need to move your sight across the target, and you know the distance to the target, then you can easily figure out how many clicks (or other increments) you have to “dial in,” in order to get your POI to meet your POA.
POINT BLANK ZERO:
So, now let’s discuss the “Point-Blank Zero” diagram, above. The “Point-Blank Zero,” too, is an easier way of doing some things with a rifle.
Some shooters use 100 yards as their basic zero setting. If they want to shoot at a greater distance, they adjust their sights according to the set of sight changes that they’ve learned for their rifles through practice-shooting experience. The advantage of this method is precision. As long as the sights are properly set for the elevation and windage that is correct for the known distance to the target, the bullet will hit as close to the shooter’s POA as his skill will allow.
But making these changes takes time that you may not have. So other shooters choose to zero their rifles in a different way, so that they can make meaningful and effective hits at many different ranges without ever needing to change their sight settings at all. This general, one-size-fits-all kind of sight setting is called a “point-blank zero.”
If you want to hunt deer-size animals and make clean, quick kills, you need to be able to place all of your hits within a three-inch circle (that is, an inch-and-a-half up, and an inch-and-a-half down) around your POA. In this case, then, the point-blank zero is the sight setting which assures a hit within that three-inch circle around your POA, at any safe, normal deer-hunting distance (from the muzzle out to perhaps 200 yards). Because the illustration above doesn’t show that particular setting, I’ll just give you the solution here: Your deer-hunting point-blank setting will probably be a 150-yard zero.
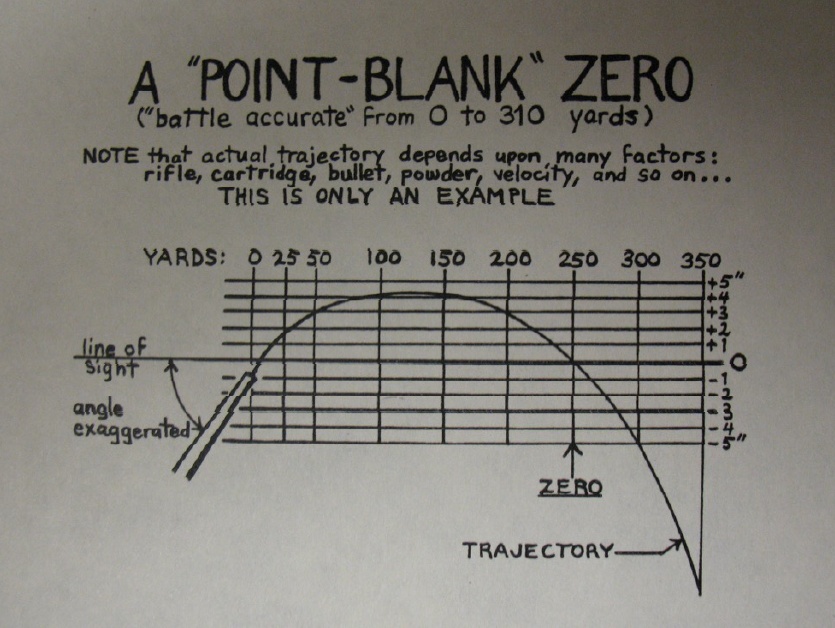
The illustration shows the point-blank zero that was once considered by the US Army to be effective against people, when using a full-power, 30-caliber rifle.
That zero setting provided a POI that would be within a 10-inch circle around the POA: no more than five inches up, and no more than five inches down. The Army said that this point-blank zero was “battle accurate” for any distance from the rifle’s muzzle to just over 300 yards away.
The first thing to note about the illustration of the Army’s point-blank zero is that the rifle’s bullet does not travel in a straight line. Bullets travel in a curve called the “trajectory” (which is exaggerated in the illustration, to make it easier to see).
However the “line of sight,” from the shooter’s eye, through the rifle’s sights, and out to the target, does form a straight line. So, as you see in the illustration, the curved trajectory of the bullet meets the straight line of sight at only two specific places: once on its way up, and once on its way down.
For reasons which are beyond the scope of this discussion, the “zero point” of any trajectory is the specific place on that trajectory at which the bullet’s path crosses the line of sight on the bullet’s way down. One of these zero points is shown on the illustration, and, in this case, it’s at 250 yards from the rifle’s muzzle.
If this particular rifle, firing this particular cartridge, is zeroed so that its bullet hits (the POI) the center of the target (the POA) at 250 yards, then any similar bullet fired from a similar cartridge in the same rifle will hit within five inches of the shooter’s POA at any distance from the rifle’s muzzle out to 310 yards.
All cartridge manufacturers, and also some people who make scope sights, publish ballistic tables, trajectory-curve diagrams, and sometimes even both, for most modern cartridge loadings. Using this information, you can figure out the actual trajectory curve for your rifle and your cartridge, firing your specific bullet, for any distance you choose as your zero point.
If you know the trajectory curve and a zero point, you can easily figure out where your bullet will be at any distance between your rifle’s muzzle and any place else.
Handy, huh?
RELATED ARTICLES:
How To Zero Your Sights (when you can’t hit the broadside of a barn) – https://guntoters.com/blog/2016/07/21/how-to-zero-your-sights-when-you-cant-hit-the-broadside-of-a-barn/
![]()