

— by M1911A1 —
It’s the beginning shooter’s “Catch 22”: How can I zero a gun’s sights to a minute-of angle, when I can’t hold my shots within a minute-of-mountain?
Well, here’s how.
Zeroing works best when you eliminate as much human error as possible. The science of statistics can do that for you, if you can supply a large enough sample of data. This zeroing method is independent of your shooting skill, so if you fire enough shots, the results will be very reliable and your weapons will be zeroed.
As long as you put at least five holes anywhere on the target, even if they’re spread all over the place, the statistical method will find the center of your group, and then tell you how far to move your sights, and in which direction, to properly center your groups on the target.
You won’t necessarily become a better shot, but from then on your hits will get as close to your aiming point as possible.
 To do this job, you need a package of special targets. They look a little like graph paper, covered in a grid of one-inch squares (see the illustration). Several scope manufacturers sell them, for use in zeroing scoped rifles. The ones you buy may or may not have numbers printed on them.
It may be helpful to also buy one-inch-diameter center dots, perhaps in a bright color, for use as aiming points. Put one of these dots in the exact center of each target.
Shoot from a rock-solid position, either prone or from a bench, and support your rifle’s fore-end on a bipod, or on your hand supported by a padded box or a stand. I suggest that you start at 25 yards, just to see whether you’re “on paper.” Fire one shot as carefully as you can, aiming at the center dot, and see where your hit falls.
If there’s a hole on the paper, you’re OK. If there’s no hole, pull the target in to 10 yards and try again, still aiming for that center dot. If there’s still no hole, pull the target in closer.
When you’ve finally made a hole in the paper, adjust your sights or scope to bring the next hole as close as possible to the center dot. (Sight-adjustment instructions are explained in detail just below the illustration.)
If you’re adjusting your rear sight or a scope, move the sight in the direction in which you want to move the next hole. If your first hole was too far to the right, move your rear sight to the left so that your next hit will be further left.
If you’re adjusting your front sight, move it in the opposite direction of the way you want to move the next hole. If your first hole was too high, you must move the front sight higher to cause your next hole to hit lower.
Shoot, and then move your sights, one shot at a time, until your last shot is as close to the center dot as you can place it. If you’ve not been shooting at 25 yards, now move the target back to that distance, and verify that you’re still on the paper. Now replace the used target with a brand new one.
Slowly and carefully, and without making any sight changes, fire five shots at the new target, aiming at the center dot. Now go and get that target, because it’s time to do some very simple arithmetic.
Your target should look something like the picture, below, although the holes you’ve put into it will be in different places. (Refer to the picture below for the remainder of the discussion that follows.)
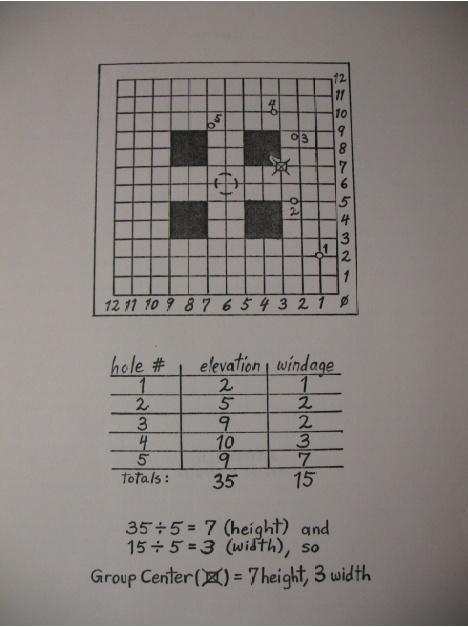
Starting at the target grid’s lower right corner, number the lines just as I’ve done. (There will probably be more lines on your target.) The corner itself is the point of origin, and the lines are numbered as increasing both up and to the left.
Pick any hole in your target, and mark it as “Hole #1.” Count the horizontal lines up from the origin point until you know the number that you gave to the horizontal line that’s closest to Hole #1. This number represents the elevation of Hole #1.
Make a quick chart like mine in the illustration, and enter that number in the “elevation” column next to Hole #1.
Now count the vertical lines from the origin corner to the vertical line that comes closest to Hole #1. This is the windage value for Hole #1. Write that number in the “windage” column next to Hole #1. Tape-over or mark Hole #1, so that you don’t count it again by mistake.
Now do the exact same thing for Hole #2, Hole #3, Hole #4, and Hole #5. Write their elevation and windage values in the appropriate columns, as I’ve done in my illustration.
Add together all of the numbers in the “elevation” column, and write that total at the bottom of the “elevation” column. Add together all of the numbers in the “windage” column, and write that total at the bottom of the “windage” column. The result should look something like my example in the illustration.
Divide the “elevation” total by the number of holes (five, in this case). Call the result the “height.”
Divide the “windage” total by that same number of shots (five, in this case). Call the result the “width.”
Starting at the lower-right origin point of the target, count upwards the number of horizontal lines equal to the “height.” Along this horizontal line, count leftwards the number of vertical lines equal to the “width.” The point that you are now on is the exact center of your five-shot group. Make a good, solid, visible mark there.
If the center of your five-shot group (its “point of impact”) isn’t right on the target’s center dot (your “point of aim”), you’ve got to move the two together. You will have to adjust your scope or rear sight (or both front and rear sights) to bring your point of impact (POI) to meet your point of aim (POA).
The lines on the target are one inch apart. In my illustration, the group center (POI) is three vertical lines too far to the right, and one horizontal line too high. To make my POI meet my POA (the center dot), I would have to move my scope’s cross-hairs or my rear sight enough to move my new POI three inches to the left, and one inch down.
Sight adjustments are usually described in terms of “minutes-of-angle,” and almost all scopes and sights are made to adjust in increments of one-quarter of, one-half of, or one whole minute-of-angle. You need to know which increment your scope or sight system uses. For our example, we’ll say that my sighting system uses one-quarter minute-of-angle increments.
For our purposes, it is enough to remember that one minute-of-angle equals one whole inch at 100 yards, two inches at 200 yards, three inches at 300 yards, and so on. Going in the other direction, one minute-of-angle equals one half of an inch at 50 yards, and one quarter of an inch at 25 yards.
To properly center my sample target, shooting at 100 yards, I would have to bring my scope’s cross-hair or my rear sight down one inch (one minute-of-angle), and left three inches (three minutes-of-angle), to make my POA and POI come together.
If a sight system adjusts in “quarter-minute” increments, then at 100 yards it would require four quarter-minute increments of sight movement to equal one inch of POI movement on the target. This adjustment is often stated as “four clicks,” because sight-adjustment knobs frequently make a clicking noise as they move. If I had been shooting at 100 yards, I would need to move my sight four clicks down to move my POI one inch downward on the target.
But in my example, I’ve been shooting at 25 yards. At that distance, moving a POI down just one inch requires that the sight move four clicks per quarter inch, or 16 clicks per inch downward. So that’s what I should do. If my sight adjusts in half-minute clicks, I would need to twist the elevation knob through eight of them, and for whole-minute clicks, the adjustment would be four.
Move your sights as required and, still at 25 yards, use a new target to repeat the whole process and verify that your POI is as close as possible to the center dot. You may have to readjust your sights, and do it again using another new target. You want the error to be as small as possible now, because at a greater distance, an error that seems small at 25 yards may put some of your shots off of the paper.
A 25-yard zero will very likely put your shots quite close to the center dot when you have moved the target out to 100 yards. This is because a modern rifle and cartridge produces a fairly flat “trajectory” (that’s the name of the curve of your bullet’s path). The position of your bullet, rising up along its trajectory when it hits a target at 25 yards, will be very close to the position of your bullet when it is falling down along its trajectory and hits a 100-yard target.
As you practice your shooting skills, and as your technique improves with practice, you can still use this statistical system to find your rifle’s (or pistol’s) zero at any distance you become able to use. You need only make five consecutive good hits, in order to use it.
In the case of a rifle, it will be useful to know the changes in sight settings required to make properly centered groups at 100 yards, 200 yards, 300 yards, and even out to 600 yards (if you have a place to shoot that far). You could also set up a “point-blank” zero, in which your POI remains within five inches of your POA at any distance from your rifle’s muzzle all the way out to just past 300 yards.
I suggest zeroing a pistol at 25 yards, and never adjusting it after that. If your pistol’s POI is well centered at 25 yards, its bullet will hit within an inch or two of your POA at any distance from its muzzle to about 35 yards. That’s good enough for practical self defense.
I also suggest that you need a log book in which to write the rifle sight adjustments that you discover, and the number of clicks that your sighting system requires to properly shift its POI when you move from one distance to any other. Memorization is necessary, but also having it in writing eliminates confusion when you accidentally get lost among the clicks.
I more completely explain “minute-of-angle,” “trajectory,” and “point-blank zero” in my article entitled, “Minute-Of-Angle? Point-Blank Zero?” that is available at https://guntoters.com/blog/2016/07/21/minute-of-angle-and-point-blank-zero-what-the-heck-are-they/
![]()