

 When I purchased the Hi-Point 4595TS carbine (read my reviews: Hi-Point 4595TS Carbine – Product Review and Hi-Point 4595TS Carbine – Product Review, Part 2 I have to admit that at first I was skeptical. That skepticism soon vanished after handling and shooting it. I decided that I would like another, but in a different caliber.
I have a Beretta CX4 Storm carbine that is chambered in 9mm and a second 9mm companion to this little guy would be nice to have. I decided on the Hi-Point 995TS WC for several reasons. The first reason is that I now consider Hi-Point carbines an excellent product for the price paid. The second reason was that I am looking forward to writing a comparison between the Hi-Point 995TS, the Beretta CX4 Storm, and the Kel-Tek SUB2000. The only common thing that can be said about the Hi-Point 995TS, the Beretta CX4 Storm, and the Kel-Tek SUB2000 is that they are in the PCC (Pistol Caliber Carbine) class of firearms. The differences between them are very distinct.
Because I wanted something just a little different than basic black polymer furniture, I opted to purchase the 995TS WC; thereby removing the “Evil Black Rifle” stigma that is commonly attached to long guns that do not look like your Grandpa’s hunting rifle.
The Hi-Point 995TS WC seemed to fit what I was looking for, a simple and inexpensive PCC that could be used for plinking, practice, home defense, and also personal defense if called upon.
THE BASICS:

SOME ASSEMBLY REQUIRED:
If you purchase any Hi-Point carbine, you will also receive some basic items with your purchase:
- 1 ea. Multi-tool that is specific to the firearm
- 1 ea. Operating Rod assembly (Operating Rod and Roller)
- 2 ea. 1” Sling Swivels
- 2 ea. Metal Sling Adjuster
- 1 ea. Nylon Sling
- 1 ea. 10-round magazine (.380, 9mm, and .40 S&W) or a 9-round Magazine (.45 ACP)
- 1 ea. Instruction Sheet w/parts breakdown
- 1 ea. Accessory List
- 1 ea. Magazine Warning Sheet
- 1 ea. Hi-Point Dual Lok w/instructions (Note: The multi-tool provides the means to operate the lock and a separate padlock is required to secure the lock.)
- 1 ea. Chamber Flag
The Operating Handle assembly must be installed and the multi-tool provides the means to install it.
If you purchased a Hi-Point carbine with any or all of the options, the optional accessories will also be included with your purchase.
All options will require mounting and all optics will require zeroing.
OVERALL APPEAL (IF ANY):
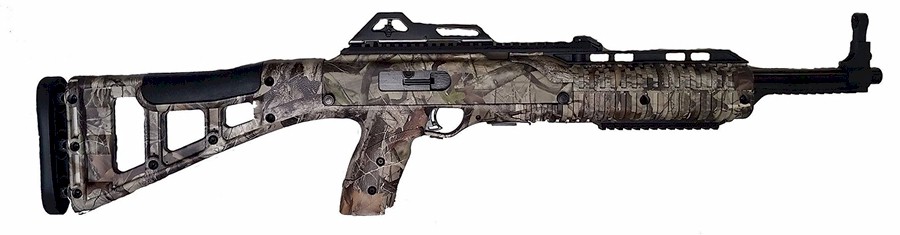
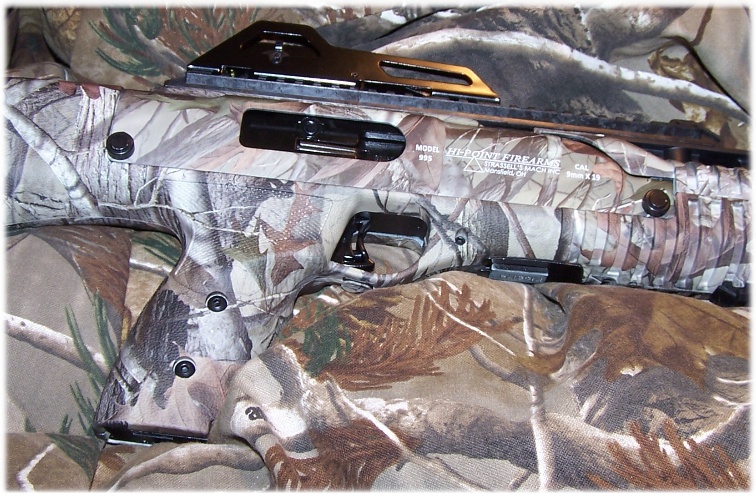
Hi-Point 995TS WC PCC
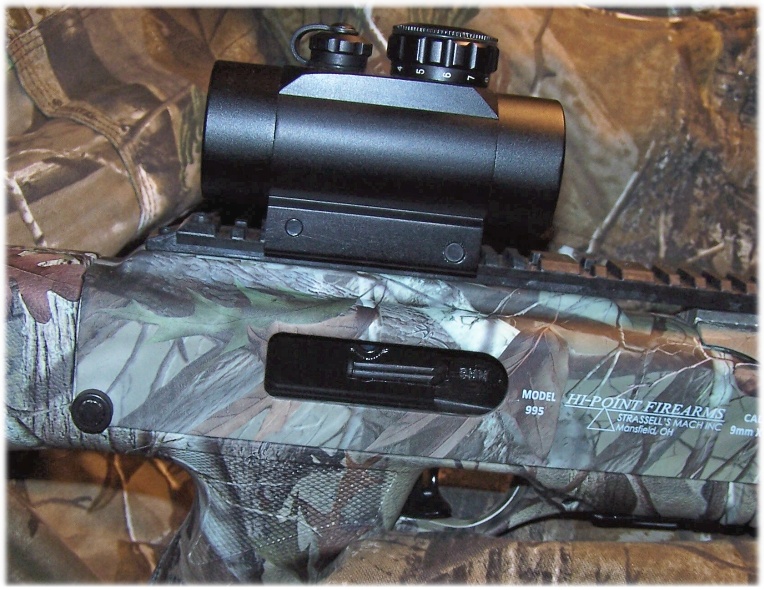
In general, and in my opinion, the Hi-Point 995TS WC PCC, like other Hi-Point carbines, has a slightly AK take to it with one big advantage of a longer sight radius and much better sights. It is a piece that definitely leans to the tactical side and that should appeal too many. There are several variations of the Hi-Point 995TS WC that include laser, scope, red dot, light, and folding front vertical handgrip, and any combination thereof. My choice was for a bare-bones carbine.
Like the Hi-Point 4595TS, the Hi-Point 995TS WC is somewhat futuristic looking with enough rail surfaces to satisfy those ardent fans of attachments. Nomics, as in “ergo,” is primarily left up to the operator to determine how well all of the controls operate in their hands and how comfortable the Hi-Point carbine is to shoot. Being a left-hand long gun shooter, and after operating the Hi-Point carbine, I had no concerns such as Operating Handle location, ejection, and safety location and operation.
While I briefly discuss the “Woodland Camo” finish later, the contrast between components really stands out in a most pleasing way. The accessory rails are in your basic black polymer and look right at home with the “Woodland Camo” finish. The butt-pad, cheek pad, trigger, rear sight assembly, and the black finish of the barrel also add an appealing contrast to the 995TS WC carbine. Overall, I find the 995TS WC highly likable. Others who have seen it for the first time had very positive comments regarding the overall look of the 995TS WC.
OVERALL QUALITY and CONSTRUCTION:
AUTHORS NOTE: some images used in this review have been taken with the 4595TS carbine. However, the images also apply to the 995TS WC carbine.
Hi-Point touts the fact that their firearms are the least returned and/or repaired in the industry. That is a pretty bold statement to state considering that most would agree that Hi-Point firearms are priced for the frugally-minded consumer. But, does the price reflect the quality of the firearm?
The Hi-Point 995TS WC is a 100% American-made product from Ohio and, as Americans, we expect a higher quality firearm (even with an inexpensive one) than what could be obtained from a foreign country for the hard-earned cash that we plunk down on the counter. Does the Hi-Point 995TS WC digress from “American” standards of expectations? Well, I suspect that it depends upon what standards that you expect. If cost is your only factor in determining quality, the Hi-Point 995TS WC may change your reasoning.
Attempting to mate stock to steel has always been a challenge to firearm manufacturers regardless of the type of stock and quality of finished steel used. Firearms, in general, have always been modular affairs (lock, stock, and barrel) and that characteristic has been passed to the present and will continue into the future. Longevity of a firearm is established through the quality and construction of a firearm and modern manufacturing and materials has stretched the lifespan of many firearms – even inexpensive ones. With that said, failures can occur even in very expensive firearms and the MTBF (Mean Time Between Failure) is usually determined by the weakest component (excluding the operator). In a lot of cases, and with firearms that use external magazines as a food source, failure of these firearms are largely with the magazines being used. The ammunition (another external source) being used in a firearm can also be a contributing factor in determining a firearm’s quality, but unfairly so. Using ammunition, which stretches the limits of common sense and the firearm’s upper limit, does not demonstrate the quality and construction of a firearm. Many; however, feel that it does. However, the people that do so are the same that would run an engine to 9,000 rpm despite the engine’s limits being 8,000 rpm just because they can. The Hi-Point 995TS WC is +P rated and that should speak to its quality. It does not; however, speak to longevity and that is always a main topic regarding inexpensive firearms.
I have read where the receiver and bolt is die-cast from zamak-3.
Considering the cost to the consumer for the Hi-Point 995TS WC, there is a lot of quality for the money. I have purchased firearms for a lot more money than the Hi-Point 995TS WC that I have found to be ill-fitted and poorly-matched finishes. I have had, on some occasions, to procure the labor of a qualified gunsmith to make things right with a new firearm and endured the agony of seeing that first scratch on a finish that was supposed to be as durable as any known to man. Note that the “Camo” treatment versions of the 995TS add a little cost to the base price of the firearm.
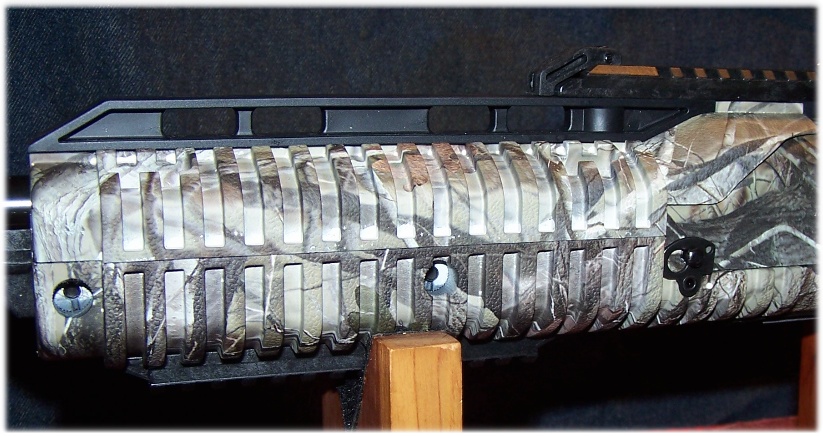
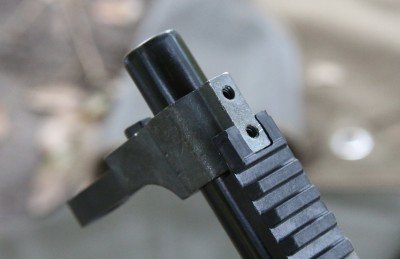
Alright, so the Receiver Shroud (4) is stamped metal! You expect forged? C’mon, is not the receiver cover on an AK stamped? The Receiver Shroud is held securely in place by two, spring-loaded captive pins; I have not yet seen that on an AK or budget MSR! The Receiver Shroud (4) is actually a nicely-sculptured, 0.065-inch thick stamped piece of work that also serves as a foundation for the sight rail. Finished with what seems to be an evenly-applied baked-on finish, the receiver cover lends itself to personal customization in a variety of finishes such as Duracoat, Krylon, or even Cerakote. The Receiver Shroud on the HP 995TS WC; however, received the same “Woodland Camo” treatment as the Stock (43) and forend Cover (8) of the firearm.
Quality is not just in the firearm but also in the manufacturer’s willingness to support their product. All Hi-Point firearms include a lifetime “no questions asked” warranty that transfers to anyone who purchases a used Hi-Point firearm.
While I cannot testify to the longevity of the Hi-Point 995TS WC, it would seem that if the firearm was properly cared for and operated within its limits, it is should be around for quite a while.
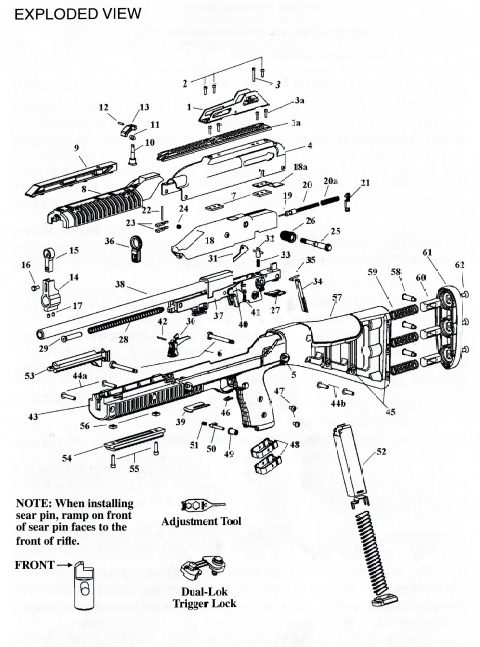
AUTHOR’S NOTE: I have attempted to include part identifiers (numbers in parenthesis) as an aid in identifying parts. For convenience, I have included an Illustrated Parts Breakdown (IPB) at the end of the article.
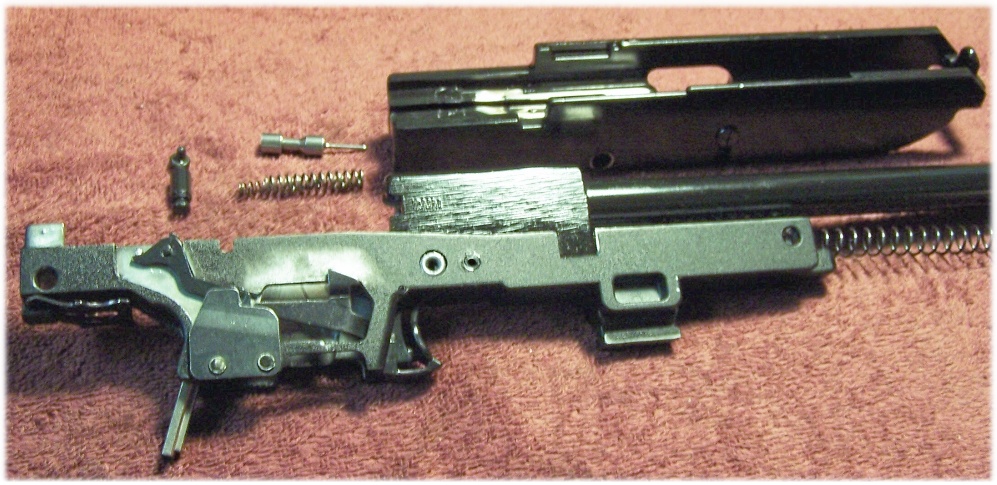 Removing the Front Sight Assembly (14 and 15) allowed me to completely remove the Breech Bolt (18) from the Receiver (37), which in turn allowed me to get a better look at the internals of the 995TS WC.
You can see from the accompanying images that the receiver is not a pretty sight nor is the Breach Bolt.
I did notice that, as compared to the 4595TS, there is no shell deflector that is part of the Breech Bolt. The shell deflector is simply an angled part of the Breech Bolt and is just above the Extractor on the 4595TS. This angled shelf; however, is not present on the 995TS carbines. With that said, it is important to note that in the IPB (illustrated Parts Breakdown) provided by Hi-Point, the Extractor is referred to as Ejector Keys (23). It is also important to note that the Ejector Keys and Ejector Key Spring (24) is kept in place by an Ejector Key (roll) Pin (22) that cannot be removed from the Breech Bolt.
The feed ramp, while not polished or machined well, works as intended. The only failures that I had during range time were (seemingly) due to the magazine follower. A bullet slammed against the upper part of the chamber. In this case, the cartridge was unusable because of too extreme of a bullet setback and I felt that it could be too unsafe to fire. Note that this only happened with the one magazine that I was using to sight in the 4595TS and I was only loading three rounds for grouping purposes. With the same magazine fully loaded, I could not repeat the FTF.
Obviously, the internals are not going to be as finely finished as a high-end carbine, but everything seems to do its job. The rifling of the barrel is not what I call the best, but it must be effective if the 995TS WC is capable of 1-inch groups at an initial zero distance of 15-yards offhanded. I’m pleased as punch, to tell you the truth.
WOODLAND CAMO FINISH:
 Before I dive into the mechanical aspects of the 995TS WC carbine, I wanted to specifically mention the “Woodland Camo” finish. The “Woodland Camo” finish is an option with all Hi-Point carbines. It is an option that should appeal too many who is tired of “black rifles” and is looking for something different.
The “Woodland Camo” pattern is excellent and the finish is applied very well. It would seem that the finish will hold up over the long term under normal use. As I mention later, the stock, Receiver Shroud, and Forend Cover all receive the “Woodland Camo” treatment, but the treatments do not perfectly match. I am willing to forego a mismatch of patterns on a firearm in the price range as the Hi-Point. The only place on the finish that might receive some wear over time and use is; at the locking notch where the Roller (26) meets the Receiver Shroud (4) to lock the Breech Bolt (18), the bottom of the stock as the Receiver Clip (39) is removed and installed to clean or to perform internal maintenance on the firearm, and the grip area from the hand (or gloves) that could cause wear on the finish just from normal use.
Product stamping was performed on the left side of the Receiver Shroud. It is; however, barely discernible under the “Woodland Camo” finish. With this version, as with other finish options, product labeling is performed on the right side of the Receiver Shroud in a very nicely contrasting white against the background pattern.
When placed against a “Woodland” background, the 995TS WC carbine almost completely disappears from view.
There is; however, one caveat emptor with Hi-Point finishes like Desert Digital, Woodland Camo, and Pink Camo. You will find this caveat emptor on a sticker that has been placed under the top lid of the box in which the Hi-Point carbine ships; “The coatings on this firearm are similar to those on a car. It will last for many years under normal use, but excessive impact or exposure to harsh solvents can result in damage. As such, other than factory defects the coating cannot be covered under the Hi-Point Lifetime Warranty.”
There is one last note about the finish. By adding the Woodland Camo” finish (or any other optional finish) to the Stock, Receiver Shroud, and Forend Cover, the overall thickness of these components has increased slightly. This makes for a tighter fit between these components, which may lead to wailing and the gnashing of teeth when attempting to separate these assemblies to disassemble and assemble the firearm. A nylon punch and a soft-faced gunsmith’s hammer do wonders in separating assemblies and work just as well in assembling the firearm.
ACTION:
The action is a straight blow-back, closed-bolt firing design and uses a heavy bolt (18), recoil spring (28), and double-spring (20, 20A) firing pin (19) system. The Operating Handle (25, 26) is located on the left side while ejection is out of the right side of the receiver. The Hi-Point 995TS WC features a lock-back-on-last-round feature (with Hi-Point magazines). After the last round in the magazine is fired, part of the magazine presses upward against a Hold Open (40) lever, which is under tension by a Hold Open Spring (41). The bolt is locked back by the Hold Open lever (40). When the Operating Handle (25, 26) is pulled rearward with or without a loaded magazine, taking tension off of the Hold Open (40) lever, the Hold Open Spring (41) pulls the Hold Open assembly out of the way of the bolt, which allows the bolt to move forward into battery due to the tension of the Recoil Spring (28 and 29).

Locking for Operating Handle
The action can be locked back manually by pulling the Operating Handle fully rearward and then pushing Operating Handle’s Roller inward to lock it into its detent in the Receiver Shroud. With that said, some effort is required because the bolt is slightly stiff at the end of its rearward travel (which also cocks the firearm). Also, with that said, I found it easier to insert an empty magazine and then pull the Operating Handle full rearward until it locks in place with the Hold Open (40) lever; this is much easier than trying to locate the locking notch without a magazine inserted (there is absolutely no charge for this useful information).
It should be noted that the bolt moves very smoothly and straight to the rear upon recoil and is not a rotating bolt as found in some semi-automatic carbines (and some pistols). I also noticed, after inspecting the Breech Bolt (18) after disassembly, that the face of all (apparent) friction surfaces is highly polished.
The Operating Handle and Roller are attached to the bolt via a hex-head bolt (a wrench is provided with the firearm). The threaded Operating Handle is pushed through the bolt upon assembly where it is secured on the opposite side by screw threads. Removing the Operating Handle is necessary when disassembling the Hi-Point 995TS WC. The tightness of the charging handle might need checking periodically during firing. A dab of “Blue” thread-locker may also be in order. Hi-Point states in its documentation, “DO NOT OVERTIGHTEN ANY SCREWS OR NUTS. SNUG IS SUFFICIENT.”
If you are a right-handed shooter, the Operating Handle will be coming back at your face at a pretty good clip when firing while ejecting shells away to your right. If you are a left-handed long gun shooter, as I am, what the charging handle does is no concern because it is on the left side of the body. Spent shell ejection; however, is to the right as it would be on most long guns set up for right handed operation. As a left-handed operator, the angle of shell ejection and hot gases could be a concern; it is not pleasant to be hit in the face with hot brass or hot gun powder residue. Obviously, eye protection should always be worn when operating any firearm.
Spent shell extraction is via a robust external (to the bolt) double-claw extractor.
The firing pin rides within the firing pin channel channel. Dual firing pin coil springs are also within the firing pin channel. The dual spring-loaded firing pin means that the firing pin will reliably protrude past the bolt face and buffer the firing pin from the impact with the spent primer during recoil, but only for a mere fraction of a second a the end of the recoil. When the bolt is fully rearward (locked), the firing pin protrudes approximately 1/8” out from the bolt face. All Hi-Point carbines use the firing pin to eject spent cartridges. While this seems to be a strange way of ejecting spent shells, it seems to be effective. When the bolt begins its forward motion, the firing pin is held in its rearward position by the Sear (32), which prevents the firing pin from protruding through the bolt face as the bolt slides into battery.
With that said, there have been very few reports about bent firing pins. I suspect; however, that bent firing pins could possibly attributed with high round counts, weak recoil springs, weak firing pin springs, too strong of an extractor, and/or high-pressure ammunition. Of course, this is all speculation on my part and only use and time with my particular Hi-Point 995TS WC will tell any story. With this said, I had placed a call to Hi-Point to ask a question about bent firing pins. Surprisingly, I was able to talk to one of the technicians about the firing pin issue and he stated that he has seen a few bent firing pins and clued me into the cause. Bent firing pins are caused by the operator. That seemed to me, at first, to be a point of placing the blame on the operator and not on Hi-Point. However, he went on to explain the cause of the problem. Hi-Point recommends that the Operating handle be pulled to the rear and locked into place prior to inserting a loaded magazine (for the first time). The bent firing pin is due to the operator not fully pulling the Operating Handle fully to the rear (to the stop) before releasing the handle to chamber a round. In shooter’s terms we have come to know this as “Short Stroking” as related to pump-action shotguns.
Because the firing pin protrudes from the bolt face, short-stroking from a closed bolt position with a loaded magazine could cause undue lateral stress on the firing pin when attempting to pick up the round from the magazine; the cartridge case hits the firing pin as the cartridge is forced into the extractor. If the bolt is locked fully to the rear when inserting a magazine, the cartridge hitting the side of the firing pin is mitigated. During normal fire, of course, the bolt is slammed fully to the rear by the force of the recoil, the spent shell casing is ejected by the firing pin, and due to the forward motion of the bolt the floating firing pin should retract back into the bolt face as a new round is picked up from the magazine. I; however, see another possibility that could cause a bent firing pin – weak loads that could cause the Breech Bolt from completing its full rearward travel and prevent the firearm from being properly cocked; whereas, the firing pin could follow the Breech Bolt forward and interfere with a cartridge being picked up from the magazine. In effect, the firearm is “short-stroked” by virtue of weak ammunition.
To digress a bit, the beauty of the 1911 pistol, even when chambered for the 9mm, is that we can quickly swap out recoil springs to accommodate loads from light to heavy to ensure proper cycling of the slide. The Hi-Point carbine does not have that capability. Until I can determine otherwise, what recoil spring comes with the Hi-Point 995TS WC is the recoil spring that you are stuck with. In short, that means that the rifle could be ammunition sensitive. The Hi-Point carbine is designed to fire commercial loads up to and including +P ammunition and it does seem to favor healthy-loaded ammunition.
You will need, as with any semi-automatic firearm, ammunition that cycles the firearm properly (among other things). While lightly-loaded hand-loads or light-recoil range ammunition may work just swell in your 9mm pistols, it may not work well in a PCC with a heavy recoil spring and bolt.
Expended shells are ejected from the chamber well to the right side. Extraction is positive and I have not experienced any problems in that area.
UPPER AND FOREND:
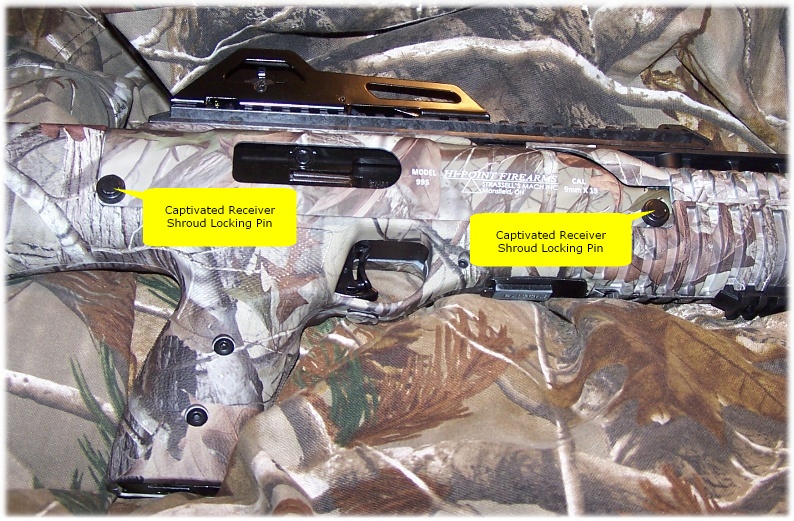 The upper section and forend is very busy. The Receiver Shroud (4) is held into place by Receiver Shroud Pin (6) and Receiver Shroud Pin Clips (5).

Forend Cover (8) Release Lever
A Rail Lock (13) and friction fitting secures the the Forend Cover (8) to the stock. The lower forearm is highly-textured and has a Bottom Rail (54) for attachments. Personally, I do not find the forearm uncomfortable to hold with my bare hands, but I have chosen to exercise a Bottom Rail option (see, MODIFICATIONS).
The upper polymer Forend Cover does blend well with the Receiver Shroud although the “Woodland Camo” pattern is mismatched with the rest of the firearm. The Forend Cover does have four slots that allow heat from the barrel to escape. The Forend Cover mates up with four slots that are part of the lower forearm of the stock. To remove the Forend Cover, simply flip the Rail Lock up and back. Then, pull the Forend Cover forward until it clears the slots. To install the Forend Cover, simply slide the Forend Cover into the four retaining slots and press the Rail Lock forward and down until it is seated. Note that the Rail Lock locks the top rail to the Forend Cover and keeps the Top Rail from flexing while holding the Forend Cover in place. Note also that the Forend Cover should be pushed as far rearward as possible to prevent undue strain on the Rail Lock. Note that with an optional finish (Woodland Camo, Desert Digital, or Pink Camo) the fit of the Forend Cover to stock can be quite tight, as mentioned in WOODLAND CAMO).
The “Woodland Camo” Receiver Shroud incorporates a full-length polymer Weaver Top Rail (1a) that extends forward and over the Forend Cover. If you use the stock as the standard for the “Woodland Camo” texture, the Forend cover is mismatched to the stock, but like the Receiver Shroud, the mismatch is acceptable for this price-range of firearm. From a distance, the differences in the application of the “Woodland Camo” on the Forend Cover, Receiver Shroud, and stock would not be detectable.
With the rear sight installed, there is approximately 4.5” of polymer rail on which to mount an optic such as a red dot sight.
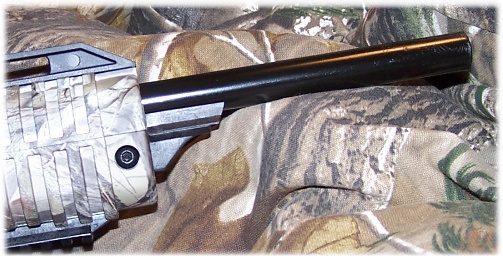
BARREL:
With the Hi-Point 995TS WC, the 16.5” barrel assembly is pinned into the Receiver and fire control system. The Breech Bolt (18) contains the Firing Pin (19), Firing Pin Springs (20, 20a), and Bolt Retainer (27). The carbon steel barrel has a 8 lands and grooves with RH 1:10 twist rate. Because of the longer barrel length over a standard pistol, some higher velocity and accuracy can be expected.
The barrel crown is a slight rounded at the muzzle and could be an area susceptible to damage. Hi-Point has a muzzle brake attachment that could help protect the most important end of this firearm.
It was apparent that my particular Hi-Point 995TS WC was fired before shipment, as evident by the fouling in the barrel. A few pulls with a Bore-Snake cleaned the bore up quite well.
Hi-Point recommends cleaning the barrel every 300-400 rounds.
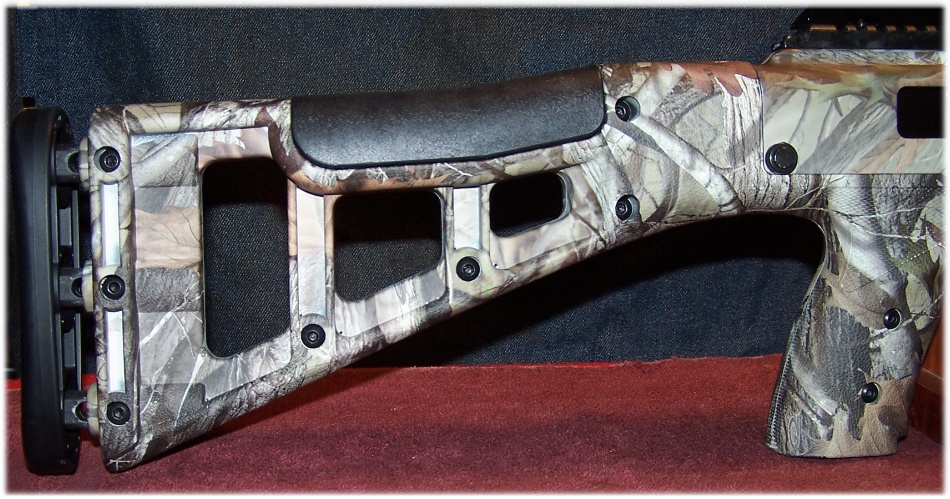
STOCK AND GRIP:
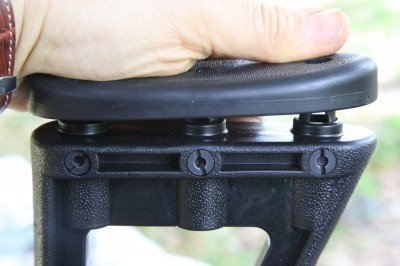
Impact Absorbing Butt Pad
The “Woodland Camo” stock (43) appears to be actually two horizontal pieces that are held together by bolts and nuts located at strategic points.
The butt area of the stock is skeletonized and incorporates a polymer, black butt-pad that bolts onto a buffered bolt-on butt-plate. Three springs provide buffering, although there is not much recoil at all with the Hi-Point 995TS WC. A Cheek Pad (57) in the top of the butt-stock provides a cheek rest of sorts. The LOP (Length of Pull) of the stock is approximately 14.5” and for me is almost perfect.
The stock is has a finely-pebbled texture with a nicely applied “Woodland Camo” theme, with the exception of the cheek-piece and polymer Weaver rails that are a contrasting black polymer. The grip area and cheek piece have a texture of their own, and all blend well to make a nice overall appearance of the stock. Each side of the grip, at the top, is sculptured to accept the trigger finger and thumb and the grip is very comfortable. I was at first, being a left-handed shooter, concerned that the trigger finger might make contact the magazine release, but this does not seem to be an issue when the Hi-Point 995TS WC is properly mounted into the shoulder.
With a grip that accepts a single-stack magazine, the width surprised me and is not one that you could call svelte in any term at 1.46” where the majority of the hand rests. The grip is mildly-textured and provides a good surface for the hand. A single finger groove (I like finger grooves) provides for quickly locating the hand to the grip.
The grip angle and contour is comfortable in my hand and has just enough arch in it for the palm of my hand to feel at home.
The front and the rear of the grip have horizontal serrations and the shooting finger and thumb area is a panel of texture different from the other textures. With the use of polymer, texturing can be as aggressive or as casual as the manufacturer deems and what is but a casual texture would take a very long time to reproduce in a stock of wood.
The front end of the stock extends well into the barrel and with a Front Rail (53) that fits into the Front Sight Base (14). A Weaver-Style Bottom Rail (54) is part of the lower hand-guard for mounting light, laser, and/or pistol grip. The Bottom rail can be removed with a 9/64” Allen Head wrench. However, there are polymer guide pins for the rail that are integral to the forearm; therefore, removing the rail may not be a viable option unless you are willing to do some cleanup work.
Two 1” sling attachments are provided with the Hi-Point 995TS WC, as is a sling. Both attachments and sling must be installed. I have not yet decided to “sling” the Hi-Point 995TS WC, but if I do it will not be with the provided sling (my momma always told me that if I didn’t have something nice to say it is best not to say anything at all), although the sling attachments would be suitable for general applications. The Hi-Point 995TS WC is not, after all, a “combat grade” firearm.
SIGHTS:
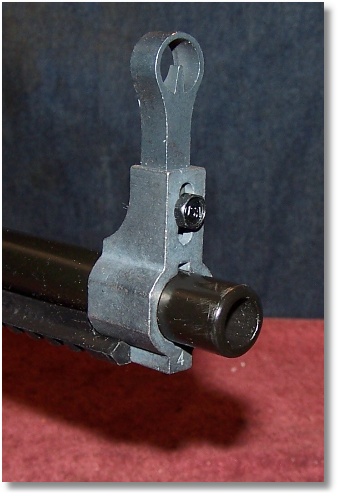
Front Sight (15). Elevation adjustment is by the Front Sight Screw (16)
Front Sight Base (14) is mounted with Two Front Sight Base Screws (17)
The Rear Sight is Fully Adjustable and Graduations are Nicely Painted for Visibility[/caption]The front sight is a two-piece, steel unit consisting of a Front Sight Base and the Front Sight that is affixed to the barrel and is in stark contrast to the barrel’s finish – to cut glare, perhaps? Two set screws attach the Front Sight Base to the barrel and the Front Sight is held in place to the Front Sight Base by a hex-head bolt. The Front Sight can be removed to accommodate optic-only capabilities while keeping the Front Sight Base in place on the barrel. The sight post is well protected by a shroud, and sits above the barrels bore axis by about 2.25-inches.
The front sight can be coarsely adjusted for elevation by loosening the Front Sight Screw slightly to allow the Front Sight to move up or down within its channel.
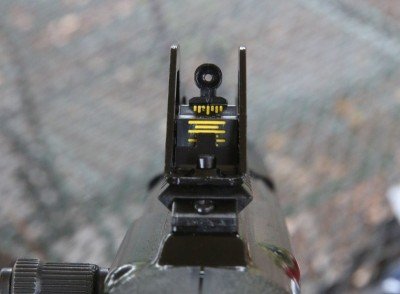
Rear Sight is Fully Adjustable and Graduations are Nicely Painted for Visibility
The rear sight is an inexpensive-looking but is a fully-adjustable “ghost” sight for windage and elevation. Adjustment increments are clearly highlighted with hi-visibility paint – almost too much so, but they are not distracting. The rear sight has indicators that help you align the sight for both windage and elevation.
The Rear Sight Holder Assembly (1) is made of formed steel and seems to be coated with the same material as the Barrel. Side rails fully protect the rear sight from damage. The rear sight, as with the front sight, is removable to accommodate optic-only sighting or for mounting a magnified optic that will “clear” the front sight.
The rear sight sits high, and due to the angle of the stock, a cheek weld is not hard to obtain when using the rear sight. In fact, I find it more difficult to pick up the rear sight on an AK than with the Hi-Point 995TS WC. While the edges of the Sight Holder are not well-finished, the “ghost” of the rear sight appears to be the same size as the hood on the front sight when sighted from the rear. Simply match the hood of the front sight to the “ghost” outline of the rear sight to place the tip of the front sight post in the center of the “ghost “ring. With the angle of the stock, it is very easy to get a good sight picture without scrunching my face into the stock as I must when shooting the AK, SKS, and M91/30 Mosin-Nagant.
Note that the rear site and optic rail is polymer and not metal. The same can be stated about all rails. Some care should be taken to not over-tighten accessories.
Other Hi-Point 995TS WC models come with a laser, light, magnified optic, or red dot sight and “light and sight” combinations – all of which do not add an excessive price to the firearm.
The Hi-Point 995TS WC is pretty flexible to attach different optics in my book.
!FRONT SIGHT REMOVAL:
Front Sight Base (14) Is mounted with Two Front Sight Base Screws (17)
Front Sight Base (14) Is mounted with two Front Sight Base Screws (17)
It is necessary to remove the front sight assembly to thoroughly clean the Breech Bolt. It should be noted that the Front Sight Base (14) is held in place by two 2mm set screws. The Front Sight Base fits into a groove in the Front Rail (53). When the Front Sight Base is removed, you will see two marks on the underside of the barrel where the two Front Sight Base Screws were tightened. When you re-install the Front Sight assembly, your zero will have changed. One method to maintain zero (as closely as possible) is to lightly scribe (or paint) alignment marks on the front sight base and the barrel. When installing the front sight assembly, simply line up the alignment marks. Once satisfied with the alignment tighten the Front Sight Base Set Screws (17). (DO NOT OVER-TIGHTEN. SNUG IS SUFFICIENT.). You should be now zeroed as close as possible to the zero point before the Front Sight was removed.
I have also found a way to ensure that the front sights will be as closely aligned with the previous zero as possible without scribing and/or painting the front sight base and barrel. Unfortunately, it will cost you a little cash.
Use an Inexpensive Laser to Align the Front Sight.
I had a spare red laser that I had picked up at Wal-Mart. Prior to removing the front sight, I mounted the laser on the Top Rail (1a), turned on the laser, and adjusted the beam to the center and top of the front sight post. I turned the laser off and left the laser mounted when I removed the Receiver Shroud (4).
After the 4595TS was assembled, sans the Front Sight, I used the laser to align the Front Sight to the barrel.
- Turn the laser on.
- Slide the Front Sight assembly onto the barrel and into the groove of the Front Rail.
- Lightly tighten one of the Front Sight Base Set Screws enough to allow some movement of the Front Sight.
- Align the front sight to the laser dot.
- Once satisfied with the alignment tighten the Front Sight Base Set Screws (DO NOT OVER-TIGHTEN. SNUG IS SUFFICIENT). You should be now zeroed as close as possible to the zero point before the Front Sight was removed.
- Re-zero, with the Rear Sight, at the range as needed.
SAFETIES:
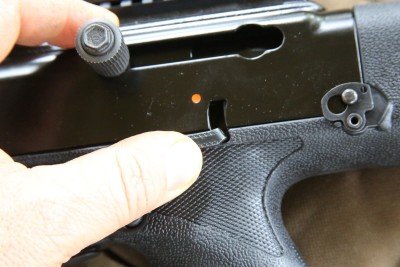
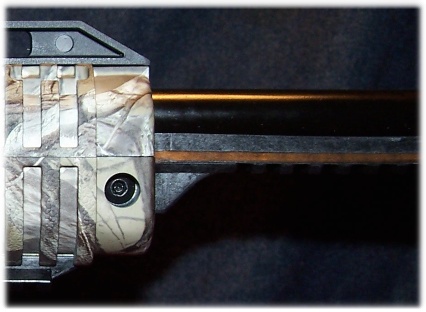
Thumb Safety Operates in Normal Fashion – Up=Safe, Down=Fire
A thumb safety lever (not shown in the IPB) is located on the left side of the firearm just above the hand grip and should be well within reach of most shooters. The thumb safety operates in a conventional manner where down=fire (the red dot on the receiver cover is visible) and up=safe (the red dot on the receiver cover is not visible in “safe” mode).
Since I am a left-handed long gun operator, my trigger finger is also my “multiple tasks” finger when it comes to right-handed long-gun setups. With the Hi-Point 995TS WC, my trigger finger gets to operate the trigger, safety, and magazine release button.
The thumb safety lever itself is a slim, but lightly-textured affair. I have become accustomed to operating the thumb safety on the MSR, but that thumb safety lever is more substantial than the thumb safety with the Hi-Point 995TS WC. The thumb safety lever could use a lip of some sort to better accommodate moving from one position to the other – in both directions. The thumb safety with the Hi-Point 995TS WC; while stiff when new, is easily moved from one position to the other and the trigger finger has ample strength to move it.
Note that the thumb safety is part of the barrel/receiver/fire control group and the safety lever simply protrudes through the Receiver Shroud and a small portion at the top of the stock. When the lever is within the Receiver Shroud, the Hi-Point 995TS WC cannot be fired.
Note that Hi-Point carbines do not incorporate a magazine safety; therefore, the carbine will fire a live cartridge with the magazine removed.
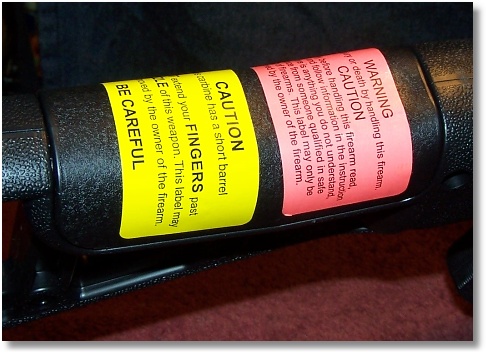
Peel-Off Safety Stickers on Cheek Rest
One feature that I did find nice is that safety warnings consists of two, peel-off stickers that are on the cheek piece rather than etched into the firearm itself.
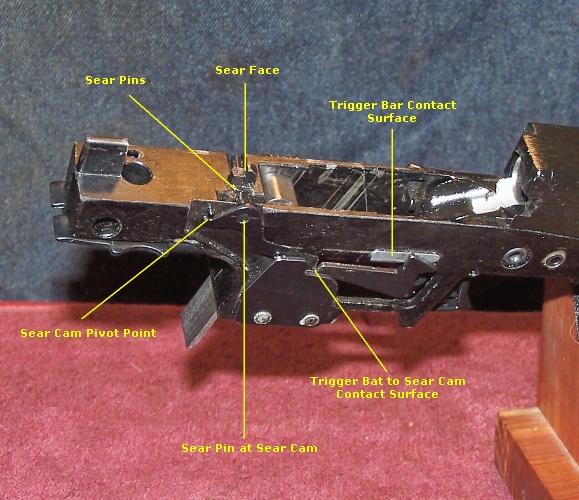
One of the mysteries I found was the Counterweight (34) that is part of the fire control system. Its purpose evaded me and a quick phone call to Hi-Point cleared up the mystery. The Counterweight is actually a “drop” safety. The Counterweight weighs 10 times more than the Sear. The sear is spring-loaded and could, without the counterweight in place, be forced from its position against the Firing Pin if the firearm was dropped. In short, the Counterweight keeps the Sear in place whenever the firearm is in a cocked condition.
MAGAZINES and MAGAZINE RELEASE:
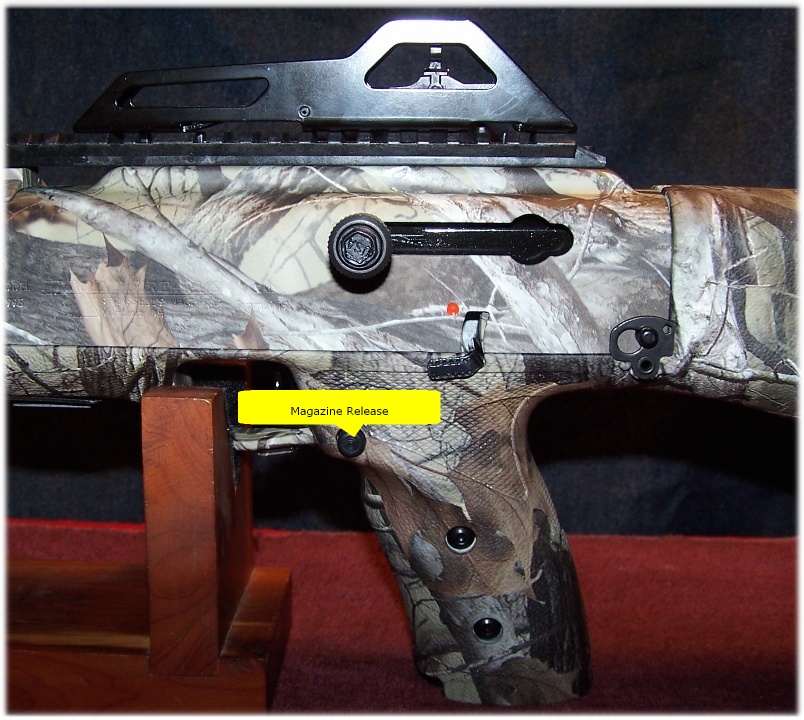 The Hi-Point 995TS WC uses a 10-round single-stack magazine and one is provided with the Hi-Point 995TS WC. The Hi-Point magazines are proprietary. Although there are higher capacity magazines available on the market, the use of them will void the warranty unless they are Hi-Point products or approved by Hi-Point. And, since Hi-Point has a life-time warranty on the Hi-Point 995TS WC, I will refrain from using magazines other than those from Hi-Point even though there is a desire for 10 more rounds in this puppy.
“Use of Pro-Mag high capacity magazines damages the loading
ramp of the model 995 and 995TS and VOIDS the warranty.”The magazine FOR the Hi-Point 995TS WC is a steel magazine with a steel follower that does not incorporate an anti-tilt feature. A polymer base-plate provides a flush-fit into the magazine well. Indicator holes in the right side of the magazine allowing for viewing of the magazine’s contents. The Hi-Point magazines seem to be of good construction, but it appears that the magazines cannot be disassembled (at least not easily) for cleaning or replacement of magazine springs. With that said, the base plate of the magazines does seem to snap into place against the housing of the magazine, but I am not willing to sacrifice a magazine to find out. Luckily, magazines for the Hi-Point 995TS carbine are not expensive and I plan to have a number of them on hand.
When a magazine is inserted into the magazine well, all goes well for a bit. Then, it seems that you hit a wall of resistance. At this point, you two options: press and hold the Magazine Catch Cap (49) while inserting a magazine or forcibly “slap” the magazine until it seats with an audible click. If you simply push the magazine into place, ensure that you hear an audible click, which indicates that the magazine is fully locked into place. The magazine, once seated, is slightly loose but that is nothing to be concerned about. Because of the protrusion on the magazine just before the Magazine Catch opening, and when inserting a magazine, I have found it to be most useful to simply press and hold the Magazine Catch Cap fully to accommodate smoother magazine insertions and removals.
The Magazine Catch Cap (49), as Hi-Point call the magazine release button, is located just rearward of the trigger guard on the left side of the firearm on the grip. I can push the Magazine Catch Cap in just fine with my trigger finger or middle finger, which also helps to keep my trigger finger out of the trigger guard and gives it something to do when not pulling the trigger (remember that I am a left-handed long-gun operator).
Once the Magazine Catch Cap is pressed, the magazine will drop free from the magazine well.
Inside the magazine well is a Counter Weight (34) that is held in place by two polymer rails. The counterweight is notched at the bottom. If a magazine is inserted in a fashion other than straight, the edge of the counter-weight may prevent the magazine from being inserted. A simply forward shift of the top of the magazine allows the magazine to bypass the counter weight’s edge.
Inside the magazine well are also two Handle Supports (45) with the apparent purpose is to add strength to the grip while providing a path for the magazine to travel. Each Handle Support (45) is secured by a Handle Support Screws (47); the two on each side of the grip. The ends of these screws protrude slightly past each Handle Support (45). With that said, the polymer magazine guides on the inside of the magazine well seem to work fine and are well above the tips of the Handle Support Screw(s).
FIRE CONTROL SYSTEM:
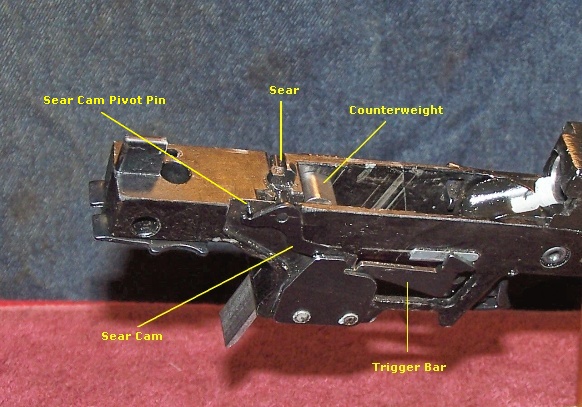
Fire Control System
The Trigger Assembly (30) is polymer and skeletonized and is not the best trigger that I have ever pulled in my life.
The face of the trigger is wide and has a serrated face.
The trigger of the Hi-Point 995TS WC is workable, but you have to work at it. After all, the Hi-Point 995TS WC was not intended as a precision piece. There is very free play in the trigger travel before tension is felt; this is apparent in my 995TS WC and is caused by a slight gap between the trigger bar and the Sear Cam. At the tension point, the trigger becomes heavy and slightly gritty (when new) but seems to break fairly clean and it seems that the more it is used, the better it feels. With that said, the trigger travel is short, but the journey is arduous. Triggers are fickle things and while they might be rough at the store, or even when dry firing at home, their true characteristics show up at the range.
Don’t expect a quick trigger reset. The reset on this trigger is almost to its front-travel limit due to the design of the trigger mechanism.
The Hi-Point carbine’s fire control system is more like that of a striker-fired system, as there is no hammer to strike the firing pin.
Let’s assume that the Breech Bolt (18) is in battery, a cartridge is chambered, and the trigger is now in its “rest” position and is ready to pull.
As the trigger is pulled rearward, the Trigger Bar forces the Sear Cam (31) downward. The Sear Cam pulls the Sear (32) down and away from the Firing Pin (19). The firing pin, which is under spring tension, is released, springs forward within the Firing Pin Channel, impacts the primer of the cartridge, and the cartridge fires. At this point, the Firing Pin is free floating and no longer under spring tension.
The Breech Bolt is forced rearward by the expanding gases of the fired cartridge. The Breech Bolt, at the beginning of its rearward travel, contacts the top of the Trigger Bar (the disconnect point) and forces it downward and away from the Sear Cam. The Sear Cam rides over the Trigger Bar and pivots upward, which forces the spring-loaded Sear upward as well. During this time, the Breech Bolt has traveled to the rear far enough to extract the spent cartridge. As the Breech Bolt moves rearward, the Firing pin comes under spring tension by the Firing Pin Springs. As the Breech Bolt moves rearward, the Firing Pin protrudes through the bolt face and forces the spent cartridge out of the breech.
The timing is such that when the Breech Bolt is to its furthest rearward position, the Sear once again engages the Firing Pin and holds it into place as the Breech Bolt moves forward to strip another cartridge from the magazine and force it into battery.
As the trigger is released, the Trigger Bar moves forward with it and reaches a point where it, once again, engages the Sear Cam. This is the trigger rest point and is very near the rest position of the trigger. Note that there is no “take-up” slack in the trigger; the Trigger Bar is in constant contact with the Sear Cam.
Note that if the Breech Bolt is out of battery, the Trigger Bar is prevented from contacting the Sear Cam and the 4595TS will not fire until the Breech Bolt is in full battery.
ACCESSORIZING:
If you like to tinker with accessories, the Hi-Point 995TS WC is an ideal firearm to tinker with. From stocks to lights, there are a lot of accessories on the market for making the Hi-Point 995TS WC your ultimate pseudo-battle carbine or you can order the Hi-Point 995TS WC with the accessories that you want (some assembly required). Add side rails or a Carbine Compensator (available through Hi-Point) to round out things. Add a vertical fore-arm grip, a bipod, or a vertical grip with bipod. I have seen examples of High-Point carbines painted to the owner’s delight. If you don’t like basic black furniture and need to something different in a Hi-Point carbine, the Hi-Point carbines comes in a flavor of patterns to include Desert Digital Camo, Woodland Camo (my version), and Pink Camo.
DISASSEMBLY AND ASSEMBLY:
To those who cannot envision disassembling a firearm without simply pushing a lever, or pulling down on a slide stop, or pushing a pin, they will simply be amazed at the complexity involved with disassembling the Hi-Point 995TS WC; it actually takes some dexterity and motor skills (oh, my!).
Disassembly of the Hi-Point 995TS WC is not for the faint of tinkering, but it is very doable. Hi-Point states that the Hi-Point 995TS WC need not be disassembled for cleaning until it reaches a round count of 1,500 rounds and there would be some people that would shoot the darn thing and sell it when the 1,500 round count is reached just to keep from performing maintenance on it. Those are the people that would sell a car when the original set of tires wear out. Of course, the second thing (the first was taking care of paperwork) after bringing the Hi-Point 995TS WC home was to disassemble it as far as I dared to (for article images and just to see what I could see). There is an excellent video regarding disassembly and assembly on the WWW and I have included a link to it prior to the disassembly procedure. Note that the video takes you into disassembling and assembling the Breech Bolt (18). Using this video as a guide, I was able to disassemble the Hi-Point 995TS WC in less than three minutes. Assembly was just as fast.
Hi-Point provides a tool with the Hi-Point 995TS WC that can be used for disassembly and assembly. I found; however, that the Hi-Point tool, a small polymer punch, and a small plastic-headed hammer for disassembly and assembly is more than adequate.
Gird you loins, maintenance warriors, we are going in!
For the sake of brevity, I am not going into detailed instruction sets about disassembling and assembling the Hi-Point 995TS WC, simply view the disassembly and reassembly video by Hutt Wigley at https://www.youtube.com/watch?v=mpsOcU12COc.
!IMPORTANT NOTE: To remove the Barrel Frame Support (36) and Breech Bolt (18) from the barrel, you must remove the Front Sight Base, which requires a 2mm Hex-head wrench.LUBRICATION POINTS:
Hi-Point does not provide information about lubrication. Therefore, I am going to make an attempt to highlight some areas of the 4595TS that should be lubricated, and which were determined by observing wear patterns as best I could.
For lubricating the majority of my firearms, I normally use two choice of lubrication; Ballistol and LUBRIPLATE NO. 130-A. I apply both as sparingly as possible.
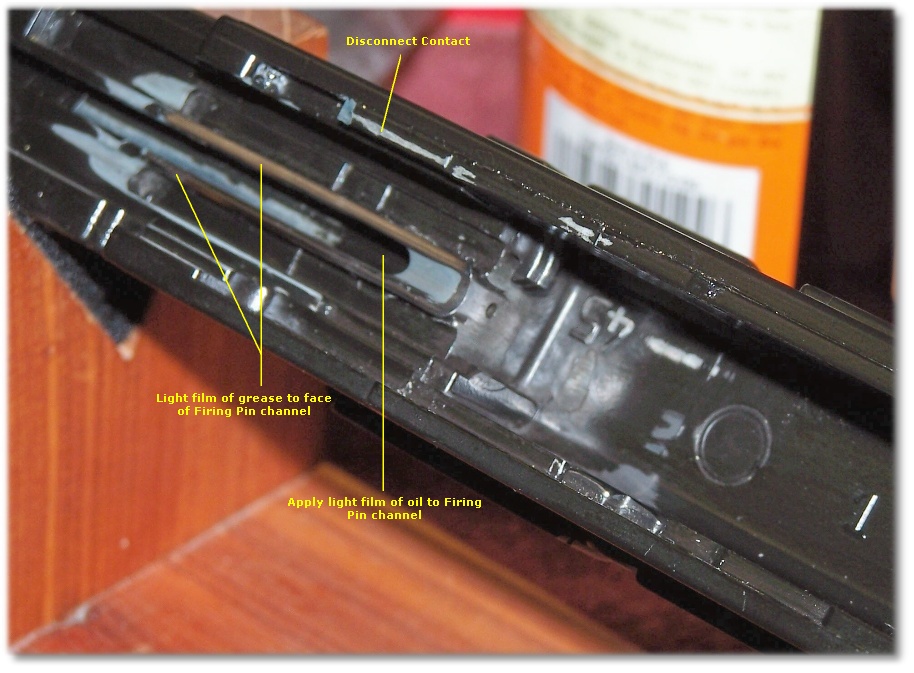
- The lower face of the Breech Bolt at the Firing Pin Channel (130-A). Only a light film is needed.
- The Firing Pin channel (Ballistol – use sparingly). Hi-Point recommends a very light film of oil to assist the firing pin in its travel. Luckily, the Firing Pin channel is very easy to clean and the Firing Pin is loosely-fitted.
- The surface of the slide that contacts the Trigger Bar (130-A).
- The surfaces where the Sear Cam and Trigger Bar contact (130-A)
- The Sear pin that protrudes through the Sear Cam (Ballistol)
- Beneath the Sear Cam arm (130-A)
- The Sear Cam pivot point (130-A)
- The face of the Sear where it contacts the Firing Pin (130-A)
RANGE TIME and FIREARM OPERATION:
 Operating the Operating Handle (25, 26) that is placed on the left side of the firearm can be a challenge for a left-handed operator if you are right-hand dominant as I am. However, operating a left-side bolt handle can be just as much of a challenge to a right-handed shooter who is used to having a bolt handle on the right side of the firearm. Obviously, one should operate their firearm under “safe” conditions before going to the range for the first time with a firearm to completely familiarize themselves with how to safely operate the firearm.
For me, since I am a right-hand dominate, left-side shooter of long guns, magazine changes are performed by rotating the top of the Hi-Point 995TS WC slightly outward from my body while holding the grip and pressing the firearm into my side. The trigger finger presses the magazine release button while the strong hand feeds the fresh magazine into the magazine well. I have also found that it is easier for me to rotate the top of the firearm toward me until the Operating Handle is facing up slightly. Then, come over top with my “working hand” (in my case, this is my strong hand), pull the charging handle slightly to the rear until I hear a click (the Hold Open lever being pulled down by spring tension) and then quickly release the Operating Handle (do not ride the slide) to release the bolt. The Operating Handle is fairly easy to release regardless of the hand used. It is all a matter of knowing what the left hand and right hands needs to do.
To start the break-in of the Hi-Point 995TS WC, I had 100-rounds of 124-grain FMJ ammunition from Monarch (PPU ammunition made for Academy Sports with a rating of 1131 fps), With that said, I was ready to obtain “as close as possible groups” at 25-yards (the limiting distance at my indoor range) while bench-resting the Hi-Point 995TS WC and shooting at a standard silhouette target. Frankly, I was not expecting a lot of shots in the “Bull.” Note that all velocities are based on, according to each manufacturer, a 5” barrel.
The cheek rest has a rise to it at the front and if my cheek is resting on that rise at the cheek bone; the sights are just at the right height for a very clear sight picture.
Recoil is negligible and the spring-loaded butt plate is actually doing something to contribute to the buffering the small amount of felt recoil.
Following the directions from Hi-Point, the bolt was locked back fully to the rear as I inserted a freshly-loaded magazine of Monarch 124-grain FMJ – my zeroing ammunition for this session. Now, it is time for me to get a little gun-geeky on you.
Regardless of where bullets fired from the Hi-Point 995TS WC would impact, as compared to my point of aim; I had to establish a distance at which to zero the firearm.
An online trip to http://gundata.org/ballistic-calculator/ allowed me to do some research on various 9mm cartridges by manufacturer.
With the Hi-Point 4595TS, I decided to go for a 50-yard zero, which I consider a good distance for a PCC with a 230-grain .45 ACP cartridge. With the Hi-Point 995TS; however, a 100-yard zero was well within the realm of my reality. The difference from firing a 230-grain .45 ACP bullet from the Hi-Point 4595TS is entirely different from firing a 124-grain 9mm bullet from the Hi-Point 995TS carbine. I was about to receive an education in ballistics.
I was working with a cartridge that I am relatively unfamiliar with – the 9mm. I normally shoot 230-grain .45 ACP cartridges, as they are used in my EDC for practice and personal defense. The .45 ACP is my primary cartridge. Although I have shot other calibers, I really don’t concern myself with their ballistics because I don’t carry them on a daily basis and shoot 9mm ammunition only occasionally. But, now I had to concern myself with them.
As most of you know, there are two zero points in a bullet’s travel. The first zero point is where the bullet first crosses the zero line (line of sight) at close range and the second zero occurs when the bullet crosses the line the sight again at some point distant. Ballistic charts can provide us data on any given cartridge if we plug in numbers of various factors that affect the flight pattern of the bullet. For instance, for the Hi-Point 4595TS I was able to plug in my zero distance and the sight front sight height to find my crossover points for a given cartridge. With the 230-grain .45 ACP cartridge that I was using for the 4595TS, and with the high sight-to-bore axis ratio, the crossover points were approximately 15-yards and 100 yards.
I usually beat my self up trying to work with ammunition ballistics. This time was no different but I decided to spare you the abuse that I put myself through when trying to understand what a given bullet will do on any given day at any given distance. My expected “working” distance with the 995TS is inward from 50-yards, but it is good to know what a particular round is capable of at longer distance, since I am responsible for that bullet’s path beyond what I am shooting at.
I was really placing a challenge on myself with the Monarch 124-grain FMJ cartridge, as there is not posted data on this cartridge. However, since Monarch is manufactured by Privi Partizan, some research on the PPU 124-grain FMJ cartridge revealed that the velocity would be approximately 1132 fps out of a 4” barrel. Sparing you my mind-racking research, I expected the following (approximated) trajectories out of this cartridge; 0 @ 15 yards, +1 @ 25 yards, +2.5 @ 50 yards, 0 @ 90 yards, and -1 @100 yards. I can live with that.
Due to the limitations of the range that I frequent, I cannot verify that the bullet would perform at any distance other than what is within 25-yards as I expect it will. I can; however, determine what I expect a bullet to do at the secondary zero distance if I am able to provide a somewhat EWAG (Educated Wild Ass Guess) by determining what it does do at the primary, 15-yard zero distance.
I had to shoot a couple of three round groups and adjust the sights for as close to zero at fifteen yards as I could while bench resting the 995TS WC. With that accomplished, I started working on groups. I have to say that I am impressed (as I was with the 4595TS) with the 995TS WC when it comes to pretty tight groups with mediocre ammunition. Once I was satisfied with bench-rested groups, and felt confident enough with it, I moved on to placing rounds downrange like a man and used a standing, off-hand shooting position. Aim, shoot, and hit my aiming point was the goal. All rounds fired impacted on target within my “comfort zone.” I ran several “Mozambique” drills from high-ready at fifteen and twenty-five yards to get an idea of the capabilities of the 995TS WC. At 6.25 pounds (unloaded), the 995TS WC is easily manipulated and the sights on the carbine are easy to pick up. Once the carbine is locked into a good shooting position, muzzle jump is very little and it is easy to get back on target. All shooting was done with the sights that came with the firearm.
The trigger resistance, while heavy, was quickly overcome. The Operating Handle is a bit tricky to work with, as was the 4595TS, but being now used to the Hi-Point carbine’s bolt I can run it pretty quickly. Recoil is extremely light and the Hi-Point 995TS WC tucks nicely into the shoulder.
The Operating Handle did not loosen at the range. I had learned from the 4595TS and had put a little dab of “Blue” thread-locker on the Operating Handle threads, and lightly tightened it down. The “Blue” thread-locker should help to keep the Operating Handle from loosening; only further shooting will tell the story.
The Hi-Point 995TS WC ran with a few glitches the first time out. I had several FTFs due to the first round not being picked up by the Breech Bolt upon releasing the Operating Handle. The magazine definitely has to be inserted fully into the magazine well and the Operating Handle definitely has to be pulled fully to the rear as far as possible before releasing it. Here is what I am observing.
When the Operating Handle is pulled fully rearward (no magazine inserted) and locked into place with the locking detent, and a loaded magazine is inserted into the magazine well and locked into place, the rim of the cartridge clears the face of the bolt. However, when the Breech Bolt locks back using the Hold Open mechanism (as with an empty magazine), the Breech Bolt is not as far rearward as when using the Operating handle lock. When a loaded magazine is inserted, the rim of the cartridge hits the bottom of the Breech Bolt, which causes the front of the cartridge to tip up. If the Operating Handle is simply pulled slightly to release pressure on the Hold Open mechanism, the Breech Bolt is not moving rearward enough to clear the rim of the first cartridge in the magazine and a misfeed occurs; the top round is not being picked up by the Breech Bolt face.
Since I have a 4595TS carbine, I had to examine how it operated. In both cases; when using the Operating Handle to lock the Breech bolt and when locking back on an empty magazine, the Breech bolt cleared the base of the cartridge when a loaded magazine was inserted and locked into place. The difference between the 995TS WC and the 4595TS is interesting to say the least.
The point here is that every firearm has idiosyncrasies. It takes learning what those idiosyncrasies are and either working with them or changing them so that they are no longer idiosyncrasies. In this case, I have to work with the idiosyncrasies of the 995TS WC carbine.
Aside from the glitches the first time out with it, all in all the Hi-Point 995TS WC made for a great day at the range as far as accuracy testing.
The second range session was much better. I sent 100 hundred rounds downrange with absolutely no issues. After the first range session, the HI-Point 995TS WC was disassembled, cleaned, and properly lubed to my standards. While I was at it, I also assembled the carbine (you thought that I would forget that part, right?).
A dot sight had been installed after the first session as was a MAGPUL AFG-2 Angled Fore Grip (see, MODIFICATIONS). These two additions really started to show me what could be done witht eh Hi-Point 995TS.
The Hi-Point 995TS WC is starting to come into its own or I was starting to get used to it. Regardless, once the dot sight was zeroed, free-handed “Mozambique” drills were again run at 10 yards, 15 yards, and 25 yards. All hits were within a 1” of where I set the dot on target after transitioning back and forth from center mass and head.
MODIFICATIONS:
After the first range session, and as with the Hi-Point 4595TS, I made a few personal modifications to the 995TS WC carbine. Note that these are not mandatory modifications because the 995TS WC is fine as it is; these are just personal changes.
UTG 3.8″ ITA Red/Green Single Dot Sight w/Integral QD Mount
The rear and front sights were removed to accommodate a UTG 3.8″ ITA Red/Green Single Dot Sight w/Integral QD Mount. I have used a similar sight on the Hi-Point 4595TS and it works just fine thank you.
While we can banter about running “optics only” but that is banter for another time and place.
Before Front Rrail Mod
After Front Rail Mod
With the existing iron sights removed, the second modification was to shorten the Front Rail to clean up the barrel area. With the front sight removed, the front rail just hangs out in mid air. The shortening of the front rail is simply for cosmetic purposes. While the front rail does look fine with the front sight installed, the front rail looks out of place without the front sight. An angled cut was made with an X-Acto saw, some minor sanding to clean up any rough edges, a dab of flat black paint was applied to blend things in, and the accompanying image shows the before and after work. (A future modification is to clean up the area on the barrel where the front sight was mounted and then Cerakote the barrel.)
If the 995TS WC is to receive a sling is still TBD (To Be Determined).
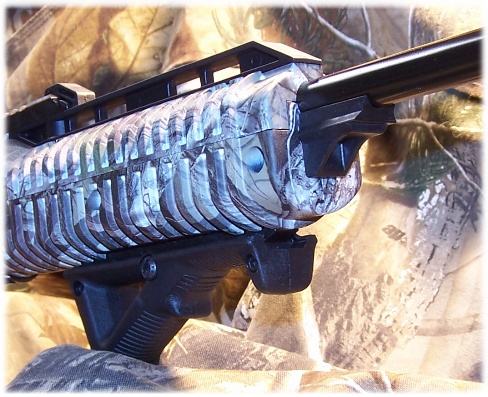
MAGPUL AFG-2 Angled Fore Grip
As with the 4595TS, I decided to install a MAGPUL AFG-2 Angled Fore Grip. I felt that the Black version of the AFG-2 would provide the contrast that already exists with the rails, butt-plate, and other black components.
The MAGPUL AFG-2 Angled Fore Grip provides a variety of support hand positions on the forearm:
- I can hold the AFG-2 grip in a quasi-vertical pistol grip fashion for QCB work.
- I can move my hand forward on the the AFG-2 and hold it as you would a standard rifle forearm in a thumb-forward position.
- I can slide my hand up further on the AFG-2 grip, and place my index finger around the front lip of the grip for a more solid forward grip.
CONCLUSION:
I have said a lot about the Hi-Point 995TS WC and probably more than what other reviewers have expounded simply because they probably do not have the time to expend on detail and obviously little time to spend on content – they do not get paid by the word count. I felt; however, that when you consider in inexpensive carbine like the Hi-Point 995TS WC the considerations should be no less as compared to a more expensive firearm of this nature. My objective is to make you an informed gunsumer.
While it took me a while to get used to the “Woodland Camo” I am finding that it is growing on me. In a sense, it also somewhat removes that mystique about “black weapons of evil” that anti-gunners are fond of saying.
The Hi-Point 995TS WC is not a simple firearm. In the Sighting System alone, there are 29 individual components. The Firing Assembly is comprised of 25 components and the Stock Assembly consists of 47 individual components.
Accessories for the Hi-Point 995TS WC are many and most can be ordered with the Hi-Point 995TS WC or separately. Accessories include, but are not limited to, a BSA 4X32 COMPACT SCOPE, a BSA RD30 Illuminated Red Dot Scope, and BEAMSHOT 1000S Red Laser (assembly to the firearm is required).
All metal is steel. Hi-Point could have well opted to use formed aluminum for the Receiver Shroud but did not, and the steel used is thicker than the receiver cover on my AK carbines. The polymer stock is two horizontal pieces mated together to form a complete unit. I have yet to figure out why this is, but the stock does what it is supposed to do. Perhaps, if one side of the stock becomes damaged, you can simply order that side instead of an entire stock?
The buffered Butt Plate is a nice touch and I would not mind having one on a few of my .308 rifles or even some 12-gauge shotguns. The buffered recoil pad assembly consists of 13 of the 47 individual stock components.
Granted, like the Hi-Point 4595TS, the Hi-Point 995TS WC has some foibles, but what firearm doesn’t. Perhaps, the finish could be better, the trigger could be a whole lot better, and the bolt could be a bit slicker operating, but the Hi-Point 995TS WC is what it is – an inexpensive 9mm carbine that is capable of putting bullets downrange at moderate distances with some degree of accuracy. For a firearm that can be purchased for less than $300, the Hi-Point 995TS WC could be used for home defense or personal defense. All in all, I think that the Hi-Point 995TS PCC is a good value for the money.
Having a PCC (Pistol Caliber Carbine) to augment your HD or PD pistol, and to extend the “middle ground” of what a pistol cartridge is capable of, may seem to be a good thing. I have read where at just shy of 75 yards, a bullet fired from a pistol-caliber carbine will hit with the same velocity as a handgun chambered for the same cartridge at about 3 yards. For a home-defense carbine to complement your handgun, one in a pistol caliber seems to make sense because you can share ammunition and extend your effective range. The magazines for the 4595TS will also work in their .45 ACP pistol. The magazine for the 995TS; however, will not work in the 9mm pistol.
There are some that will; however, decide that a PCC is not for them and opt for a more aggressive long-gun cartridge such as the .223/5.56mm NATO or the 7.62x39mm. I am just one who likes to have more than what I think I will need just in case that I do need it.
A carbine in pistol caliber could also serve as a graduation point from a .22 caliber rifle to a higher caliber rifle. A graduated introduction into heavier recoiling firearms has its benefits. People of smaller physical stature, who cannot handle high-recoil, may find a pistol caliber carbine very comfortable to shoot.
Aside from the Hi-Point PCCs, there are also others that fit more of the MSR mold (they may be found in 9mm, .40 S&W and .45 ACP calibers) and may be more desirable to you if you insist on spending more money than what would be spent on the Hi-Point carbine; the Colt AR6951, Rock River Arms LAR-9 CAR A4, Lone Wolf Distributors G9 and JR Carbine come to mind.
Hi-Point TS carbines are available in .380, 9mm, and .40 S&W, and .45 ACP. For the price they just might be worth a look-see if you are interested in a low-cost pistol caliber carbine. From all indications, they will serve you well.
With the Hi-Point 995TS in hand, I am ready to start planning a comparison between the 995TS, the Beretta CX4 Storm, and the Kel-Tec SUB 2000 (first generation). That should be an interesting article to read let alone write.
UPDATE 04/08/2017:
The Hi-Point 4595TS was recently updated with a magnified optic. Information about the optic can be found @ Hi-Point 4595TS and 995TS WC Advanced Optics Project – More Optical Delusions!: https://guntoters.com/blog/2017/04/03/hi-point-4595ts-and-995ts-wc-advanced-optics-project/
DON’ JUS’ TAKE MY WORD FOR IT:
In this section, I include links to various reviews of the Hi-Point 995TS PCC. I feel that it is important to you, as a gunsumer, to have as much information as possible on a firearm that might interest you. There are many more reviews on the Hi-Point 995TS PCC than I can link to here, but here is a good start:
- Hi-Point 9mm Carbine 995 TS (Hickok45 review): https://www.youtube.com/watch?v=Jt4Le2SR0dQ
- “Hi-Point 995 TS: Ugly Is As Ugly Does” by Nutnfancy: https://www.youtube.com/watch?v=mxw_Sm6kRRg
- Hi-Point 995 testing: Trench Warfare Drill by Nutnfancy: https://www.youtube.com/watch?v=ouqWxI9oLG8
- RedBall Sports 20 round Hi-Point 995 mag test: https://www.youtube.com/watch?v=MTqmAuJ8a-0
- WARNING! HI POINT 995 and 995TS owners: https://www.youtube.com/watch?v=UotrPIfEhZY
RESOURCES:
- 995TS: http://hi-pointfirearms.com/Hi-Point-carbines/9MM_carbine.html
- 995TS Camo: http://hi-pointfirearms.com/Hi-Point-carbines/9MM_carbine_camo.html
- MAGPUL AFG-2 Angled Fore Grip Review: https://guntoters.com/blog/2016/07/07/afg-2-angled-fore-grip-1913-picatinny-product-review/
ILLUSTRATED PARTS BREAKDOWN:
![]()
Pingback: More HP love - Hipoint Firearms Forums