

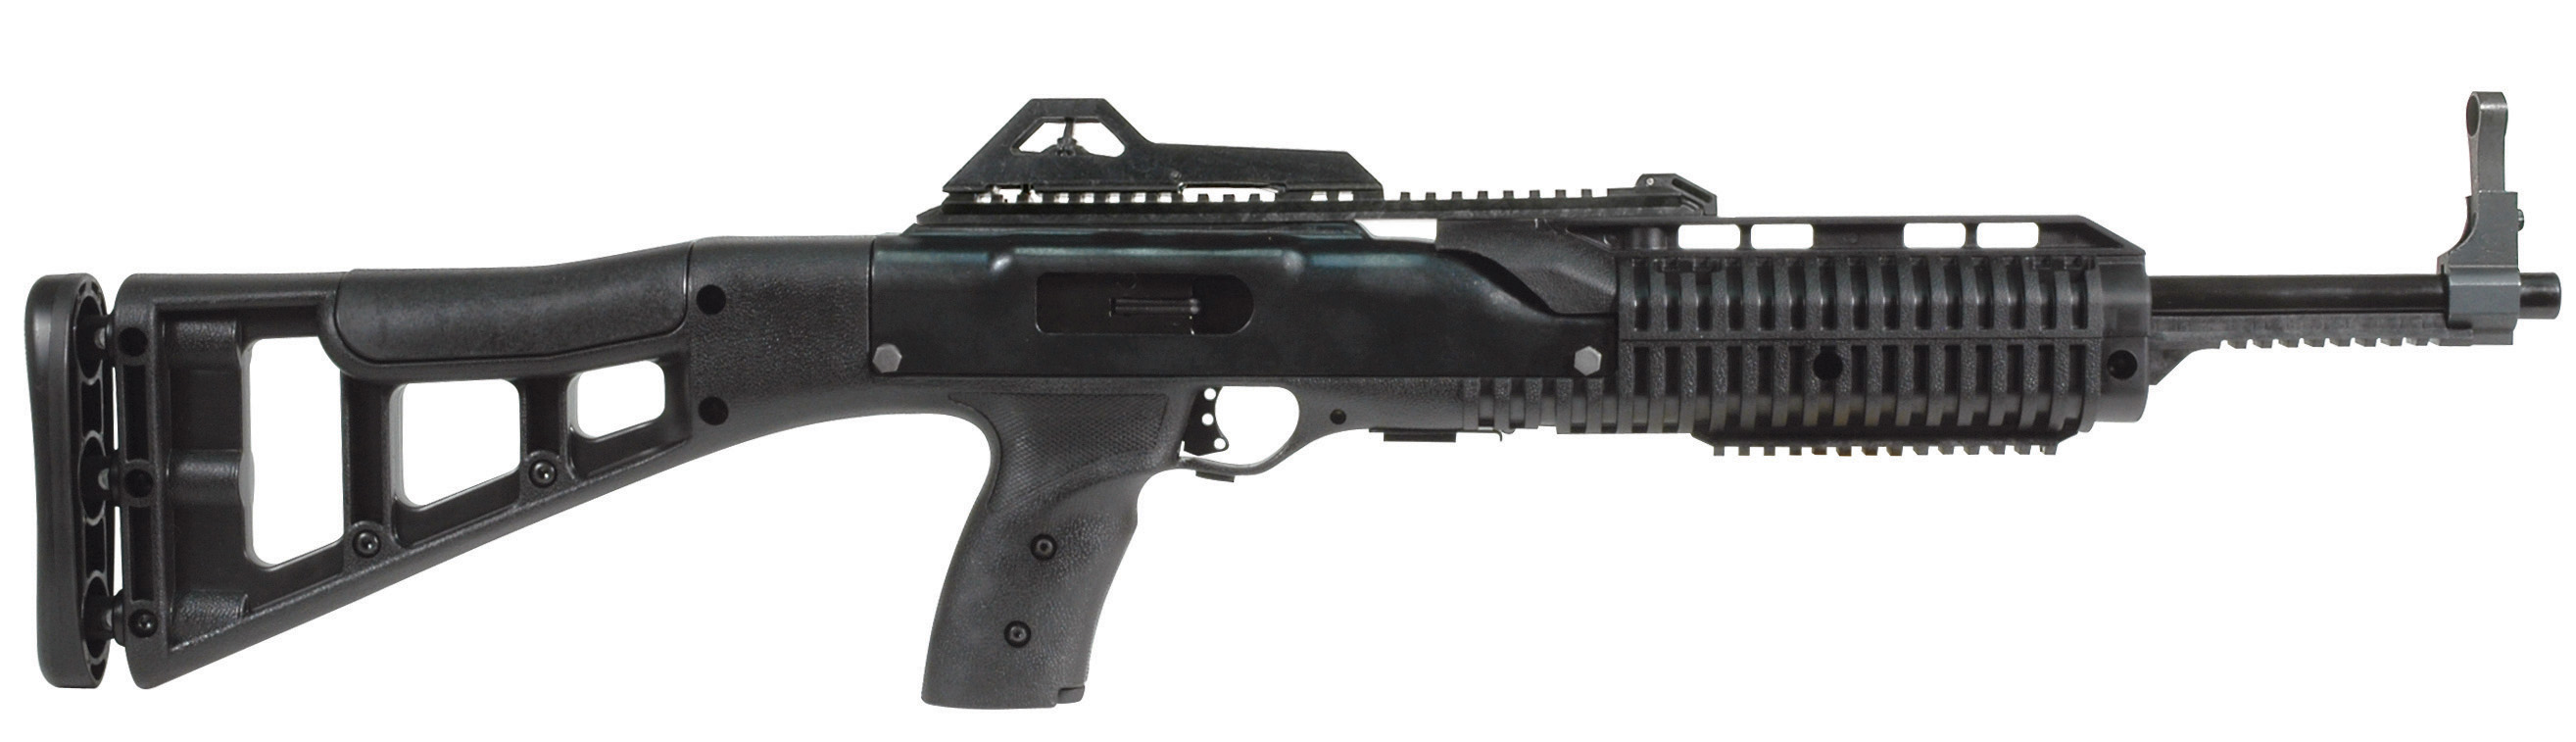
Hi-Point 4595TS Carbine
I decided to do a Part 2 of the Hi-Point 4595TS to bring out some corrections to Part 1 (see, https://guntoters.com/blog/2016/06/12/hi-point-4595ts-carbine-product-review/) and to present some new information that I thought important to those who may be considering a Hi-Point carbine regardless of caliber.
BARREL – CORRECTION:
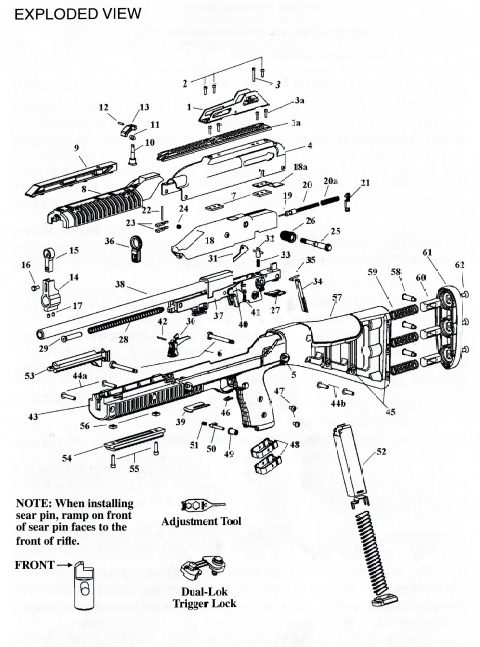
In part one of the reviews; I stated that the barrel was screwed into the breach. This is incorrect; the barrel assembly (which includes the chamber) is roll-pinned into the Receiver (37).
With the 4595TS, there are 9 lands and grooves instead of the conventional 6 that would be common among most .45 caliber firearms. The barrel has a RH 1:12 twist rate. It handles 230-grain bullets in a most proficient fashion and should be excellent for lighter bullet weights as well.
INTERNALS:
Removing the Front Sight Assembly (14,15) allowed me to completely remove the Breech Bolt (18) from the Receiver (37), which in turn allowed me to get a better look at the internals of the 4595TS.
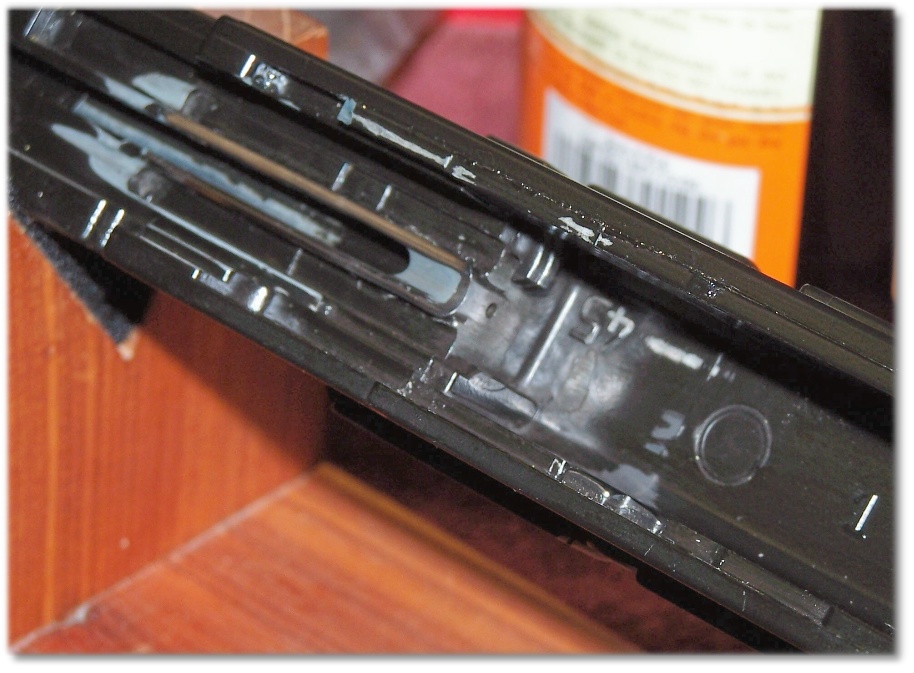
Breech Bot Internal View
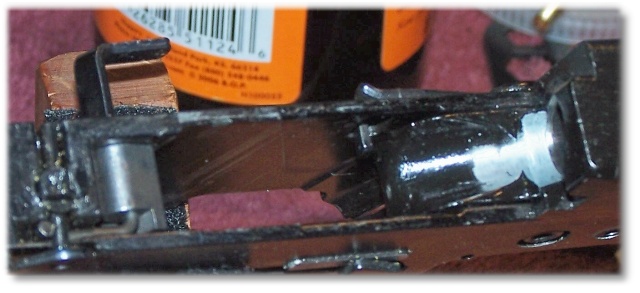
Receiver Internal View
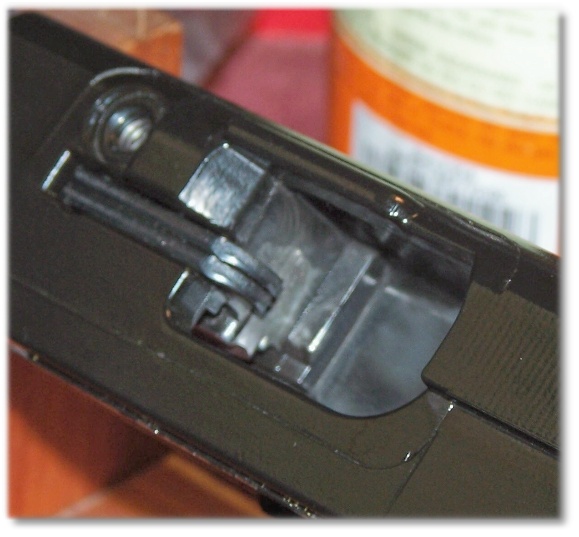
Shell Ejector Shield Just Above Extractor (Hi-Point Call This the Ejector)
You can see from the accompanying images that the receiver is not a pretty sight nor is the Breach Bolt.
I did notice that there is a shell deflector that is part of the Breech Bolt. The shell deflector is simply an angled part of the Breech Bolt and is just above the Extractor. With that said, it is important to note that in the IPB (illustrated Parts Breakdown) provided by Hi-Point, the Extractor is referred to as Ejector Keys (23). It is also important to note that the Ejector Keys and Ejector Key Spring (24) is kept in place by an Ejector Key (roll) Pin (22) that cannot be removed from the Breech Bolt.
The feed ramp, while not polished or machined well, works as intended. The only failures that I had during range time were (seemingly) due to the magazine follower. One one occasion a bullet slammed against the upper part of the chamber. The cartridge was unusable because of bullet setback and I felt that it could be too unsafe to fire. Note that this only happened with the one magazine and (so far) one cartridge that I was using to sight in the 4595TS – and I was only loading three rounds for grouping purposes. With the same magazine fully loaded, I could not repeat the FTF.
Obviously, the internals are not going to be as finely finished as a high-end carbine, but everything seems to do its job. The rifling of the barrel is not what I call the best, but it must be effective if the 4595TS is capable of 1-inch groups at an initial zero distance of 15-yards offhanded. I’m pleased as punch, to tell you the truth.
SAFETIES:
One of the mysteries I found was the Counterweight(34) that is part of the fire control system (see, FIRE CONTROL SYSTEM). Its purpose evaded me and a quick phone call to Hi-Point cleared up the mystery. The Counterweight is actually a “drop” safety. The Counterweight weighs 10 times more than the Sear. The sear is spring-loaded and could, without the counterweight in place, be forced from its position against the Firing Pin if the firearm was dropped. In short, the Counterweight keeps the Sear in place against the Firing Pin whenever the firearm is in a cocked condition.
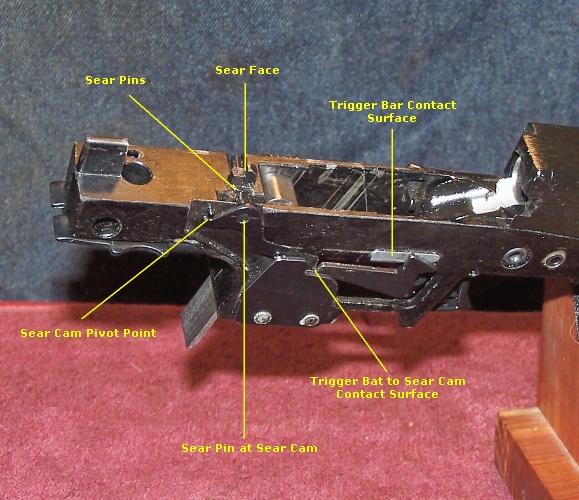
FIRE CONTROL SYSTEM:
Although never indicated by Hi-Point, I assumed that the firearm was hammer-fired; that is, that a hammer would strike the firing pin that would subsequently impact the cartridge primer. However, after spending a bit more time with the 4595TS, I realized that the 4595TS fire control system was more like that of a striker-fired system.
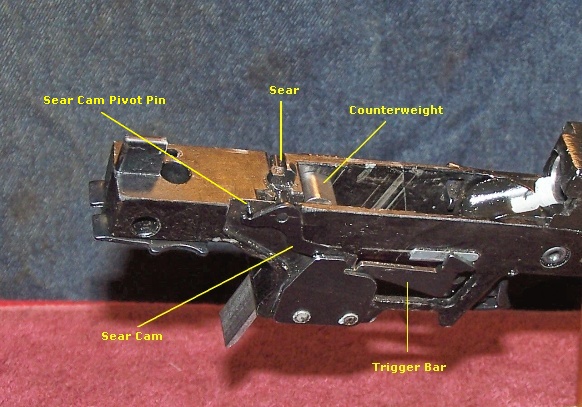
Fire Control System
Let’s assume that the Breech Bolt is forward, a cartridge is chambered, and the trigger is now in its “rest” position and is ready to pull.
As the trigger is pulled rearward, the Trigger Bar forces the Sear Cam downward. The Sear Cam pulls the Sear down and away from the firing pin. The firing pin, which is under spring tension, is released, springs forward within the Firing Pin Channel, impacts the primer of the cartridge, and the cartridge fires. At this point, the Firing Pin is free floating and no longer under spring tension.
The Breech Bolt is forced rearward by the expanding gases of the fired cartridge. The Breech Bolt, at the beginning of its rearward travel, contacts the top of the Trigger Bar (the disconnect point) and forces it downward and away from the Sear Cam. The Sear Cam rides over the Trigger Bar and pivots upward, which forces the spring-loaded Sear upward as well. During this time, the Breech Bolt has traveled to the rear far enough to extract the spent cartridge. As the Breech Bolt moves rearward, the Firing pin comes under spring tension by the Firing Pin Springs. As the Breech Bolt moves rearward, the Firing Pin protrudes through the bolt face and forces the spent cartridge out of the breech.
The timing is such that when the Breech Bolt is to its furthest rearward position, the Sear once again engages the Firing Pin and holds it into place as the Breech Bolt moves forward to strip another cartridge from the magazine and forces it into battery.
As the trigger is released, the Trigger Bar moves forward with it and reaches a point where it, once again, engages the Sear Cam. This is the trigger rest point and is very near the rest position of the trigger. Note that there is no “take-up” slack in the trigger; the Trigger Bar is in constant contact with the Sear Cam.
Note that if the Breech Bolt is out of battery, the Trigger Bar is prevented from contacting the Sear Cam and the 4595TS will not fire until the Breech Bolt is in full battery.
The trigger; albeit heavy, is wearing in fine. At first it was heavy and gritty. While it is still heavy (12-pound pull) it is no longer gritty due to some wear and lubrication. The trigger pull now feels more like a Glock with a “New York” trigger and is very manageable.
!FRONT SIGHT REMOVAL:

Front Sight Base (14) Is mounted with Two Front Sight Base Screws (17)
It is necessary to remove the front sight assembly to thoroughly clean the Breech Bolt. It should be noted that the Front Sight Base (14) is held in place by two 2mm set screws. The Front Sight Base fits into a groove in the Front Rail (53). When the Front Sight Base is removed, you will see two marks on the underside of the barrel where the two Front Sight Base Screws were tightened. When you re-install the Front Sight assembly, your zero will have changed. But, I have found a way to ensure that the front sights will be as closely aligned with the previous zero as possible. Unfortunately, it will cost you a little cash.
Use an Inexpensive Laser to Align the Front Sight
I had a spare red laser that I had picked up at Wal-Mart for use as a spare. Prior to removing the front sight, I mounted the laser on the Top Rail(1a). I turned on the laser and adjusted the beam to the center and top of the front sight post. I turned the laser off and left the laser mounted when I removed the Receiver Shroud (4).
After the 4595TS was assembled, sans the Front Sight, I used the laser to align the Front Sight to the barrel.
- Turn the laser on.
- Slide the Front Sight assembly onto the barrel and into the groove of the Front Rail.
- Lightly tighten one of the Front Sight Base Set Screws enough to allow some movement of the Front Sight.
- Align the front sight to the laser beam.
- Once satisfied with the alignment tighten the Front Sight Base Set Screws (DO NOT OVER-TIGHTEN. SNUG IS SUFFICIENT). You should be now zeroed as close as possible to the zero point before the Front Sight was removed.
- Re-zero, with the Rear Sight, at the range as needed.
LUBRICATION POINTS:
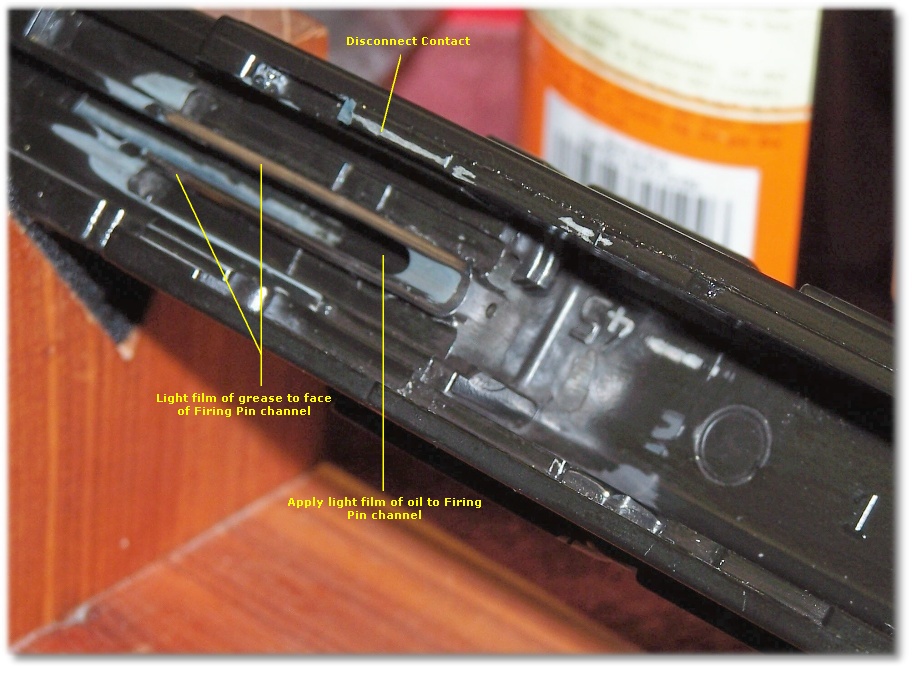
Hi-Point does not provide information about lubrication. Therefore, I am going to make an attempt to highlight some areas of the 4595TS that should be lubricated, and which were determined by observing wear patterns as best I could.
For lubricating the majority of my firearms, I normally use two choice of lubrication; Ballistol and LUBRIPLATE NO. 130-A. I apply both as sparingly as possible.
Note that lubrication points and lubricants are my personal choices. Yours may differ.
- The face of the Breech Bolt at the Firing Pin Channel (130-A). Only a light film is needed.
- The Firing Pin channel (Ballistol – use sparingly). Hi-Point recommends a very light film of oil to assist the firing pin in its travel. Luckily, the Firing Pin channel is very easy to clean and the Firing Pin is loosely-fitted.
- The surface of the slide that contacts the Trigger Bar (130-A).
- The surfaces where the Sear Cam and Trigger Bar contact (130-A)
- The Sear pin that protrudes through the Sear Cam (Ballistol)
- Beneath the Sear Cam arm (130-A)
- The Sear Cam pivot point (130-A)
- The face of the Sear where it contacts the Firing Pin (130-A)
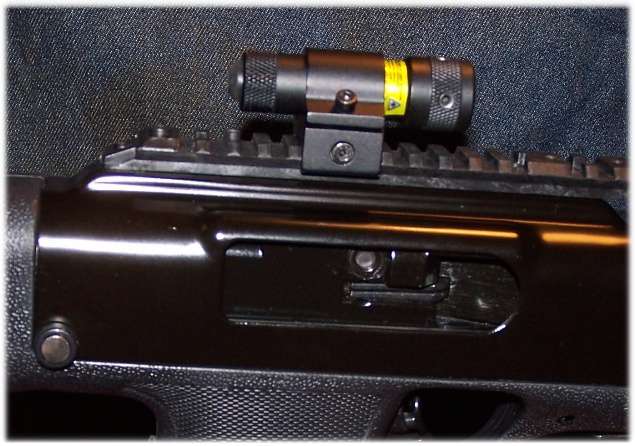
SIGHTS – UPDATE:
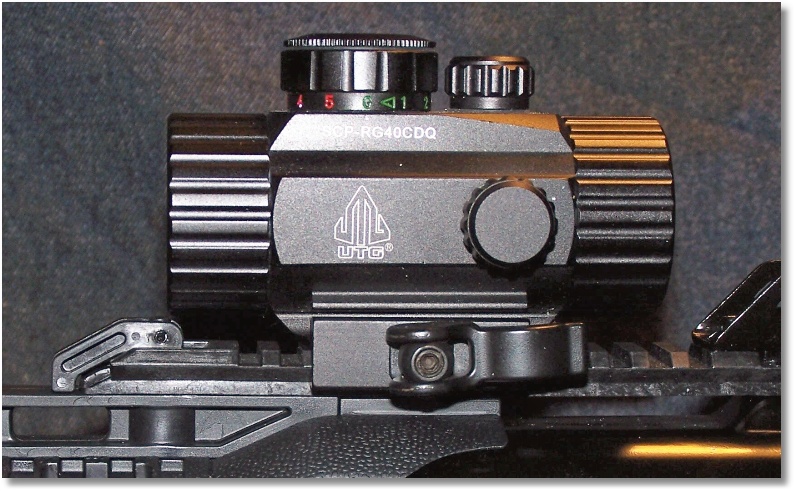
Red/Green Dot Optic Mounted (see article for detail)
Initially, I wanted to keep the UTG Red/Green Dot Sight and the front and rear open sights. I co-witnessed the optical sight to the open sights and all was well – for a bit anyway. I changed the location of the optical sight to a more forward position on the top rail. After I did that, I quickly realized that any co-witness I had obtained at the previous position was now gone. But, I had to find out why.
I placed a small bubble level on top of the rail and moved it forward from the rear sight. Sure enough, the rail was warped. That did not surprise me since the rail is constructed of polymer and not aluminum. If I were to keep the optical sight, I would have to have a more suitable location on which to mount it. That meant only one thing – remove the rear sight.
The rear sight has three mounting locations plus a rear sight adjustment screw hole, which is also part of the rail. The rail itself is mounted securely on the Receiver Shroud by four hex-head screws. The most stable point to mount an optic is on the rail portion that is secured by the rail screws (well, duh!). But, there is also a downside in doing so. The receiver Shroud is secured into place by two, spring-loaded captivated pins and is pretty secure, with no play, while mounted. However, the receiver Shroud must be removed to completely break down the 4595TS for complete cleaning. This could possibly lead to a loss of zero when the Receiver Shroud is reinstalled. With that said, is this not the same dilemma when field stripping a MSR? Well, not quite. With a MSR, the entire upper, which includes rail, optics, and front sight are removed as a unit. Theoretically, the sights and optic should remain in sync unless one or both is removed. With the 4595TS; however, the front sight remains on the barrel while the Receiver Shroud and rear sight (in this case, an optic) is removed as a unit; any continuity between the rear sight and front sight has now been compromised (oh, waaah!).
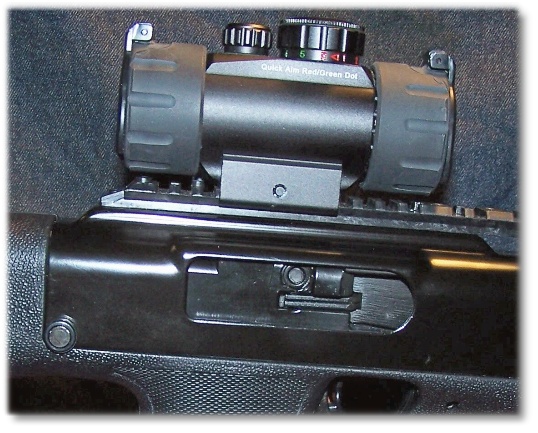
UTG Red/Green Dot Sight Replaces the Rear Sight
The rear sight was quickly removed and the optic installed in its place. Now, rather than a “ghost open rear sight, I had a fully adjustable electronic rear sight. A questioned remained. Could I use the projected, circular sight image of the UGG sight with the front post sight, or would I have to remove the front sight as well as the rear sight. Note that the front sight can be adjusted for elevation by loosening the Front Sight Screw. The front sight can also be removed with the same screw.
At the range, I decided to keep the front sight at its current height and simply adjust the optic (now the rear sight) as I would a standard rear sight to obtain POI at my zero distance of 15-yards. The end result (I hoped) was that I could simply place the center dot of the optic on the tippy-top of the front sight to give me POI at POA. At least, that is what I hoped for. Unfortunately, all did not go as planned.
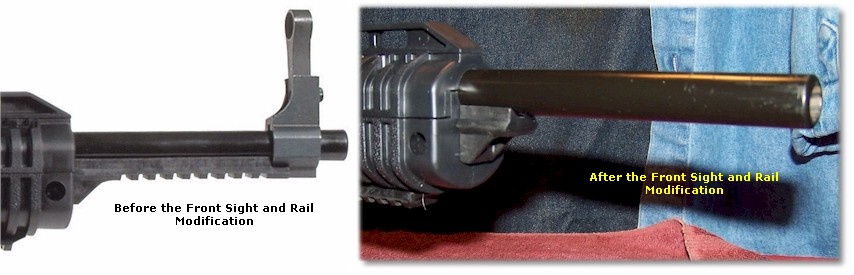
Once I zeroed the optic, I could no longer co-witness the front sight. A decision had to be made; either run the 4595TS with the standard sights, or run the 4595TS with optics only. The latter option won. The Front Sight assembly was removed from the 4595TS and the 4595TS has become an optic-only carbine.
However, removing the front sight led to another task – modifying the Front Rail (53). I did not want to remove it entirely because that would have left a large gap at the end of the stock. I simply decided to cut it back to clean up the barrel area. A few swipes at the desired separation point with an X-Acto saw, some light sanding, a dab of flat black on the cut end, and the modified front rail was secured. I like the appearance of the barrel, and the overall appearance of the 4595TS, better now. The results are shown below.
UPCOMING MODIFICATION:
The muzzle end of the barrel will receive a muzzle break that will cover some of the cosmetic flaws due to removing the front sight assembly. More importantly, the muzzle break will protect the muzzle. I have found a nice unit at Midwest Industries that may fit the bill. Other wise, a barrel shroud may be looked into. I have found one that looks like the barrel shroud for the Beretta CX4 Storm, but I have to make some critical measurements first before moving forward with muzzle breaks or barrel shrouds.
PART 2 – CONCLUSION:
The more time that you spend with a firearm, the better you get know it. Getting to know a firearm is not only important from an operational standpoint, but also from a maintenance point of view. A firearm will usually tell you what is going on with it, if you take the time to observe what it is telling you.
While you may spend some time with your high-priced firearms, inexpensive firearms should call for the same attention. In fact, even more so at times because an inexpensive firearm may take more attention to detail than with a more expensive firearm. A Volkswagen will require a lot more attention to maintenance than a Mercedes.
I feel pretty pleased with the cost-benefit ratio of owning a Hi-Point 4595TS and I hoped that I helped you in determining if you want one as well. While some aspects of it may not be finely executed, it is finely-engineered and Hi-Point carbines are worth looking into. In fact, when I was researching a PCC and ended up with the Beretta CX4 Storm, I now wish that I had spent more time researching the Hi-Point carbine in 9mm and had not been so much of a gun snob. I should have learned a lesson from purchases of Rock Island Armory 1911 pistols. While considered “Low end” I can state emphatically that these pistols shoot as well as my “higher-end” pistols at half the cost. While these “low-end” pistols may take some tweaking to get them running right, I trust my life to one that I carry daily. Yes, I do value my life but the old argument about mortgaging the house to pay for a defensive firearm does not float with me.
Where does a PCC like the Hi-Point 4595TS fit in? Once I am 100% assured of its reliability, it will make a fine HD carbine and I need not worry if rounds fired from this thing will penetrate walls three houses down the block. I need not worry about recoil or muzzle blast. Granted that it does not have the capacity of an Ak or AR, or even the capacity of some other PCCs in its caliber league of carbines; however, the Hi-Point 4595TS carbine holds 9 rounds in the magazine as compared to 8-rounds in the Beretta CX4 Storm in .45 ACP. I could buy about three more 4595TS carbines before I could match the Beretta CX4 Storm in price. The Hi-Point carbines are much more plentiful in the PCC platform than many others in this genre of firearms.
For the price of the Hi-Point 4595TS, I can afford to purchase a second one for back-up or even as a spare parts source. As long as I can forego all of the attachments and keep the firearm basic, it is all I really need in a PCC.
On a final note, Hi-Point Customer Service is excellent and they are happy to answer any of your questions, technical or otherwise, regarding any of their firearms.
See also – Hi-Point 4595TS Carbine Scope Project Updating the Hi-Point 4595TS Carbine: https://guntoters.com/blog/2017/03/29/hi-point-4595ts-carbine-scope-project/
UPDATE 04/08/2017:
The Hi-Point 4595TS was recently updated with a magnified optic. Information about the optic can be found @ Hi-Point 4595TS and 995TS WC Advanced Optics Project – More Optical Delusions!: https://guntoters.com/blog/2017/04/03/hi-point-4595ts-and-995ts-wc-advanced-optics-project/
RESOURCES:
Center Point Model CP0427 Laser Sight: Available on-line or at Wal-Mart.
ILLUSTRATED PARTS BREAKDOWN (IPB)
![]()
Pingback: Hi-Point 995TS WC – Product Review | Gun Toters