

While I do own several Rock Island Armory (Armscor) pistols, don’t expect a biased report concerning the Rock Island Armory (Armscor) 1911 Standard MS. I am not beholden to any firearm’s manufacturer and I will provide the bad with the good, even though even though in doing so may reflect upon the wisdom of my decision to purchase and carry such firearm.
However, I will say up front that I feel the Rock Island Armory (Armscor) pistols are underrated by many not familiar with these pistols. And, if you feel that an under $500 pistol cannot protect you as well as a $5,000 pistol then you need not read further.
After participating in a recent training course, I realized that my preferences in a 1911-based pistol needed to change. I needed a feature that most 1911 purist detest on a 1911-based pistol. I will get into that in the write-up.
Over the years, Rock Island Armory (Armscor) has expanded its line-up of 1911-based pistols. The current line-up includes:
- TCM Series
- TAC Series
- Rock Series
- GI Series
- BBR Series
- XT Series
- Pro Series
Their line-up also includes calibers in .22 LR, .22TCH, 9mm, .40 Smith & Wesson, 10mm, and .45 ACP. Available are FS (Full Size or “Government” model), MS (Medium Size or “Commander” model, and CS (Compact Size or “Officer” model). Essentially, a Rock Island Armory (Armscor) 1911-based pistol is available for virtually any need in the pistol community (for example, competition, sport shooting, home defense, personal defense, and plinking).
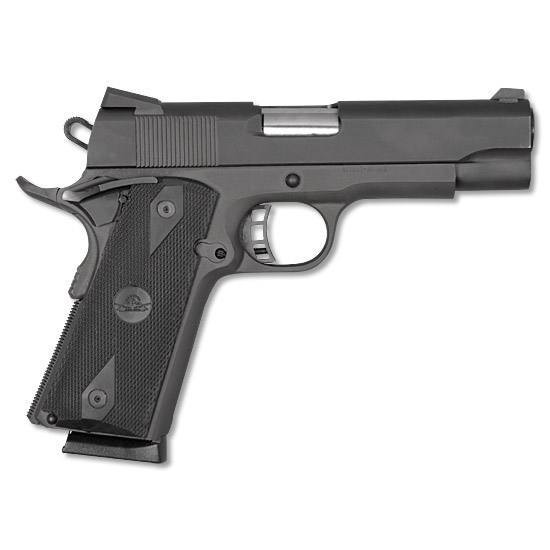
Rock Island Armory (Armscor) 1911 MS Standard (51443)
A week later, I had this hot little item in my hand. An initial inspection and function check was made and I determined that the pistol was fit enough to accompany me home. The first order of the day was to perform a disassembly and really see what I was dealing with. Disassembly of the Rock Island Armory (Armscor) 1911 MS Standard is not as straightforward as a standard 1911, but I’ll get into that later in the write-up.
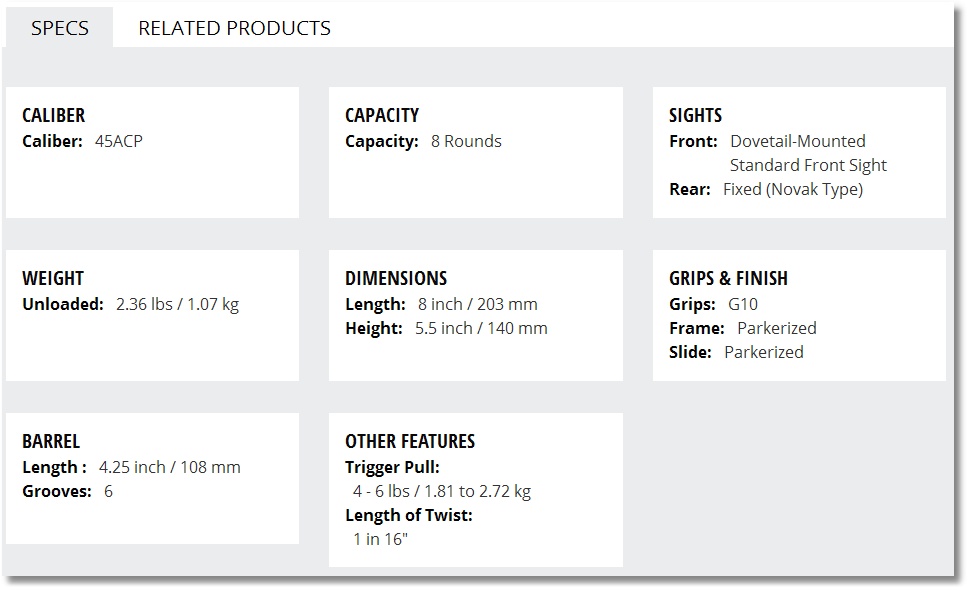
Here are the specifications for the Rock Island Armory (Armscor) 1911 MS Standard:
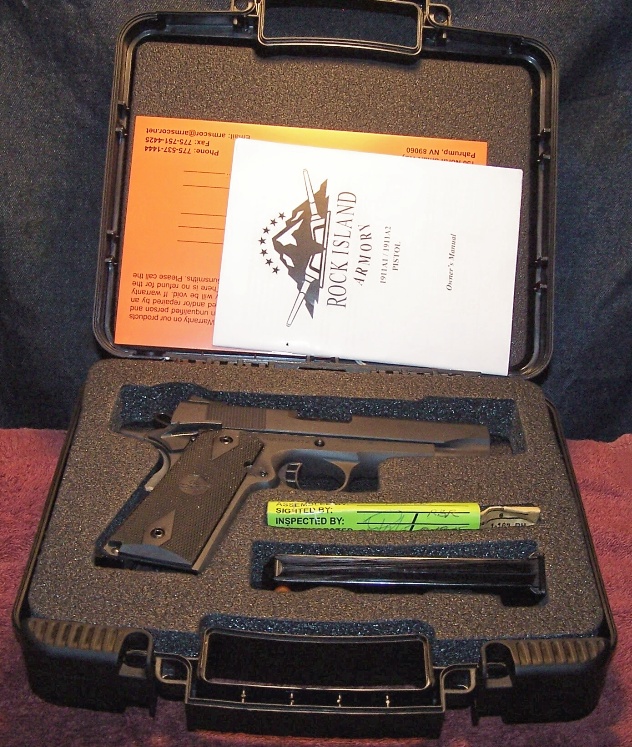
What’s In The Box
Also included is a single, 8-round ACT-MAG magazine that incorporates a “slap bumper” and which rounds out the package.
So, let me present the Rock Island Armory (Armscor) 1911 MS Standard to you.
First of all, the Rock Island Armory (Armscor) 1911 MS Standard is far from your “standard” model of 1911-based pistol.; it has features that you would only find on higher-priced 1911-based pistols, with the exception of the sights, but I’ll mention them later.

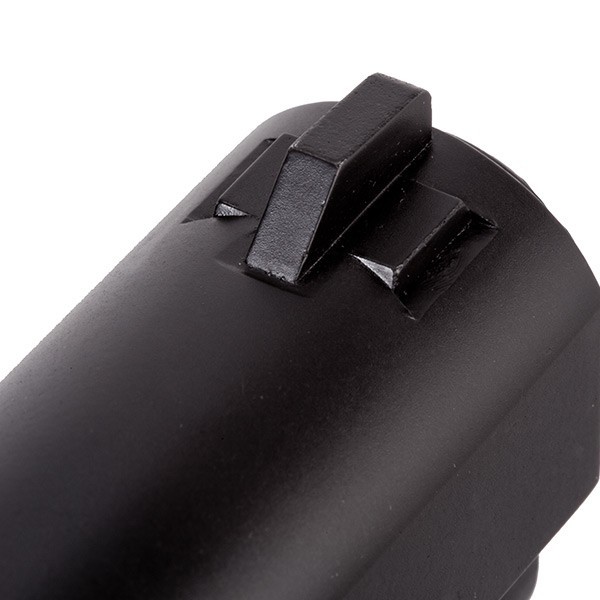
Bushingless “Bull” Barrel and Full-Length Guide Rod – Note “Crown” of Barrel That Helps To Protect the Muzzle
Dovetailed Blade Front Sight
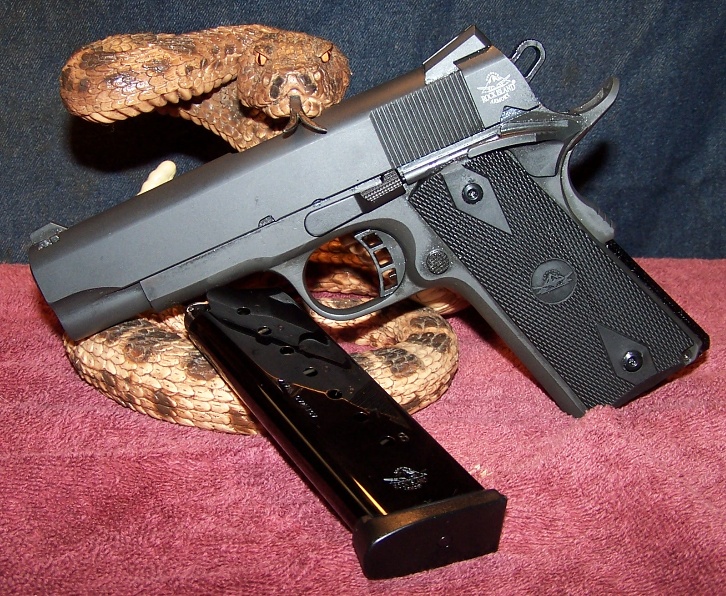
A “Commander” 1911-based Pistol Makes For a Nice Carry Package
The slide incorporates a relieved and lowered ejection port, which aids in ridding the pistol of expended shell casings. Early in the history of the 1911-based pistol this was a “custom” feature; today, it is commonplace as a “standard” feature.
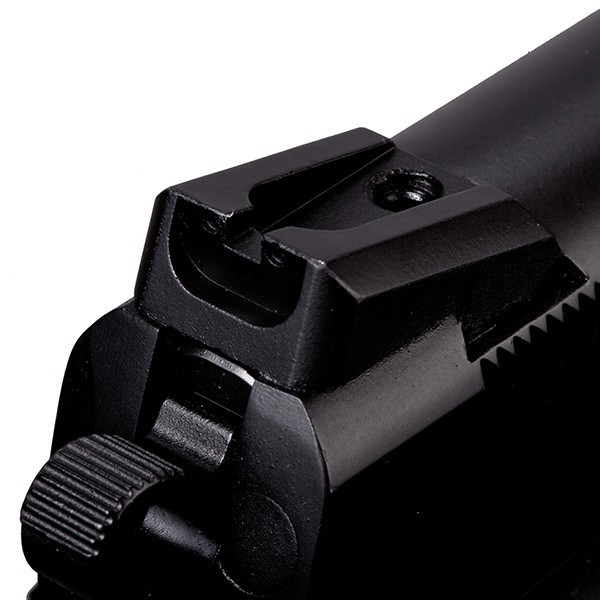
NOVAK Style Notched Rear Sight
The left side of the pistol sports the usual 1911 fare; take-down/slide lock lever, magazine release button (not extended), and an extended thumb safety lever. The take-down/slide lock lever, magazine release button, and an extended thumb safety lever all have been Parkerized and blend well with the rest of the pistol.
The magazine well is slightly beveled, which aids in locating the well and inserting a magazine. The Rock Island Armory (Armscor) 1911 MS Standard comes with an 8-round ACT-MAG magazine with an extended base-plate. The pistol; however, runs well with virtually any 1911 single-stack magazine. The Wilson Combat magazines work well as do those from Meg-Gar.
The front strap of the trigger guard has vertical serrations to aid in gripping the pistol (some higher-priced 1911-based pistol do not even have this). The mainspring housing is a checkered polymer affair that now seems standard on even the most expensive COTS (Commercial-Off-The- Shelf) 1911-based pistols.
Adding to the features of the pistol is the nicely up-swept beaver-tail grip safety with memory bump, which helps to keep the shooting hand as high as possible without experiencing slide or hammer tattoos to be imprinted into your hand.
Speaking of the beaver-tail grip safety, I noticed a difference between it and the rest of the pistol – it is a different color. I thought it was my eyes, but the beaver-tail is actually greyer like the color of the Parkerizing on the RIA 1911 Standard Tactical! Not a deal breaker because the grip safety works as it is supposed to, but the darn thing is colored differently than the rest of the pistol! A QC issue at the factory, perhaps? I would not have even noticed it if it wasn’t for the main spring housing being shiny black rather than flat black. This is what you get when you don’t pay the big bucks for a pistol. The mainspring housing is plastic, which seems to be the norm these days (except for the Ruger SR1911 series). Regardless, I would not have rejected the pistol because it had grey-colored beaver-tail safety. In fact, and to turn a negative into a positive, I just may swap out the beaver-tail safety on the RIA 1911 FS Tactical, which is black with the beaver-tail on the RIA 1911 MS Standard to match the Parkerizing on the RIA 1911 MS Standard. Funny how things work out!
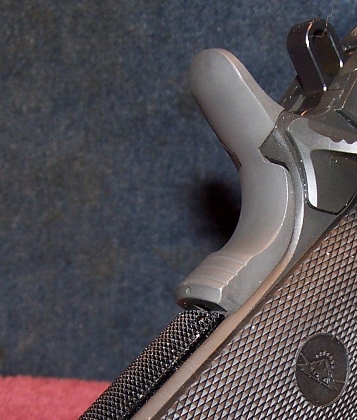
Mismatched Beaver-tail Grip Safety
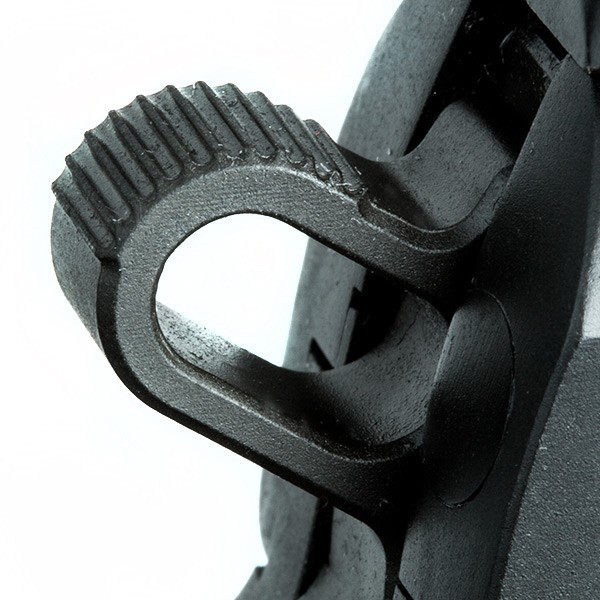
Skeletonized and Roiled Hammer Makes for Easy Cocking and De-Cocking
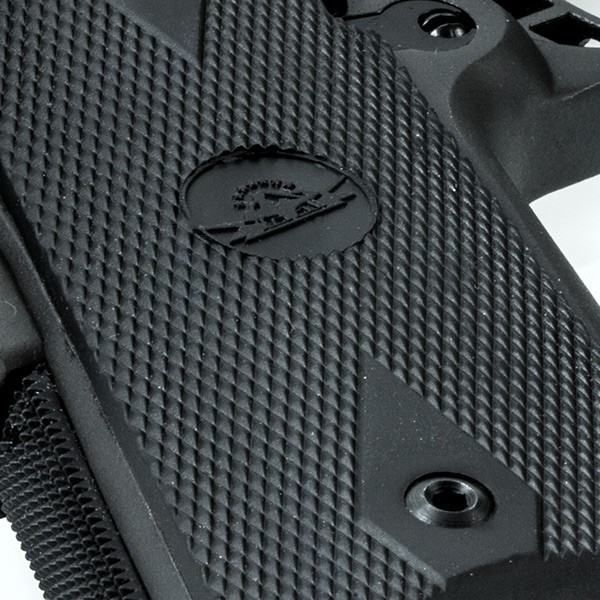
Rubber, Standard Height, Double-Diamond Grip Panels Are a Big Plus

Skeletonized Trigger with Over-Travel Adjustment
The slide-to-frame fit is good with just a slightly perceptible amount of play detected when the pistol is dry. When the pistol is loaded, and with a round chambered, there is absolutely no play in the slide. The internal extractor is flush with the rear of the slide (as it should be) and the roiled (and serrated) hammer nestles nicely in the well of the beaver-tail grip safety.
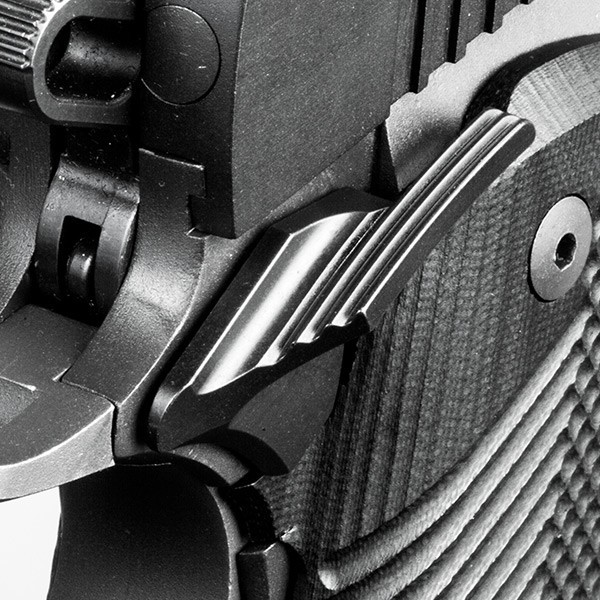
An Ambidextrous Safety Is a Feature That Now Appeals To Me
After I had participated in the Bare Bones Gunfighting course, which was taught by the more-than-capable CR Williams, I began to develop some of my own drills. One, in particular, involves transitioning the pistol from the right hand (my strong side) to my weak hand (and vice-versa). The drill also includes a reload (weak and strong hand). Now, releasing the magazine release is not a problem when using the trigger finger of the left (weak side) hand nor is releasing the slide lock with the same finger. Operating the safety lever; however, requires a different (and alien) set of pistol-handling skills.
I talked to one of the folks at the LGS, who is left-handed, and he told me that he shoots l his 1911 left-handed with his left thumb on top of the thumb safety – on the left side. Obviously, this impacts the grip on the pistol. His right hand (weak side support) provides most of the support. I tried this and I cannot do it. Now, I have two methods that I use to run the safety and slide lock lever on the 1911 using the right hand when shooting the pistol left-handed. As the left trigger finger presses the magazine release button, the right hand loads the fresh magazine. Once the magazine is shoved into place, the right hand either comes over the rear of the pistol, or beneath the left (shooting) hand, to operate the slide lock lever and the thumb safety (if the safety is on). In most cases, I can push the safety lever on with the trigger finger of the shooting (left) hand. It is pushing the safety off safe that is the challenge. Having an ambidextrous thumb safety lever eliminates the need for right hand (weak hand) intervention when operating the 1911 left-handed. A simple press of the lever with the left thumb on the right side of the frame does the dirty deed of making the pistol “ready to rock.” The safety can also be placed in the safe position by a simple upward motion of the shooting hand thumb, while maintaining a good grip on the pistol when the fight is over, but yet remain ready to “flick the switch” if the fight is to continue.
The thumb safety has a good feel when moving from safe to fire positions with enough of a detent to makes it secure in either position. The plunger spring housing, like most 1911-based pistols, is staked to the frame and the internal spring is healthy enough to hold the slide lock and thumb safety lever but not stiff enough or interfere with proper operation (With my Springfield 1911 Loaded, for example, a small screwdriver is necessary to press the slide lock plunger inward to install the slide lock/takedown pin assembly.)
That takes care of the “pretty” stuff.
Arriving home with the Rock Island Armory (Armscor) 1911 Standard MS, the first order of things were to take care of paperwork (recordkeeping) with the next thing being disassembling the thing to see what the innards look like, effectively clean everything, and then properly lubricate the beast.
DISASSEMBLY AND THE CONTORTIONS OF THE DAMNED!
As I mentioned earlier, disassembling the Rock Island Armory (Armscor) 1911 Standard MS, which is equipped with a full length, one piece guide rod, can be a challenge that most would balk at and buy a more traditional 1911-based pistol. However, I am used to full-length guide rods and have discovered that field stripping is not all that bad with a 1911-based pistol equipped with them.
- Lock the slide open with the slide stop.
- Use the left hand to push the slide to the take-down notch, grasp the slide and frame with the right hand to maintain the slide take-down position (the slide is under extreme spring tension at this position). Caution! Keep the fingers of the right hand clear of the ejection port.
- With the left hand, remove the slide-stop/take-down pin assembly while maintaining the hold with the right hand on the slide and frame.
- With the left hand, support the slide by wrapping the left hand around the slide with the fingers beneath the slide. Caution! Keep the fingers of the right hand clear of the ejection port. Failing to heed this caution may cause the ejection port and barrel to pinch the fingers, which will result in extreme pain, lots of language not suitable to young ears.
- Slowly, while maintaining pressure on the slide, allow the slide to move forward off of the frame. Note that until the spring pressure is fully released, the guide rod and spring could fly from the slide. Maintain upward pressure on the spring and guide rod with the fingers of the left hand.
- Once spring tension is no longer felt, remove the slide from the frame. Note that the guide rod is still under extreme spring tension. Normally, I will place the slide bottom side down on a firm surface just in case the guide rod decides that it does not like where it is and wants to be free.
Now to remove the guide rod, guide rod spring, and guide rod bushing as a unit from the slide.
Guide Rod Removal:
You will need a standard paper clip, a pair of needle-nosed pliers, and a set of side-cutters for creating a “hook” for removing the guide rod, guide rod spring, and guide rod bushing from the slide. This “hook” will also be necessary for disassembling and assembling the “Captive” guide rod assembly.
- Straighten a standard paper clip (leave one end bent for gripping, if desired). The guide rod of the pistol is approximately 5/16-inch in diameter.
- With a set of needle nose pliers, bend one end 90-degree so that the bent end is approximately 5/16-inch long (the approximate diameter of the guide rod).
- Cut the length with the side cutters, if necessary to achieve the proper length.
- Have the paper clip, which you prepared earlier, ready to use for the next step.
- Rotate the slide so that it is facing bottom up while maintaining pressure on the guide rod and guide rod spring.
- Push the guide rod to the front of the pistol until the hole in the guide rod can be observed. I normally hold the front of the slide with the trigger finger and push the guide rod forward with the thumb.
- Place the short end of the paper clip into the hole in the guide rod.
- Allow the guide rod to slowly move rearward until the paper clip stops against the guide rod bushing.
- To remove the “captive” guide rod assembly from the slide, push the entire captive” guide rod assembly toward the rear of the pistol and lift it out of the slide.
Now, you can remove the barrel assembly from the front of the slide.
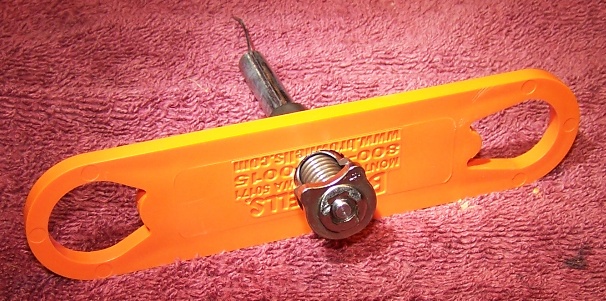
Modified Barrel Bushing Wrench Makes Disassembling and Assembling the “Captive” Guide Rod Assembly Easy
If; however, you are willing to undergo the task of disassembling the guide rod assembly, continue on. If not, jump to CLEANING, INSPECTION, AND LUBRICATING.
Guide Rod Disassembly:
Dissembling the “Captive” Guide Rod
Caution! The “captive” guide rod assembly is under extreme spring pressure. Keep your face away from the front of the guide rod assembly.
- Slide the modified barrel bushing wrench over the guide rod bushing until it is against the base of the bushing – with the guide rod base on a firm and non-slippery surface.
- Slightly press the guide rod bushing to the rear of the guide rod. The object here is to simply remove pressure from the paper clip.
- Remove the paper clip while maintaining pressure on the guide rod bushing.
- Slowly allow the guide rod bushing to move forward and off of the guide rod. Maintain pressure on the guide rod bushing until no further resistance is felt. The “captive” guide rod assembly is now fully disassembled.
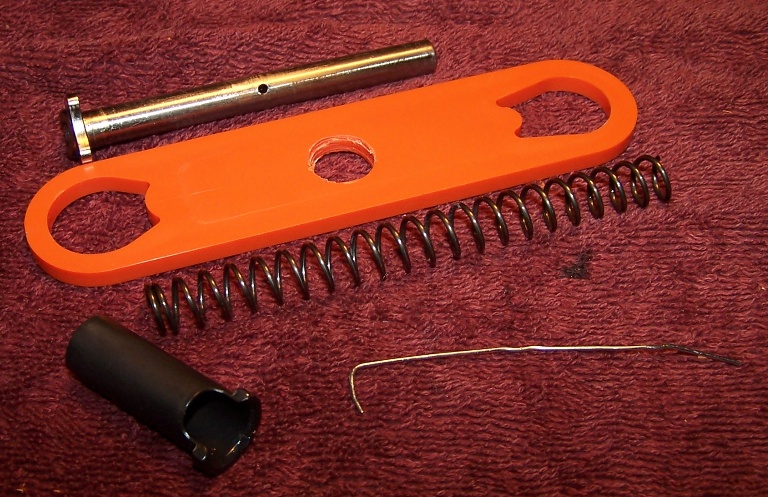
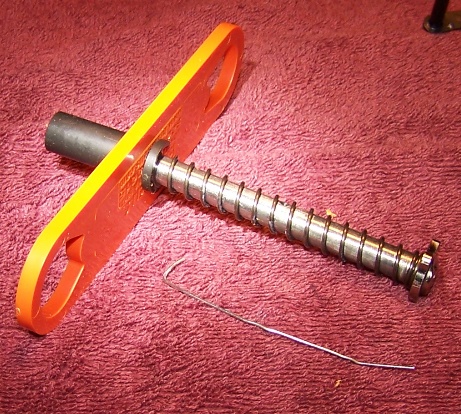
Fully Disassemble Guide Rod
CLEANING, INSPECTION, AND LUBRICATING:
I normally clean parts like the barrel, guide rod, and guide rod spring with BrakKleen to start, which removes all lubricants from these assemblies. The barrel is further cleaned with Hoppes, nylon bore brush, and bore jags with appropriately-sized patches. Everything else (except the grip panels) gets a wipe-down with appropriate cleaning chemicals, soft brushes, and then wiped down with a light coat of Ballistol.
The slide incorporates an internal extractor and the frame-mounted ejector is substantial. The breech face showed signs of firing (a test round) and that was cleaned with an appropriate brush to remove any leftover debris from the test firing. Everything looked great!
The Rock Island Armory (Armscor) 1911 Standard MS pistol is built in traditional classic 70 series design and is delivered with Rock Island’s top quality production and engineering standards. This pistol has a 4.25” button rifled barrel supported by a full length guide rod. The barrel, as was mentioned earlier, is a tapered barrel and incorporates the John Moses Browning designed swinging link.
The slide rails are inspected to detect possible wear points. The slide contact points are coated with a light coating of Lubriplate NO. 130-A. The barrel locking lugs, internal to the slide and external to the barrel are also Lubriplate NO. 130-A treated. Lubriplate NO. 130-A is also used on the guide rod and the outside of the barrel itself.
While the above seems like overkill, I know people that run a new 1911-based pistol dry. When I asked why, the response that I received is that running a slide dry will allow to metal-to-metal contact to “bed” them in – whatever that means. To me that philosophy is akin to buying a car and then running the engine without oil so that the rings will “bed” with the cylinders.
The inside of the slide is well machined and finished, which is surprising as one would expect an inexpensive pistol to be roughly machined and finished. The internal extractor blends perfectly with the rear of the slide and there are no “look see” or other indicators that the chamber is loaded. The frame is as well machined and finished internally and I could not find any machining marks. The manufacturer states; “All Rock Island 1911’s, each is built using 4140 ordinance steel on the industries best CNC machines while being hand fitted and tested to strict tolerance guidelines for unmatched quality and value.” From what I see, I believe it.
Everything checked out. Now comes the fun of assembling the Rock Island Armory (Armscor) 1911 Standard MS.
The first thing, if you disassembled the guide rod into its individual components (guide rod, guide rod spring, and guide rod bushing, is to assemble the guide rod. There is only one safe way to do this. As I mentioned previously, I have modified a bushing wrench to handle the task of assembling the guide rod components. This allows me to have a full hold on the guide rod bushing as I compress the recoil guide spring, which is a very stout fellow.
- Locate the paperclip that you used to disassemble the guide rod assembly.
- Place the base of the guide rod against a firm and non-sliding surface.
- Place the guide rod spring over the guide rod. Note that if the guide rod spring is smaller at one end than the other, the smaller end goes over the guide rod first.
- Place the guide rod bushing over the guide rod spring. Ensure that the base of the guide rod bushing is at the bottom toward the guide rod base.
- Press the guide rod down over the guide rod until the hole in the guide rod is just visible. This is where the modified bushing wrench comes in handy. I will position the guide rod so that the hole will be between two fingers once it is visible.
- While holding the guide rod bushing in place, insert the short end of the paper clip into the hole in the guide rod.
- Release the pressure on the guide rod slowly. The guide rod will press against the paperclip and the guide rod “assembly” is now complete.
Install the barrel into the slide and you are ready to install the guide rod “assembly”
Install the Guide Rod Assembly:
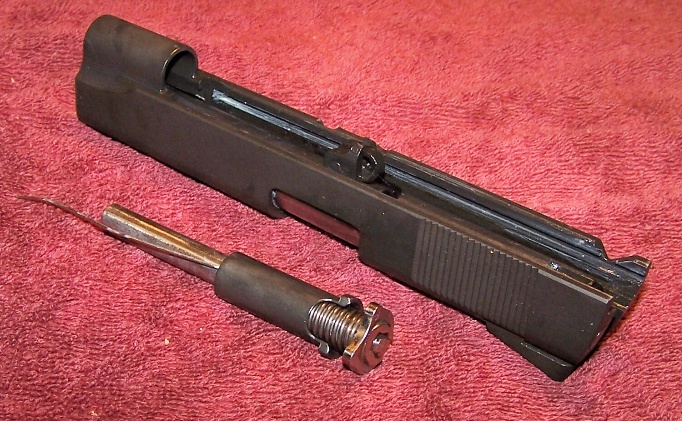
Slide and Fully Assembled Guide Rod Assembly Ready For Installation
- Position the slide so that the bottom is facing up.
- On the guide rod assembly, rotate the guide rod bushing and guide rod into the proper position for assembling in the slide.
- Insert the guide rod “assembly into the slide from the rear of the slide. The guide rod bushing should be flush with the rear of the guide rod bushing housing and the round part of the guide rod base should be upward toward the (yet to be installed) frame.
- Push the guide rod toward the front of the pistol until tension is just off the paperclip. In most cases, the paperclip will just fall out.
- Slowly allow the guide rod to move to the rear of the slide. Again, I use the trigger finger on the front of the slide with the thumb holding the base of the guide rod to control the rearward movement. The guide rod, once fully rearward, will be against the front of the barrel’s swing link housing. But don’t relax just yet. At this point, I use the finger of my right hand to hold the guide rod into place while I apply pressure to the guide rod at the front of the guide rod just behind the guide rod bushing.
Now you are ready to install the slide into the frame.
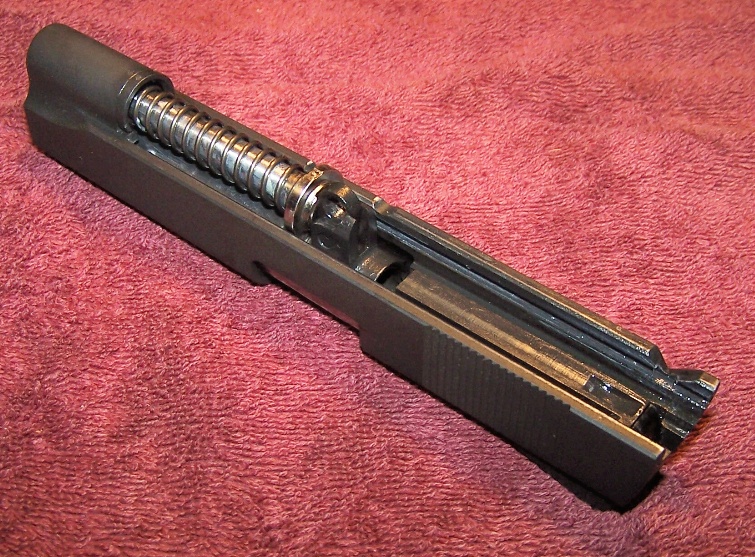
Guide Rod In Place and Slide Ready to Install on the Frame
- While holding the slide and guide rod assembly in place, position the swing link up for insertion into the frame.
- Insert the slide into the frame just far enough to insert the slide lock/take-down pin into the frame and through the swing link. At this point, you can remove the support to the recoil guide rod. Also at this point, there may be slight tension in the slide. This is due to the guide rod spring being slightly compressed. Don’t worry because the worse is yet to come.
- Push the slide to the rear of the pistol until the alignment notch is lined up.
- Hold the slide in place with the right hand while pushing the takedown/slide lock assembly into place.
- Release tension on the slide. If you did everything well, the slide will stop.
- Rack the slide several times to ensure that no binding occurs.
- Perform a function check of all safeties.
If everything passes muster, the pistol is ready to go. Of course, that won;t be verified until you take it to the range.
RANGE TIME:
I always look forward to taking a new firearm to the range. As the character Forrest Gump once said, “Life is like a box of chocolates; you never know what you are going to get.”
I had fifty rounds of 230-grain FMJ ammunition from Georgia Arms with me and that was going to serve as the indicator of what the Rock Island Armory (Armscor) 1911 Standard MS was going to be; good, bad, or really ugly.
A silhouette target was placed at 7-yards just to get the feel of things. At 2.36 pounds (unloaded), the Rock Island Armory (Armscor) 1911 Standard MS is not light by any means. With a “commander” length barrel of 4.25-inches, muzzle flip can be a little bit more than anticipated at first. But, I am used to the weight because I have been carrying the Rock Island 1911 FS Tactical for two weeks now and it weighs in at 2.5 pounds (unloaded). Just for comparison sake, the Ruger SR1911CMD, a comparable sized pistol, weighs 2.275 pounds unloaded. However, the Ruger SR1911CMD does not have a full-length guide rod or ambidextrous safety, which might account for the difference in weight.
The slide was moved to its locked position and the 8-round ACT-MAG that was stuffed with FMJ rounds slid into place in the magwell with just a snick as the magazine was locked into place.
One of the things that I always liked most of the “Commander” length 1911-based pistols is that once loaded, the balance of the pistol just feels good. It is neither barrel nor butt heavy. The grip is long enough to accommodate all of the fingers of the shooting hand and the standard ¼” thick grip panels provide enough girth to the handle for my mitts. The grip panels are as comfortable as the Hogue checkered rubber grips that I installed on the RIA 1911 FS Tactical. As I stated earlier, these grip panels just may remain on the pistol.
Pressing down on the slide lock lever released the slide with authority and the second round of this pistol’s life was now chambered (the first being the test round).
I lined up the all black slot and post sights for a 6 o’clock hold on the bull’s-eye, began the trigger pull and 4-pounds later a hole appears just below the center of the bull and slightly left. I adjusted the POA a bit and the round impacted centered and slightly above the bulls-eye. The POA is just where I like it, with the barrel covering what I want to shoot. I emptied the pistol of the remaining six rounds without fail. All fifty rounds that I had brought with me cycled and fired without a glitch. While my groups were nothing to brag about, all rounds were in the oval that surrounds the “X” and I was pleased with that. The results were good enough to declare the pistol combat worthy – at least at seven yards.
I also tried 8-rounds of Federal Hydr-Shok to see how well the pistol did with hollow-point counter-offensive ammunition. There were absolutely no issues.
The trigger pull is excellent and the flat-faced trigger lines up naturally with the first joint of my shooting finger. Subsequent range sessions and my getting used to the Rock Island Armory (Armscor) 1911 MS Standard should result in some pleasing sessions as I gain confidence in the pistol as a new EDC.
WRAP UP:
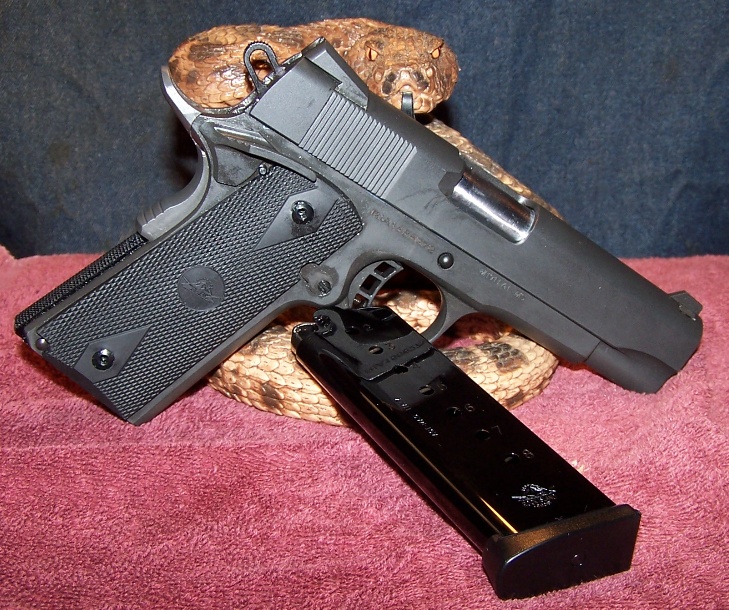
Rock Island (Armscor) 1911 MS Standard
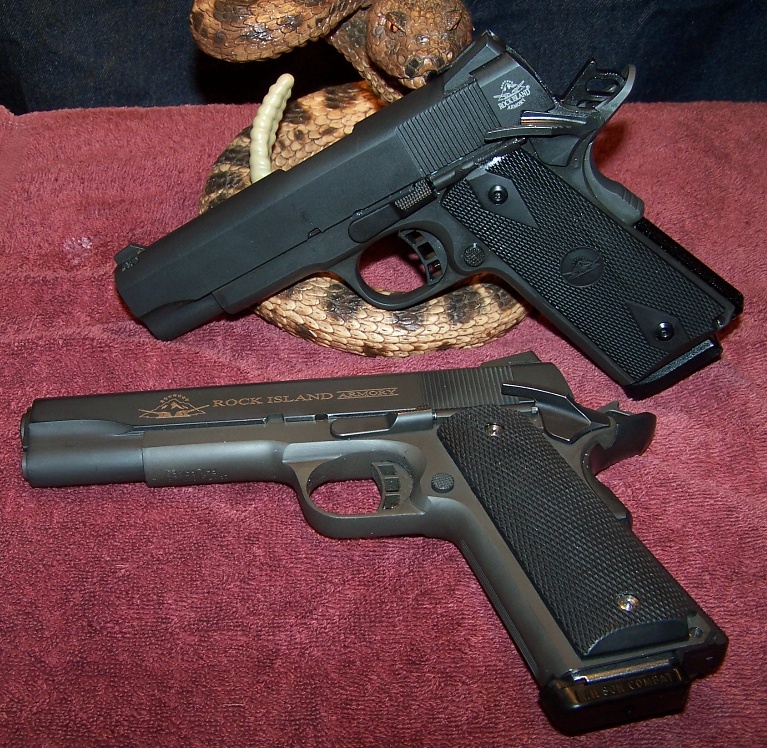
The RIA 1911 MS Standard With His Big Brother the RIA 1911 FS Tactical
At the range, it performed very well and that matters. If you want something pretty, you need to buy a Kimber. If you want something functional, and are budget minded, the RIA line is a hard value to beat in a 1911-based pistol, although some minor tweaking might be in order. All of my RIA 1911-based pistols have been performers and that is what I demand. There is an old saying in biker circles (otherwise known as motorcycle enthusiasts), “chrome don’t get you home!” I think that the Rock Island Armory (Armscor) 1911 MS Standard, as is, will help me get home and I can’t ask for more than that, but more range time and break-in will tell the true tale.
UPDATES:
12/12/2015:
I Ordered set of VZ ETC Dirty Olive G-10 grips (https://vzgrips.com/pistol-grips/1911/elite-tactical-carry/elite-tactical-carry/etc-dirty-olive-g10) and e-mailed Armscor Customer Service regarding beaver-tail safety issue (mismatch).
12/16/20015:
Response from Armscor Support to my question about the grip safety mismatch:
“I have shown the picture to the gunsmiths and the fit and gap is completely normal and is actually necessary to allow for the bottom of that grip safety to rotate down to properly disengage. The color tone of some parts can vary from time to time depending on how long they were in the parkerizing tank”
My response:
“Thank you for your response, although it was not to my liking.
Although the grip safety looks like a different shade of grey than the rest of the pistol, it is more of an O.D. Green depending on the lighting. Parkerizing usually results in shades of grey more than green from what I currently understand. I have a set of VZ grip panels, in what what they call “Dirty Olive G10”, being shipped that should match the color of the grip safety close enough.
The gap at the base of the grip safety is really of no concern as the grip safety does what it is intended to do. However, it is the only grip safety of my ten 1911-based pistols where I can actually see the hammer strut, so I did not consider the gap normal.
12/19/2015:
Armscor Customer Service Ticket closed.
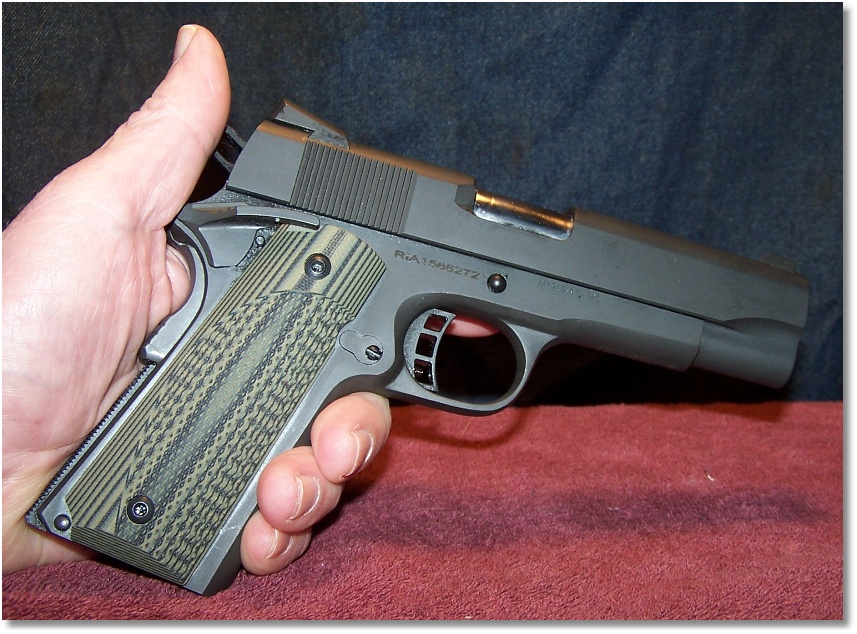
The VZ ETC Dirty Olive G10 Grip Panels Add a Bit of Class To the Pistol.

The VZ ETC Dirty Olive G10 Grip Panels, in Standard Thickness, are Perfect For My Hand
I had ordered the VZ grip panels with a beveled bottom and standard thickness in addition to the Rock Island ambidextrous thumb safety cut. They are a perfect fit and the right side panel is notched perfectly for the Rock Island version of an ambidextrous thumb safety. VZ ETC Dirty Olive G10 grip panels add a bit of class to an otherwise mundane-looking pistol.
12/20/2015:
Several issue showed up during this day’s shooting session.
- The screws holding the VZ grip panels in place were working looses under recoil. The grip panels were removed after arriving home and the original grip panels reinstalled. They have been installed; however, on a RIA 1911 FS 9mm Standard (a review of this pistol is in the near futures) and they seem to work better on this pistol due to its lower recoil.
- My Son-In-Law had made up some “Geezer” loads so I though that I would give them a try to see if they would cycle. On one occasion when using the magazine provided with the pistol, the slide did not lock back on the last round.
- On one other occasion, the slide stop had actually worked its way out of the frame just enough to jam the pistol. The only thing that I could figure out is that the slide was now working slower due to the “Geezer” loads that somehow there was just enough time for the take-down notch in the slide to coincide with the slide lock’s removal/installation pin to wiggle just past the spring-loaded slide stop plunger in the frame. The slide lock assembly was realigned with disassembly/assembly notch and pushed back into the frame. I returned back to my normal range ammunition and a Wilson Combat magazine and experience no further occurrence of “slide lock pin walk.”
- Lastly, the magazine provided with the pistol jammed in the frame. This occurred on the last round of the magazine. I pressed the magazine release button and nothing happened; the magazine stayed put. I pulled and pushed the magazine while pressing the magazine release button and the magazine would not budge. I pressed the magazine follower down and the slide went forward into battery. I pulled the slide all the way back to the slide stop and the magazine dropped free after pressing the magazine release button. I could not find any reason for the magazine to hang up like it did. I used Wilson Combat magazines afterward and the issue did not repeat itself.
12/25/2015:
I may have discovered the solution to two problems that reared up during the last range session; a magazine hanging up in the pistol and the slide stop pin walk. One was the effect of the other.
Issue #1 – Magazine Lock-up:
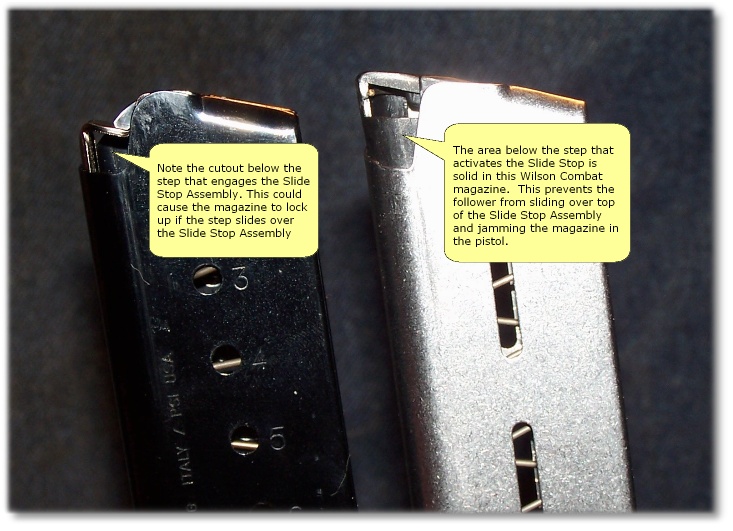
Provided Magazine (ACT-MAG Left) and Wilson Combat Magazine (Right)
Apparently, when the slide stop pin “walked” outward (See Issue #2 – Slide Stop Pin Walk), there was enough clearance for the follower to “step over” the slide lock assembly and lock the magazine follower into place. This was the reason why pushing the magazine release button had no effect on the magazine; it was locked into place by the slide stop. I was able to duplicate the issue by pushing the slide stop pin against the slide while the slide was in battery and then racking the slide to the rear until it locked up with the slide stop. Sure enough, I hear a slight “ping” and the follower had come up over top of the slide stop. The use of the Wilson Combat magazine negated the issue as the magazine follower is solid and prevents the follower from slipping over top of the slide stop assembly.
Issue #2 – Slide Stop Pin Walk:
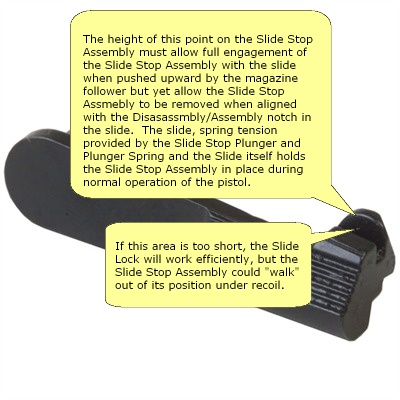
Slide Stop Issue
When the military first started to teach soldiers how to shoot the 1911, the trigger was pulled with the middle finger while the “trigger” finger rested against the frame of the pistol, which served as a “pointer” to the intended target. It was found that if the soldier pushed hard enough against the frame the pressure of the “Pointer” finger could dislodge the Slide Stop when the Disassembly/Assembly notch coincided with the Slide Stop “Tab” and that could prevent the pistol from cycling. The practice was stopped and soldier would fire their pistol using the normal “Trigger” finger. It; however, did not prevent “Slide Stop Pin Walk” if the Slide Stop assembly was not correctly fitted to the pistol. I believe that was the case with this pistol.
I had a spare Slide Stop assembly from another 1911 that was removed and decided to do a comparison of this one against the Slide Stop installed in the pistol. I found that while they were close, the “tab” of the Slide Stop in the pistol was slighter shorter than the other. I replaced the Slide Stop with the taller “tab” and did a function check of the pistol. The replacement Slide Stop fully engaged the slide on an empty magazine and no lateral movement was detected when in full battery. It was a much better fit to the pistol than the original Slide Stop so it remains in place.
12/25/2015 Update Summary:
I think that running too light a load without exchanging the recoil spring to accommodate the lighter load may have contributed to the problem.
Sometimes you have to tweak a pistol to get the desired results – a perfectly functioning pistol. While the RIA pistols are not custom-fitted, custom-tuned pistols some imperfections in their manufacturing is to be somewhat expected. Most can be rectified easily while others may take a certified and competent gunsmith to do the work. Fortunately, this fix was easily accomplished without gunsmithing. A magazine without a solid follower will no longer be used in my 1911s and I hope that the “Slide Lock Pin Walk” has been cured. Only additional range time will tell.
Aside from the few glitches, the pistol ran beautifully with no FTFs or FTEs. The recoil spring is breaking in as is the trigger. I have about 170 rounds through the pistol thus far and I am working any bugs out as I go. Really there are no real complaints about the pistol and I feel that it will be a good full-time carry at some point.
12/27/2015:
Another trip to the range and slide lock issue reared its ugly head again. The slide would not lock back on an empty magazine during fire, but I could make it lock back when I cycled the slide by hand. I was shooting range loads (Georgia Arms 230-grain FMJ rated at 810fps). My first thought were light loads, since I had exchanged the slide stop with one that I had and it seemed like that would fix the problem. Unfortunately, it did not. Also, the issue was intermittent.
I returned home and located some hotter ammunition; a couple of old Silvertips that I needed to shoot, some defensive loads at 875fps, and some Magtech 230-grain ball ammunition that I had shot at the BBG course without failure. I also exchanged the slide stop with the original part to give me a baseline to work against.
Back to the range and the problem was, again, intermittent. However, if I pressed the slide stop inward after every magazine, the slide stop functioned fine and the slide would lock back after the last round. If; however, I allowed the slide stop to work on its own, the slide failed to lock back. Apparently it was a two-fold problem; the slide lock walking out and also not enough ledge to catch the lips of the magazine after the slide stop had walked out.
Arriving back somewhat frustrated, I ordered a new Wilson Combat Slide Stop, which according to several reviews, fixed the same problem in other RIA customer’s 1911s. I hope that it will fix this customer’s issue with the RIA. If not, the pistol will be delivered to my certified and competent gunsmith to further analyze the problem. The first issue will be to correct the slide lock walk as none of my other 1911 pistols exhibit any slide pin walk to any degree. The second will be to ensure that the magazine catch catches the magazine properly.Although the Wilson Combat Slide Stop’s lever width is slightly smaller (more like the standard 1911), if it works I could care less.
Granted that the pistol is brand new and I could send it back to Armscor under warranty. Considering that they sold it this way, why would I want them to work on it as they seemed to pass over the defect during QA? The pistol would have had to be fired more than twice (two fired test cases are provided with the pistol), as it would have taken at least one magazine to catch the fault. If the pistol truly is defective, as determined by my certified and competent gunsmith, I will most certainty will return the pistol under warranty, but not until I have exhausted all means to prove that it is a manufacturing defect and not operator head-space.
So, the Rock Island Armory (Armscor) 1911 MS Standard is now residing in its case awaiting the ordered part. In the meantime, I am carrying the Rock Island (Armscor) 1911 FS Tactical as my EDC; A pistol that has been tried and trusted over time.
UPDATE 01/03/2015:
Although I had ordered a Wilson Combat Slide Lock assembly, I decided to do some experimenting in an attempt to correct the “Slide Lock Pin Walk” that I had been experiencing with the pistol.
I have a RIA first generation GI Standard MS – 45ACP model and I removed the Slide Lock from that pistol and installed it on the ROCK Standard MS – 45ACP just to see if I experienced the same malady.
The installation of one RIA pistol’s Slide Lock into the ROCK Standard MS – 45ACP proved successful and yet perplexing. I could feel a difference in inserting the Slide Lock into the ROCK Standard MS – 45ACP, which was a slight click that I had not heard nor felt previously. The Slide Lock also did not move outward from the frame – at all. I tried several magazines and all locked the slide back perfectly. Working the slide several times, I tried to push the Slide Lock out, but it would only move outward when the Slide Lock and the disassembly/assembly notch lined up – as it is supposed to. Only a range session would tell the true story.
At the range, I went through 50-rounds of ammunition in various magazines and the pistol operated wonderfully. No sign of “Slide Lock Pin Walk” was experienced and every magazine locked the slide back when empty. There were also no premature “lock backs” although there was a minute tell-tale sign of rounds brushing slightly on the slide stop. That will diminish with more use. The Slide Lock assembly exchange was successful. Now, comes the perplexing part.
The Slide Lock assembly from the ROCK Standard MS – 45ACP also installed perfectly in the GI Standard MS – 45ACP with absolutely no “Slide Lock Pin Walk” and all magazines functioned as they should; lock the slide back on an empty magazine. There was also no problem with bullet clearance with the Slide Stop. The ROCK Standard MS – 45ACP was also shot at the range and I experienced no failures, just as with the ROCK Standard MS – 45ACP. Go figure!
I am not a gunsmith nor have I ever played one. I cannot explain why or how swapping out a Slide Lock from one pistol with a pistol (a government model at that) to a ROCK Standard MS – 45ACP pistol with a “Slide Lock Pin Walk” issue fixed the ROCK Standard MS – 45ACP nor can I explain why or how the “Slide Lock Pin Walk” issue did not show up in the GI Standard MS – 45ACP, in which the suspected Slide Lock was installed. Logic would dictate that if the Slide Lock failed in one pistol, I should see the same issue if I installed the Slide Lock into another pistol – but it did not. Both pistols functioned according to Hoyle, or as close to Hoyle as can happen.
Troubleshooting Slide Stop issues or any problems with a firearm can be both simple and complex at the same time. With most issue, it is doing some homework to understand how the suspected part is supposed to work in relation to the operation of the firearm, what critical measurements are necessary for it to work, and then determining if the part(s) is working within those measurements. Sometimes, it is simply necessary to hand the firearm over to someone who is certified and competent enough to do the troubleshooting and subsequent repair work for you. In this case, a simple parts exchange solved the problem and the ROCK Standard MS – 45ACP did not have to be returned to the factory or turned over to my favorite certified and competent gunsmith. I like that.
RESOURCES:
Rock Island Armory (Armscor): http://armscor.com/
Rock Island Armory (Armscor) 1911 Standard MS: http://armscor.com/firearms/rock-series/rock-standard-ms-45acp/
![]()
2 Responses to Rock Island Armory (Armscor) 1911 Standard MS – Product Review