

It has been stated that “Practical Accuracy” is the ability of a gun, cartridge, and the shooter to aim and fire at a specific target… and HIT that target reliably, at will, and with confidence.
Can You Draw and Fire 5 Rounds in a 3″ Group in Under 4 Seconds? If so, is this a measure of “Combat Accuracy”?
Target accuracy means being able to hit the center of, or as close to the 10 ring as possible, usually under more relaxed conditions, and mostly from a rest or supported shooting position, or so it has been stated by some.
Hold over, hold-under, and aim points become especially important as ranges increase and the shooter is using open sights or optics.
Awareness:
Something that we all should be aware of is that recoil is a big factor in one’s ability to fire an accurate shot under pressure. The less the recoil (and noise), the more likely a well-executed shot can be accomplished. We should also be aware that the handgun is the least stable of all firearms to shoot proficiently, as compared to shoulder-mounted firearms like a rifle or shotgun. So, we spend a lot of our time attempting to control recoil and “lock time” while attempting to keep the sights aligned on the target throughout the process, since we have little or no control over noise. In short, we try to control the stability of the shooting platform before and after the projectile exits the barrel.
Good Hunting!
Most hunters will tell you that the most critical shot is the first “cold-barrel” shot. It should be no different for those who carry a handgun for defensive purposes. Most hunting rifles are “zeroed ” at a certain range. When sighting in a scoped rifle, the first cold-barreled shot placement is my starting point for adjusting the scope crosshairs to where I want them. Once I adjust the crosshairs, I wait until the barrel is cool to fire the next shot. I will then readjust the scope, as necessary and let the barrel cool again. By the third “cold-barrel” shot, the scope and the rifle is usually on the mark as long as I have done my part in the process. If I zeroed the scope at 25-yards at my indoor range, I need to move to the outdoor range and zero the scope at whatever distance I desire. For my scoped Marlin 336C, zero would normally be at 100 yards. Why I would have to re-zero, you might ask. Simply put, it is a matter of bullet trajectory and knowing the point of impact at various distances for the given rifle/ammunition match-up. The initial zero at 25 yards will simply get me on paper at 100 yards but probably no where close to where I want to be. My abilities, the rifle’s capabilities, and the ammunition ballistic characteristics determine where on the paper at 100 yards the round is going to impact. So why is knowing my zero at a given distance important? If my target is closer or longer than 100 yards, I need to know how much necessary holdover or hold-under to make according to the estimated distance in order to place the shot where I want it on the target.
Zero and Flight Path:
For example, look at the trajectory chart below for the ammunition that I am currently using in my Marlin 336C in .30-30:

Zero and Flight Path Example
You can see my zero is at 100 yards with this particular rifle/ammunition combination. You will also notice that at 50 yards, the round is only .3″ above zero. In other words, I can hold the same sight picture at 50 yards as I do at 100 yards. I can also hold the same sight picture at 150 yards as I did at 100 yards even though the round may hit at 2.7″ low of zero. Why, you might ask.
For deer-sized game, the vital zone may measure 10 inches (+/- 5 inches) or more. For varmints, the vital zone may be 2 to 4 inches (+/- 2 inches). The distance at which the bullet would fall below 3″ is around 156 yards (or so) for my rifle/ammunition combination and is commonly termed as the MBPR (Maximum Point Blank Range). For a man-size target, some will say that the critical area is 8″ (+/- 4″) around COM (Center-of Mass). If you can place a shot within +/- 3″ center of mass, the bullet should hit something critical.
 On the same token, and if I wanted the bullet to hit at zero at 150 yards, I could simply place the scope’s crosshairs about 2.7″ high on the target or adjust the crosshairs for the new “zero”. In addition, I could hold over the crosshairs about 8.3″ at 200 yards to have the bullet hit at zero (my intended point of impact). Luckily, my scope has mil-dot gradients that I can use for holdover, hold-under at distances beyond my initial zero at 100 yards and mil-dots for windage adjustments so I do not have to do many calculations in my head. Note also, that if I decided to use the Hornady 160-grain LEVERevolution round, I would set my zero at a greater distance because of the performance of the LEVERevolution cartridge with the zero probably being at 200 yards. Still, knowing what that projectile is doing before and after zero is crucial. (Cabela’s even sells a scope that is designed for use with LEVERevolution ammunition.)
How does all this talk about holdover and hold-under apply to self–defense?
With deer-size game, I want a quick kill with no suffering by the animal in my sights. With a human who is trying to take my life, or the life of another, I want to stop the threat – immediately.
Most of us practice at the “golden rule” 7-yard combat distance. I have seen shooters virtually break out into a sweat when having to shoot at a target 25 yards distant – and that includes those who carry a handgun daily to “serve and protect” the public.
Why the concern with shooting targets at 25 yards? The “Minute of Angle” (MOA) might provide the answer.
Minute of Angle (MOA) is the measurement (in fractions of degrees) of a ballistic round’s deviation from its initial heading due to gravity and/or the effect of air resistance on velocity. Informally known as a “Bullet’s Trajectory” or “the rainbow effect”. Long range weapons must account for this effect because a fired round falls at a quadratic rate. Weapons such as large caliber rifles use scopes with adjustments for elevation and windage.
The exact measure of MOA is 1.0471996″ at 100 yards of distance. MOA is a linear measure so 1″ of MOA at 100 yards would equate to .5235998″ at 50 yards, 2.0943992″ at 200 yards, 3.1415988″ at 300 yards and so on. Most high-end rifle scopes used by military snipers, law enforcement snipers, and hunters are equipped with MOA adjustment knobs which provide the shooter with MOA adjustment. Depending on the scope, the adjustments are measured in “clicks” of the knob which equate to a manufacturer set adjustment. For example, one click may be 1/2 MOA for every click while another scope may have 1/4 MOA adjustments, which is considered to be a finer MOA adjustment.
Minute of Angle is a linear effect, not quadratic. That is: twice the distance will result in twice the deviation. The value of 1 MOA @ 100 yds is 1.04719758 inches. In linear progression, 1 MOA is equal to 0.52359879 inches @ 50 yds and to 2.09439516 inches @ 200 yds that, incidentally equates to 0.261799395″ @ 25 yards. It is the measure of the opposite side of a right triangle with a 1 MOA (1/60th of 1 deg) “A” angle. (Source: Minute of Angle).
To put it simply, a person shooting a firearm at a target 12.5 yards away, and if the bullet hits 0.1308996975 off center, this would result in a 1″ hit at 100 yards (all things considered). What if the fired round hits 4″ off center (it really does not matter if it is elevation or windage)? At 25 yards, that is 8″ off center and 16″ off center at 50 yards and that is not considering trajectory and the effects of natural occurrences like high wind, rain, etc. I think that you can see where I am heading with this – or not.

Sight Picture
A short-barreled and light handgun is more susceptible to errors by the user when handling the handgun. Even a slight variation during the lock-time can throw the round off considerably.
Practicing at longer ranges, such as 25 yards can help your close-up-and-personal distance shooting. At these ranges, there is virtually no holdover or hold-under to consider; simply aim at COM. It now comes down to the point to where your handgun is pointed.
We have seen the “perfect” site picture illustrated many times. However, the point at which this perfect sight picture is aimed (the POA) may not agree with the point-of impact (POI) of the round being fired.
Correcting the Sight Picture:
If the round hits high on the target (assuming you did everything correctly), and if you have fixed sights, you have to lower the front sight (hold-under) to bring the POA down while maintaining the correct sight picture. It is a given that the POA and the POI will not agree. If your gun is fortunate enough to be equipped with an adjustable rear sight, you can simply adjust your rear sight down in order to bring the front of the barrel down. With the adjustment made and holding the identical sight picture as you had before, the next round hits lower on the target. You then adjust the rear sight, if necessary, until the POA and the POI agree with each other.
If the bullet hits the target 1″ right, you have three choices; physically move the point of aim (POA) to the left, drift the front sight to the right to bring the muzzle left or drift/adjust the rear sight left to accomplish the same thing. If you have both fixed front and rear sights, it is obvious that you will need to compensate for the lack of adjustments by physically moving the sights (Kentucky windage) to a new POA until the POI is where you want it. I once had a single-action .22 revolver that shot (bench rested) >2″ left and 4″ low. Rather than spending an inordinate amount of time trying to get this inexpensive gun to shoot correctly, I quickly sold it. I also had a Llama .45 acp that shot so far left it was ridiculous. It turned out to be an incorrectly drilled barrel from the factory. Some things you just cannot control.
Many gun manufactures have sights that will give you POI @ POA with a specific round. For example, for years the standard for the .38 special was the 158-grain bullet. Most .38 special/.357 magnum fixed sight revolvers seem to be manufactured for a center POI @ a POA at 25-yards. The standard for the .45 acp was a 230-grain bullet and gun manufacturers made their sights for center at 25 yards. It seems that my 9mm Glock pistol sights are spot on for 124-grain ammunition.
Most adjustable sights have adjustments for windage and elevation. In addition, adjustable sights allow compensation for varying cartridge bullet weights or propellant loadings, which alter the round’s velocity and external ballistics and thus its trajectory and point of impact. Some adjustable sights, like those found on my Bersa 380, allow for the adjustment of windage but not for elevation; I must use holdover or hold-under as applicable to the ballistic characteristics of the ammunition.
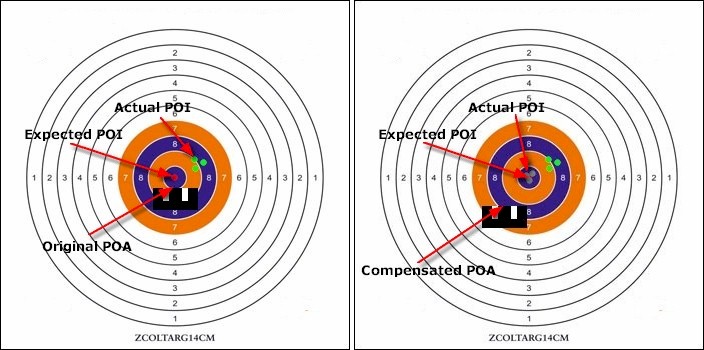
Original and Compensated Sight Picture - Fixed Sights
All of the above assumes that the gun is held in the “vertical” position. Holding a gun at an angle changes the dynamics.
In the left image of the above figure, you can see that the sights are set for a (near) perfect sight picture with a “6 o’clock hold”. After firing three rounds, we see that they hit the target up and right. To compensate for this, we must move the sights to a position that is equal distance to the left and down. The affect of this move of the sight picture is shown in the right image. In short, in order to the rounds to hit center, the shooter had to hold-under and use left “Kentucky” windage. With adjustable sights, the shooter could compensate by simply adjusting the rear sight to maintain the original POA and put the rounds centered in the bulls-eye.
Ballistics and Trajectory:
Most ammunition manufactures provide access to the ballistics for their specific ammunition. Remington; for example, posted the following trajectories for the Remington Golden Saber round in 9mm, .45 acp, .40S&W, and .380 acp at their Remington Ballistics website. You simply enter the caliber (rifle or handgun) and ballistic data displays like magic.
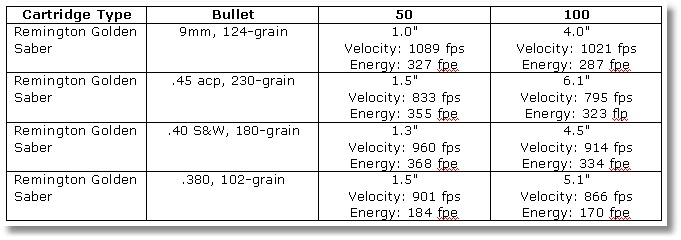
Remington Ballistics Example
You can readily see in the table above, that the Remington Golden Saber 9mm, 124-grain ammunition will hit the target about 1″ high at 50 yards and 4″ high at 100 yards. A handgun with a 4″ barrel was used for testing. So, why is this information important? Well, you may be tasked to perform a shot at a distance greater than 25 yards. What is important to notice that you could use the same sight picture at 50 yards as you did at 25 yards (COM) and the probability to hit something vital is high. At 100 yards, you may have to compensate for the rise at that distance for the projectile to hit what you are wanting to hit.
Notice also that there is not much difference in trajectory at 50 yards and, surprisingly, not that much difference at 100 yards for all of the rounds. The greatest difference is in the energy and velocity at the given distances. However, the rise between 50 yards and 100 yards is significant.
Consider this incident at Fairchild Air Force Base that occurred in 1994:
A significant event at Fairchild occurred on June 20, 1994 when Dean Mellberg, an ex-Air Force member entered the base hospital and shot and killed five people and wounded many others. Mellberg had been discharged after failing psychological evaluations by base psychologists Maj. Thomas Brigham and Captain Alan London. At the time of the shooting, Fairchild’s hospital was an ungated facility. The gunman, armed with a Chinese-made MAK-90, an AK-47 clone entered the office of Brigham and London and killed both men. Mellberg continued to move through the hospital, injuring and killing several people, including 8-year-old Christin McCarron. The gunman then walked out of the building into the parking lot, where after killing Anita Lindner, was confronted by Security Policeman, Senior Airman Andy Brown. From approximately 70 yards away, Brown ordered Mellberg to drop his weapon. After Mellberg refused, from a kneeling position Brown fired four shots from his 9mm pistol, two rounds hitting the perpetrator in the head and shoulder, killing him. After an investigation it was concluded that Airman Brown was justified in his actions, saving countless lives, and was awarded the Airman’s Medal by President Clinton.
The shots were taken at 70 yards, from a kneeling position; with a pistol, (I am assuming the Beretta 92F, the M9). Four shots were fired and two hit the mark. Where did the other two shots go? Did they endanger others? If the shooter was closer, could all four rounds have hit the target? In addition, and since the rounds were fired from a “Military Service Pistol” the ammunition used was probably 9×19mm Parabellum 124-grain FMJ M882 Ball (bullet weight and manufacturer is unknown and all is an assumption on my part). The Maximum range of the M9 is 1800 meters (1968.503 yd) with an effective point of 50 meters (54.6806 yd). Beyond 50 meters, the effectiveness is up to speculation but, in this case, it was effective enough to stop the threat.
As the distance increases, the projectile will rise above the line-of-sight (LOS) to a point where it begins to fall. At some point, the projectile again crosses the line-of sight and continues downward. The result is an arc often referred to as the trajectory of the projectile. Trajectories can be relatively flat or pronounced arcs. Knowing the trajectory of the round that you are firing out of your specific handgun (or rifle and shotgun [slugs]) is crucial, as it is our responsibility to know what that round is doing from the time of ignition and is part of knowing the weapon that we are carrying for self-defense or for hunting purposes.
We spend hours of research deciding what handgun we will carry for the purpose of self-defense and we may even have the opportunity to shoot one before we decide to purchase it. We choose our ammunition based on ballistic tests in gelatin, real-world autopsy reports, manufacturer’s data, and opinions from writer’s for gun magazines and on the web. We want the hardest hitting, flattest shooting, and the most expansion that can be expected from the ammunition that we carry. Nevertheless, in most cases, we neglect to educate ourselves on the dynamics of the ammunition that we load. Those who use the handgun for hunting are more cognizant of the dynamics of the ammunition that they shoot because the game that they are hunting will be at different distances and the handgun/rifle/shotgun hunter must compensate for these varying distances to put meat on the table. Why then, would attempting to take down a human being who is trying to kill us, or others, be of a lesser concern?
Where to Start:
One of the things that I advocate when shooting any firearm for the first time is to fire from a supported position such as a bench. By doing so, you enhance the stability factor of the shooting platform. By using a supported platform, the shooter can concentrate on where the round is hitting using the “starting” sight picture we have come to know. For the handgun, I normally shoot the first round at 7-yards and see where it hit on the target. If I have exercised the basics of marksmanship properly, the first “cold shot” is positive indicator as to what adjustments I may need to perform in order to have the round hit at the point to which I am aiming. In other words, I want the bullet’s POI to be the same as my POA. I let the gun cool down and make the necessary adjustments. Then, I will repeat as often as necessary. Once I perform the initial sighting-in, I can move to an unsupported firing position; whereupon, any variations in POI is reliant more on my capabilities rather than the firearm’s accuracy potential.
Distance:
If you are not comfortable with shooting beyond 7-yards, then do not start elsewhere. Advance to greater distances once you are happy with your performance at “Combat Distances”. Move the target to 15 yards when you are ready. Repeat as often as you feel necessary. As you gain confidence, move to 25 yards. Pretty soon, you will be going to the range, posting a target at 25 yards, and knocking the heck out of it.
I call the 7-yard target my “Milk and Cookies” distance. If I have done well at 25 yards, then it is time for “Milk and Cookies” as a reward and I’ll move the target to the 7 yard line.
Double Action/Single Action:
Many pistols have double action/single action triggers (for example: the Beretta 92FS, all Bersa pistols, and the SIG P239). The transition between double action and single-action has been the bane of many shooters and most shooters will agree that the single-action shots are easier to make because of the shorter and lighter trigger pull. More often than not, the shooter will pull that first shot. As I mentioned earlier, the first “cold barrel” shot may be the most critical. If you fire a pistol that is DA/SA, I recommend that you practice as much as possible in DA mode until you are confident that you can place that shot just as accurately as you can in SA mode.
For most DA/SA pistols, simply use the de-cocking lever to set up for multiple DA shots.
Most revolvers are set up for DA/SA operation. There are exceptions, of course. When I was an LEO all of our revolver qualifications were double-action only and all of our competitions were double-action only. In the “real world”, due to the lighter trigger pull and reduced “lock time”, firing a DA/SA revolver in SA mode for defensive purpose increases the possibility of a “Negligent Discharge”.
Double-action types of revolvers are fired by just pulling the trigger, which cocks the hammer and sets up the gun for firing. Many target shooters prefer the single-action pistol because of the finer trigger pulls (reduced “lock time”). However, leave the SA modes for target shooters. Some folks will get frustrated with their performance firing double-action and switch to single-action. The result is that they never become highly competent with the double-action in response to a surprise attack. That will translate to substandard performance in an actual incident. This reason alone, I believe, is justification enough for rendering a revolver DAO for defensive purposes. or for practicing only in double-action mode.
Two Schools of Thought for Long Range Handgun Shooting:
When adjusting the handgun (or any weapon, for that matter) for long range shooting, two schools of thought exists: (1) Raise the front sight while leaving the rear sight where it was, and (2) raise the muzzle of the weapon while maintaining the correct sight picture. I am an advocate of the latter method for the simple matter that it reduces guesswork and is a more accurate approach.
By changing the angle of the muzzle without maintaining a correct sight picture, the dynamics of the gun in the hand change because of the steeper angle. The grip angle changes, the direction of the trigger pull changes, the pressure and distribution of recoil in the hand changes. If we have to revert to a more level position, we have to rotate the muzzle back down and refresh our sight picture. With the second method, we simply move the platform to the new shooting position. The sight picture, grip, and dynamics of the gun in the hand are not changed. The handgun is simply shifted to the new point of aim while keeping the sight picture intact.
More Information on Trajectories:
Chuck Hawks published a listing of general handgun ballistics as a guideline and included the following:
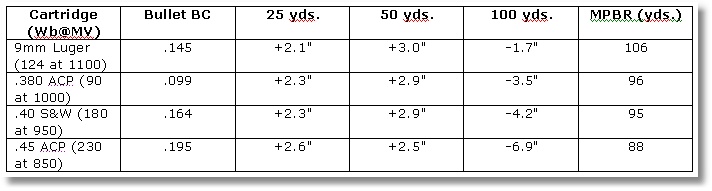
Handgun Trajectory Table by Chuck Hawks (Partial)
Note; however, the Mr. Hawks has established different criteria for his computations and I invite you to visit Handgun Trajectory Table by Chuck Hawks for further information.
Some say that the table is flawed in that it does not include a specific zero at a specific distance. You can judge for yourself whether that table is valid after reading the basis of the table.
Summary:
- We must understand not only the characteristics of the weapon that we hold in our hands, but also the characteristics of the ammunition that is being fired from that gun.
- Initially fire your defensive handgun from a supported position to determine the impact of the bullets in relation to your sight alignment. Does the POA agree with the POI? Adjust accordingly.
- Do not rely on manufacturers’ data, or the words of others, alone for your defensive or hunting ammunition. Find out for yourself.
- Understand the ballistics of the ammunition that you are using for self-defense in the firearm that you carry for self-defense (or hunting).
- Establish a standard. If you decide to carry the 124-grain bullet as your defensive choice of ammunition and you know where to place the sights of the firearm for zero at any given distance – that is your standard. If you switch ammunition, what deviation from your standard do you observe if any?
- Practice at long distances will improve your hits at short distances.
- Aim small, miss small (Benjamin Martin – The Patriot).
- Visualize the trajectory of the round that you are firing.
- Practice correcting one plane at a time; vertical (elevation) or horizontal (windage). If your hits are stacked pretty much in a vertical plane, but wide in the horizontal plane, practice to bring your horizontal hits in closer together. For example, and when sighting in a scope, and if the bullet is hitting high and right, I will adjust the scope vertically to center with the center of the bulls-eye and then move to the horizontal plane. For example, if your shots are hitting high and right, and if you have adjustable sights, adjust for elevation until satisfied with the strike of the bullet on the target. Then, adjust windage, as necessary. With fixed sights, you may be able to drift the rear sight for windage and change out the front sight for elevation.
- It is the pistol’s accuracy or the shooter’s ability, rather than the trajectory that usually limits effective range.
This write-up was not intended to be a present-all, know-all presentation. I hope that it serves as a primer to help you unlock your potential as a shootist from any distance.
See also:
![]()
One Response to Holdover, Hold-under, Hold off, Hold On!!